Knitty: little purls of wisdom
Miss Babs Hand-Dyed yarn & Fibers
Title

For almost as long as I’ve been a knitter, I’ve been fascinated by the history of knitting. I’ve especially enjoyed the mind-twisting process of working with the often obtuse and obfuscatory language of antique patterns. There’s a thrill, I find, in watching a project emerge row by row and knowing that other knitters, long gone, followed the same path.

The process of decoding, testing and correcting isn’t for everyone, though; and so in this column I hope to share the excitement of the journey by removing as many of the roadblocks as possible. You don’t need to be a historian to come along–just a knitter with a curious mind.


title
beauty shot

translated by Franklin Habit from My Knitting Book (Second Series)
by Frances Lambert

Tangy


spacer model: Liz Moran spacer photos: Franklin Habit

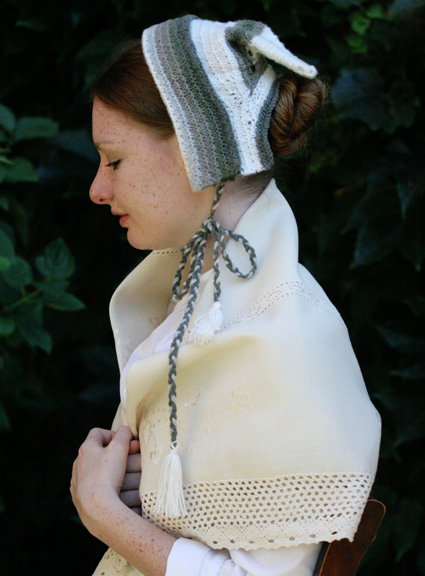
FINISHED MEASUREMENTS

Length from front edge of roll to tip of peak: 8 inches
Height from crown to bottom edge of roll: 9 inches

MATERIALS
Yarn

Historic note:
The original pattern calls for a selection of five shades of any light color, plus white.

spacer [MC] Sunday Knits Nirvana 3 ply [92% merino wool, 8% cashmere; 246yd/225m per 50g skein]; color: Cream; 1 skein
spacer [CC1] Sunday Knits Nirvana 3 ply; color: Twig; 1 skein
spacer [CC2] Sunday Knits Eden [100% merino wool; 246yd/225m per 50g skein]; color: Sage; 1 skein
spacer [CC3] Sunday Knits Nirvana 3 ply; color: Wren; 1 skein
spacer [CC4] Sunday Knits Brigadoon 3 ply [100% merino wool tweed; 246yd/225m per 50g skein]; color: Stone; 1 skein
spacer [CC5] Sunday Knits Brigadoon 3 ply; color: Birch; 1 skein

Recommended needle size
[always use a needle size that gives you the gauge listed below -- every knitter's gauge is unique]
spacer 1 24-inch US #5/3.75 mm circular needle

Notions
spacer Row counter (optional)
spacer T-pin or safety pin
spacer Yarn needle

 
GAUGE
20 sts/28 rows = 4" in texture pattern
spacer

PATTERN NOTES
[Knitty's list of standard abbreviations and techniques can be found here.]

The cap is worked in one piece from the outer “roll” or brim to the “frill” at the back.

p3tog: Purl next 3 sts together. 2 sts decreased.

p4tog: Purl next 4 sts together. 3 sts decreased.

Texture Pattern (Worked over an even number of sts):
Row 1 [RS]: K1, [k2tog] to last st, k1.
Row 2 [WS]: [K1, m1] to last 2 sts, k2.
Row 3 [RS]: K all sts.
Row 4 [WS]: K1, p to end. Note that changes of color are always made at the beginning of this row!
Repeat Rows 1-4 for Texture Pattern.

It is a good idea to swatch the texture pattern before beginning, to ensure that you are familiar with it.

Directions for making a tassel can be found here.

spacer

DIRECTIONS

FRONT ROLL
Using CC1, CO 102 sts. K 1 row (a WS row).

Work Rows 1-3 of Texture Pattern.

Continue in Texture Pattern as follows, beginning with Row 4. When changing colors, always leave a tail approx. 6 inches long of both the color you have just finished working with, and the new color.

Work 4 rows using CC2.
Work 4 rows using CC3.
Work 4 rows using CC4.
Work 4 rows using CC5.
Work 4 rows using MC.
Work 4 rows using CC5.
Work 4 rows using CC4.
Work 4 rows using CC3.
Work 4 rows using CC2.
Work 4 rows using CC1.

Using MC, p 1 row. This row marks the point where the front roll will fold back.
The side of the work which has been the RS will now become the WS.

CROWN
Continuing with MC, work Row 4 of Texture Pattern, then Rows 1-3.

Crown is shaped using short rows, as follows:
Row 1 [WS]: P82. Turn work.
Row 2 [RS]: K1, [k2tog] 30 times, k1. Turn work.
Row 3 [WS]: [K1, m1] 29 times, k1. Turn work.
Row 4 [RS]: K52, m1, k1. Turn work.
Row 5 [WS]: K1, p48. Turn work.
Row 6 [RS]: K1, [k2tog] 22 times, k1. Turn work.
Row 7 [WS]: [K1, m1] 22 times, k2. Turn work.
Row 8 [RS]: K46. Turn work.
Row 9 [WS]: K1, p to end.
Row 10 [RS]: K1, [k2tog] to last st, k1.
Row 11 [RS]: [K1, m1] to last 2 sts, k2.
Row 12 [RS]: K82. Turn work.
Row 13 [WS]: Using CC3, k1, p61. Turn work.
Row 14 [RS]: K1, [k2tog] 30 times. Turn work.
Row 15 [WS]: K1, [k1, m1] 29 times. Turn work.
Row 16 [RS]: K58. Turn work.
Row 17 [WS]: Using CC3, k1, p56. Turn work.
Row 18 [RS]:  K1, [k2tog] 27 times, k1. Turn work.
Row 19 [WS]: [K1, m1] 26 times, k2. Turn work.
Row 20 [RS]: K53. Turn work.
Row 21 [WS]: Using CC3, k1, p51. Turn work.
Row 22 [RS]: K1, [k2tog] 25 times. Turn work.
Row 23 [WS]: K1, [k1, m1] 24 times. Turn work.
Row 24 [RS]: K48. Turn work.
Row 25 [WS]: Using MC, k1, p46. Turn work.

Note: The following pair of short rows is worked at a different interval than the rows that preceded it.

Row 26 [RS]: K1, [k2tog] 21 times. Turn work.
Row 27 [WS]: K1, [k1, m1] 19 times. Turn work.
Row 28 [RS]: K39. Turn work.
Row 29 [WS]: K1, p37. Turn work.
Row 30 [RS]: K1, [k2tog] 18 times. Turn work.
Row 31 [WS]: [K1, m1] 17 times, k1. Turn work.
Row 32 [RS]: K34. Turn work.
Row 33 [WS]: K1, p32. Turn work.
Row 34 [RS]: K1, [k2tog] 15 times. Turn work.
Row 35 [WS]: K1, [k1, m1] 14 times, k1. Turn work.
Row 36 [RS]: K29. Turn work.
Row 37 [WS]: K1, p27. Turn work.
Row 38 [RS]: K1, [k2tog] 13 times. Turn work.
Row 39 [WS]: [K1, m1] 12 times, k1. Turn work.
Row 40 [RS]: K24. Turn work.
Row 41 [WS]: K1, p22. Turn work.
Row 42 [RS]: K1, [k2tog] 10 times. Turn work.
Row 43 [WS]: K1, [k1, m1] 9 times, k1. Turn work.
Row 44 [RS]: K19. Turn work.
Row 45 [WS]: K1, p17. Turn work.
Row 46 [RS]: K1, [k2tog] 8 times. Turn work.
Row 47 [WS]: K1, [k1, m1] 7 times. Turn work.
Row 48 [RS]: K14. Turn work.
Row 49 [WS]: K1, p12. Turn work.
Row 50 [RS]: K1, [k2tog] 5 times, k1. Turn work.
Row 51 [WS]: K1, [k1, m1] 4 times, k1. Turn work.
Row 52 [RS]: K9. Turn work.
Row 53 [WS]: K1, p7. Turn work. 91 sts on needle: 8 sts at center, 42 sts at left side of center, 41 sts at right side of center, with RS facing.

Shape back of crown as follows. Note that decreases used will create holes in fabric; this effect is intentional.
Row 1 [RS]: K1, [k2tog] 3 times, k1. Turn work.
Row 2 [WS]: [K1, m1] 3 times, k2. Turn work.
Row 3 [RS]: K8. Turn work.
Row 4 [WS]: K1, p6, p3tog. Turn work.

Row 5 [RS]: K1, [k2tog] 3 times, k3tog. Turn work.
Rows 6-8: Work as for Rows 2-4.
Repeat Rows 5-8 four times more, then work Rows 5-7 once more. 67 sts: 8 sts at center, 30 sts at left side of center, 29 sts at right side of center (when RS is facing).

FRILL
Using CC3, continue as follows:
Row 1 [WS]: K1, p6, p4tog. Turn work.

Row 2 [RS]: K1, [k2tog] 3 times, k4tog, k1, [k2tog] 2 times. Turn work.

Row 3 [WS]: K3, [k1, m1] 3 times, k2. Turn work.

Row 4 [RS]: K11. Turn work.

Row 5 [WS]: K1, p9, p4tog, p3. Turn work.

Row 6 [RS]: K1, [k2tog] 6 times, k4tog, k1, [k2tog] twice. Turn work.

Row 7 [WS]: K3, [k1, m1] 6 times, k2. Turn work.

Row 8 [RS]: K17. Turn work.

Row 9 [WS]: Using MC, k1, p15, p4tog, p3. Turn work. 48 sts: 20 sts at center, 14 sts at each side.

Row 10 [RS]: [K2tog, k1] 6 times, [k2tog] twice, k2. Turn work.

Row 11 [WS]: [K1, m1] 14 times, k2. Turn work.

Row 12 [RS]: K30. Turn work.

Row 13 [WS]: K1, p32. Turn work.

Row 14 [RS]: *[K2tog] 3 times, k1; repeat from * 4 times more. Turn work.

Row 15 [WS]: [K1, m1] 19 times, k4. Turn work.

Row 16 [RS]: K42. 58 sts: 42 sts at center, 8 sts at each side.

Row 17 [WS]: Using CC1, k1, p48, k1. Short row shaping is complete.

Continuing with CC1, work Rows 1-3 of Texture Pattern.
BO all sts.

TIES (Make 2)
Cut eight 24-inch lengths of CC5 and sixteen 36-inch lengths of CC1.
Divide lengths into six bundles of four strands each: two bundles of CC5 and four bundles of CC1.

Take one CC1 bundle and two CC5 bundles and tie them together with an overhand knot approx. 1 inch from the end. Fasten the knot end to a blocking mat or the arm of an upholstered chair with a T-pin or safety pin, and braid the three bundles together. When approx. 3 inches of yarn remain, fasten with another firm overhand knot.

Trim ends to approx. 0.25 inch.

Using MC, create two three-inch long tassels. Attach one tassel to each tie.

Historic note: As an alternative to the braided cords, Miss Lambert recommends using lengths of matching ribbon without tassels. She says these are “prettier,” and they also happen to be less of a pain in the neck to make.


FINISHING
Weave in ends. Soak and gently block.

When dry, fold back front roll along the MC stripe and use a  length of CC1 to sew CO edge to foremost edge of crown.

Using MC, firmly sew non-tasseled end of each tie to right and left inside of cap, where front roll and back shaping come together at a point.

This cap is worn very high, exposing most of the top of the head. It should be tipped backwards slightly so that the sides of the front roll cover the ears. Tie the cords just under the right or left ear, whichever is preferred. When rough travel is expected, for example by coach or on Mr. Cunard’s new ocean-going paddle wheeler, a few judiciously-placed hair pins may be employed.

spacer
ABOUT THE DESIGNER
Franklin Habit is the Chicago-based proprietor of the popular knitting blog The Panopticon and author of It Itches: A Stash of Knitting Cartoonslink (Interweave Press), which has recently spawned both the Work in Progress Notebook and a 2011 calendar.

He doesn't loll about living history museums all days, since men in living history museums don't get to knit.

spacer