|
|
 |
|
Welcome to Blocking, Part 1! |
|
Okay – you’ve just bound off the last stitch of your project. You’ve spent hours working on it and have likely dragged it along on at least one trip, your cat has had several naps on it and it’s had a little party with the dust bunnies under the sofa. Our first task is to give it a little bath to remove the dust and grime. First check the label that came with your yarn – it should give important information about what kind of washing treatment your finished project will tolerate. Care instructions are usually given in a pictogram code: Some yarns do tolerate being washed in a washing machine on the gentle / wool cycle. If you’re in doubt, use your gauge swatch (you did make a gauge swatch, right?) to test the way your yarn reacts to the washing machine. But you are taking a risk – the agitation in washing machines always carries with it a chance of shrinking animal fibers. The safest, most gentle way to wash your hand knits is, not surprisingly, by hand. Fill a large sink or container with water – you want enough water that the knitting floats around freely and you don’t have to move it around too much: Remember – fulling (the proper term for “felting” when you’re working with knitting rather than raw fiber) happens to wool and some other animal fibers when you subject it to a combination of friction, alkaline soap and heat. To avoid fulling, water should be around baby bathwater temperature: 90 F / 30 C or so. If you need to use warmer water to remove stains or body oils on knits worn against the skin, be sure to keep agitation to an absolute minimum. You don’t need a thermometer, though - just test the water with the inside of your wrist: If the water feels comfortable – neither uncomfortably hot nor cold – it's probably about right. Add a small amount of a non-alkaline detergent – not soap! – to the water and swish it through to dissolve. Soap is alkaline and opens up the scales on animal fibers making them again more subject to fulling. Mild dish detergent (like Ivory or Dawn) or baby shampoo (without added conditioner which tends to be alkaline) work well and are inexpensive. Expensive commercial laundry detergents that propose to be specially made for delicates might actually be more alkaline that you want to use on your knitting! Know your products and test a small swatch if you’re in doubt. Add the knitting to the water after the sink or container is full. Don’t let water run from the tap onto the fabric – that’s agitation. Push it gently down until it’s completely submerged.
You may want to gently push the knitting down and let it float
back upwards a few times until the knitting
is wet through. Avoid swishing, wringing or
otherwise traumatizing the fabric. Let it soak
for around 15-30 minutes then drain the water.
Avoid picking it up while soaking wet, but
let it drain against the side of the container
until most of the water is gone... Then remove the knitting, supporting all
its weight so that nothing gets stretched
out of shape. Now let’s
figure out a way to get most of the water
out. You definitely don’t want to leave
the knitting lying around wet. If it’s
a small project, a salad spinner works wonders.
The centrifuge on your washing machine – IF you can control
the speed or timing of the spin cycle – will remove even
more water, cutting down on drying time.
In a top-loading machine, set the machine
to spin for a very short cycle – just
enough to remove most of the water. If you
have a front-loading washer that lets you
control the speed, use the lowest speed to
sling the water out of your project – we
don’t
want to stretch anything out of shape. My
front-loading washer takes a year and a day
to finish the spin cycle and I get bored
standing around watching the washing machine
so this is what I do: I place the knitting
flat on a dry towel, then starting at one
end, roll the towel up with the knitting
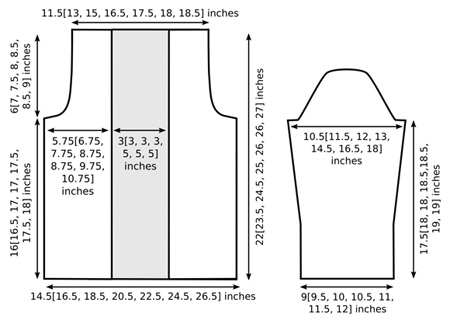
inside like a burrito. This squeezes out a surprising amount of water! Now grab another dry towel and place your project onto it. Using the project’s schematic – which is the bit in the pattern that looks like this:
...smooth the knitting until it matches the right dimensions. Ribbing - if blocked out too much – can lose its natural elasticity. Nudge it in a bit to help it keep the right shape: Leave the knitting until to dry. Ideally this will be in a room with some air circulation and low humidity so the drying process won’t take too long. If you have a drying rack that allows some air circulation under the drying towel, it will help. Steam blocking is a quick method of blocking projects made from yarn which does not tolerate getting wet. It’s also good for inelastic fibers that are weaker when wet – cottons, silks and alpaca, for example. To block with steam, set your iron to the setting appropriate to your fiber and turn on the steam setting. Holding the iron about an inch away from the fabric... ...hit the steam button repeatedly to send blasts of steam down into the fabric. Don’t place the iron directly on your knitting as it can permanently damage the fibers. If you’re in doubt whether or not your project will tolerate steam blocking, test with your gauge swatch. If your iron doesn’t have a good steam setting, you can also steam block through a wet cloth, this time tapping the cloth to let the heat of the iron send the steam down into the fibers. Blocking – quite frankly – works miracles on finished knitting. I’ll let a side by side comparison speak for itself!Tune in next issue for more about blocking… |
| ABOUT THE AUTHOR |
You may follow her at Twitter if you like. |
© 2010 Theresa Vinson Stenersen. Contact Theresa. |