Knitty: little purls of wisdom
Jimmy Beans
Title
beauty shot

Tangy

My family lived in many places while I was growing up, following my stepfather’s mill jobs in the pulp and paper industry. In Tacoma, Washington, he picked up a genuine Cowichan sweater that he wore as his winter coat for most of my childhood. When we moved to the Canadian Maritimes, it was warm enough for him even in January as he left for work before sunrise. This sweater always felt important to me, even though it smelled faintly of chlorinated wood pulp and many guilty pleasure cigars. He gave it up when my parents moved south after they retired, but I’ve missed it like a family dog ever since.

If you choose to work flat with circular needles or needles, you can start any row at either edge of the knitting as you choose. This is particularly handy for changing colors between charts and for always beginning the garter ridge with the RS facing, regardless of the direction of the row previously worked. Pattern is written to be knit flat, but if you are comfortable with steeks, there’s no obstacle to working it in the round.

spacer model: Julia Farwell-Clay
spacer photos: Caro Sheridan


SIZE
S[M, L, 1X, 2X] (shown in size L, worn with 6“ positive ease)

FINISHED MEASUREMENTS
Chest: 39[44.5, 49.75, 55, 60.5] inches, with fronts buttoned
Note: Choose a size with at least 4 inches of positive ease.

Length: 24[26, 28, 29.5, 30] inches

spacer

MATERIALS
Yarn

spacer Cascade Yarns Eco+ (MC and CC1) and Ecological Wool (CC2) [100% natural Peruvian wool; 478yd/437m per 250g skein]
spacer [MC] #7098 Merlot; 2[2, 2, 3, 3] skeins
spacer [CC1] #9459 Yakima Heather; 1 skein
spacer [CC2] #8085 Mocha; 1 skein

Recommended needle size
[always use a needle size that gives you the gauge listed below -- every knitter's gauge is unique]
spacer 1 set US #8/5mm double-point needles
spacer 1 US #8/5mm circular needle, 32 inches or longer
spacer 1 US #9/5.5mm circular needle, 32 inches or longer

Notions
spacer Stitch markers
spacer Stitch holders or spare needles
spacer Yarn needle
spacer 6 buttons, approx. diameter 1.5 inches(buy buttons after sweater is complete to ensure correct size)
spacer Sewing needle and thread

spacer

GAUGE

18 sts / 20 rows = 4 inches in stranded colorwork chart pattern using larger needles, after blocking
Note: The yarn is worked more tightly than the recommended ball band gauge to yield a thick, firm fabric.


PATTERN NOTES
[Knitty's list of standard abbreviations and techniques can be found here.]

Three-needle bind off is usually worked with right sides held together; for this project it is worked with wrong sides held together, so that a decorative ridge is formed on RS of work.

Instructions for the Backward Loop Cast On can be found here.

spacerCharts
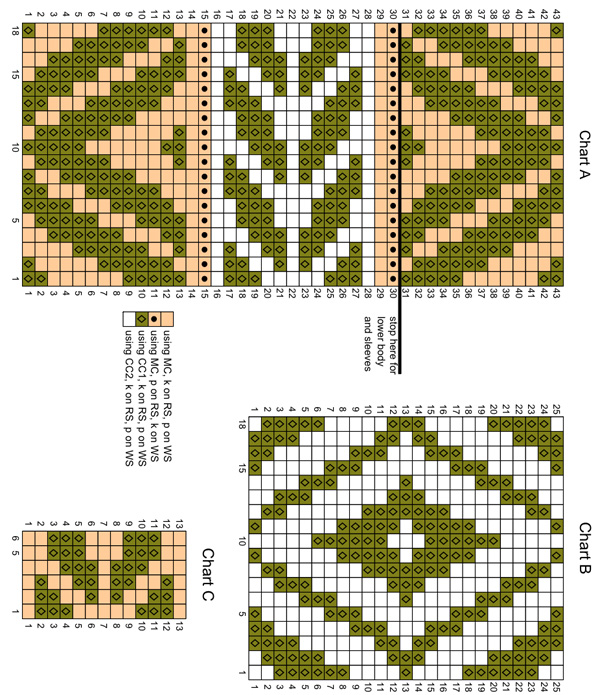
The chart for this pattern is very large and fits on a letter-sized page.
Click here and print the resulting page.


DIRECTIONS
LOWER BODY
Using smaller circular needle and MC, CO 168[192, 216, 240, 264] sts. Do not join; sweater is worked back and forth in rows.

Row 1 [RS]: K3, [p2, k2] to last st, k1.

Row 2 [WS]: P3, [k2, p2] to last st, p1.

These 2 rows set 2x2 Rib for lower band. Continue in 2x2 Rib until band measures 2.5 inches, ending with a WS row.

Switching to larger circular needle, work 0[0, 4, 4, 4] rows in stockinette st.

Important: If you wish to change the length, note that the sweater has been designed so that the colorwork bands on the body and sleeves line up when worn. Notes are included throughout the pattern to indicate where length can be added/reduced. Remember to note the number of rows added or subtracted, so that sleeves and body can both be altered to match!

If you wish to lengthen the body without changing the sleeve length, work more rows before beginning chart patterns.

Next Row [RS]: Beginning and ending as indicated below, work Row 1 of Chart A, placing markers between pattern repeats (edges of chart).
Begin with 7th[13th, 1st, 7th, 13th] st of chart; end with 12th[6th, 18th, 12th, 6th] st of chart.

Note: Leave markers in place throughout, even when working solid-colored sections. After sts have been bound off for underarms, these markers will be used to help align chart patterns for upper fronts and back.

Work Rows 2-30 of Chart A.
Work 9 rows stockinette st, ending with a RS row.
K 1 WS row.
Work Rows 1-25 of Chart B, beginning and ending as indicated for your size. Stitch markers will align with pattern repeats.
Join MC with RS facing. K 2 rows.

Continue in stockinette st until work meaures 16[17, 18, 19, 19] inches, ending with a WS row.

If you wish to shorten the body, or to lengthen or shorten both the body and the sleeves, work more or fewer rows before shaping armholes.

Shape Armholes:
Next Row [RS]: K36[41, 46, 51, 56], BO 12[14, 16, 18, 20] sts, k71[81, 91, 101, 111] (72[82, 92, 102, 112] sts on right needle after bound off sts); place last 48[55, 62, 69, 76] sts on spare needle or st holder for left front, leaving markers in place. Place first 36[41, 46, 51, 56] sts of row on st holder or spare needle for right front, leaving markers in place.

UPPER BACK
Work 2 rows in stockinette st, ending with a RS row.
Work Rows 1-43 of Chart A, aligning pattern repeats with stitch markers.
Removing markers, work in stockinette st using MC until work measures 8[9, 10, 10.5, 11] inches from underarm, ending with a WS row.

Next Row [RS]: K23[27, 30, 33, 36], BO 26[28, 32, 36, 40] sts, k to end. Place two sets of 23[27, 30, 33, 36] sts on st holders.

UPPER LEFT FRONT
Place 48[55, 62, 69, 76] held sts of upper left front on larger circular needle and join MC with RS facing. BO 12[14, 16, 18, 20] sts, k to end. 36[41, 46, 51, 56] sts.

Work 2 rows in stockinette st.

Work Rows 1-43 of Chart A, aligning pattern repeats with stitch markers, then continue in stockinette st using MC.
AT THE SAME TIME, when work measures 3[3.5, 3.75, 3, 3.25] inches from underarm, ending with a WS row, shape neckline as follows:

Neckline Decrease Row [RS]: Work in pattern to last 2 sts, ssk.

Work 1 WS row in pattern.

Repeat these 2 rows 12[13, 15, 17, 19] times more. 23[27, 30, 33, 36] sts.

Continue in stockinette st until work measures  8.25[9.25, 10.25, 10.75, 11.25] inches from underarm, ending with a WS row. (Note: Upper front is 0.25 inch longer than upper back.)
With RS facing, join to held sts of back left shoulder using three-needle bind off (see Pattern Notes).

Note: Three-needle bind off is usually worked with right sides held together; for this project it is worked with wrong sides held together, so that a decorative ridge is formed on the RS of the work.

UPPER RIGHT FRONT
Place held sts of right front on larger circular needle and join MC with WS facing (at armhole edge).
Work 2 rows in stockinette st.

Work Rows 1-43 of Chart A, aligning pattern repeats with stitch markers, then continue in stockinette st using MC.
AT THE SAME TIME, when work measures 3[3.5, 3.75, 3, 3.25] inches from underarm, ending with a WS row, shape neckline as follows:

Neckline Decrease Row [RS]: K2tog, work in pattern to end.
Work 1 WS row in pattern.
Repeat these 2 rows 12[13, 15, 17, 19] times more. 23[27, 30, 33, 36] sts.

Continue as for upper left front.

SLEEVES (Make 2)
Using smaller circular needle and MC, CO 44[46, 52, 54, 56] sts. Do not join.

Row 1 [RS]: K3[2, 3, 2, 3], [p2, k2] to last 1[0, 1, 0, 1] st, k1[0, 1, 0, 1].

Row 2 [WS]: P3[2, 3, 2, 3], [k2, p2] to last 1[0, 1, 0, 1] st, p1[0, 1, 0, 1].

These 2 rows set 2x2 Rib for cuff. Continue in pattern until cuff measures 3 inches, ending with a WS row.

Note: Read ahead! Sleeve shaping instructions are worked at the same time as color pattern instructions.

Switching to larger needles, work 4[6, 8, 8, 8] rows in stockinette st.

If you wish to lengthen or shorten the sleeves but left the body the same length, work more or fewer rows at this point.
If you shortened the body but do not wish to shorten the sleeves, lengthen the sleeves at this point by the same number of rows that you shortened the body.
Note that if you have changed the length of this band of stockinette st and worked more or fewer increase rows (see below), the beginning and ending points for the chart may change as well.

AT THE SAME TIME: Beginning on 7th[5th, 5th, 5th, 5th] row after cuff, shape sleeve as follows:

Increase Row [RS]: K1, m1, work in pattern to last st, m1, k1.

Work 5[3, 3, 3, 3] rows in pattern, working increased sts into chart pattern as set.

Repeat these 6[4, 4, 4, 4] rows 13[16, 18, 19, 21] times more. 72[80, 90, 94, 100] sts.

AT THE SAME TIME: After working stockinette st band above cuff, continue as follows:
Work Rows 1-30 of Chart A, beginning and ending as indicated below, placing markers between pattern repeats of chart.
Begin with 6th[4th, 1st, 18th, 17th] st of chart; end with 13th[15th, 18th, 1st, 2nd] st of chart (based on 44[48, 54, 56, 58] sts).

Work 9 rows stockinette st, ending with a RS row.
K 1 WS row.
Work Rows 1-25 of Chart B, aligning pattern repeats with stitch markers.
Join MC with RS facing. K 2 rows, removing markers.

Continue in stockinette st until work meaures 17[18, 19, 20, 20] inches or desired length to underarm, ending with a WS row.

If you lengthened or shortened the band of stockinette st after Chart B when working the body, lengthen or shorten this band by the same amount.

Note: Edges of remaining length of sleeve will be sewn to bound off underarm edges of body.

Work Rows 1-13 of Chart C, beginning and ending as indicated below.
Begin with 1st[6th, 1st, 5th, 5th] st of chart; end with 6th[1st, 6th, 2nd, 2nd] st of chart.

Work 0[2, 4, 6, 8] rows in stockinette st using MC. Loosely BO all sts.

FRONT BANDS AND SHAWL COLLAR
Note: Instructions below are for a woman's sweater, with buttonholes worked in right band. If making a man's sweater, work buttonholes in left band instead.

Left Front Band:
Using double-point needle in smaller size and MC, and leaving a tail approx. 1 yd long (used for sewing band in place), CO 8 sts.

Work in garter st until band is long enough to reach from lower left front corner to beginning of neckline shaping, when slightly stretched. Make a note of the number of garter st ridges worked, so that buttonholes can be spaced evenly when working right front band.

Leaving sts on needle and with working yarn positioned at right edge of band, use tail to sew band to left front edge of sweater, so thst upper edge (sts on needle) aligned with beginning of neckline shaping. Working yarn should be between band and sweater edge, ready to work a RS row.

Shape Left Front Collar:
Next Row
[RS]: Pick up and k 1 st in edge of sweater, k to end of band. 1 st increased.
K 1 row.
Repeat these 2 rows, picking up 1 st for every 2 rows along edge of sweater, until you reach the shoulder seam, ending with a WS row (yarn is positioned between sweater and band). Break yarn; leave sts on hold on double-point needle (holding needle). Count sts; it will be important for both sides of collar to have the same number of sts.

Right Front Band:
Work as for left front band to beginning of neckline shaping, working 6 buttonholes evenly spaced along length of band as follows:
Buttonhole Row 1 [RS]: K3, BO 2 sts, k2 (3 sts on right needle after  bound off sts).
Buttonhole Row 2 [WS]: K3, CO 2 sts using backward loop method (see Pattern Notes), k3.
Work first buttonhole approx. 1.25 inches from lower edge, and last buttonhole just below beginning of neckline shaping.

End band with a WS row. Leaving sts on needle and with working yarn positioned at right edge of band, use tail to sew band to right front edge of sweater, so that upper edge is aligned with beginning of neckline shaping. Working yarn should be at outer edge of band, ready to work a RS row.

Shape Right Front Collar:
Next Row
[RS]: K to end of band, pick up and k 1 st in edge of sweater. 1 st increased.

K 1 row.

Repeat these 2 rows, picking up 1 st for every 2 rows along edge of sweater, until you reach the shoulder seam, ending with a WS row. Count sts to be sure that right and left sides of collar have the same number of sts. Break yarn; leave sts on holding needle.

Back Collar:
Using circular needle in smaller size and MC, with RS facing, pick up and k 26[28, 32, 36, 40] sts (1 st in each bound off st) across back neck edge.

Shape collar stand:
Row 1
[WS]: K to last st on circular needle, k this st together with first st from adjacent holding needle.

Row 2 [RS]: Work as for Row 1.

Repeat these 2 rows until back collar measures 2[2.5, 3, 3, 3.5] inches, ending with a RS row.

Shape back collar:
Row 3
[WS]: K to end of circular needle, k1 from holding needle, W&T. 1 st increased on circular needle.

Row 4 [RS]: Work as for Row 3.

Repeat these 2 rows until 1 st remains on each holding needle.

Next Two Rows: K to end of circular needle, k remaining st from holding needle.
Loosely BO all sts.

FINISHING
Weave in ends and block to measurements shown.
Sew sleeves into armholes. Sew sleeve seams and side seams.
Sew buttons to left front band opposite buttonholes.

spacer
ABOUT THE DESIGNER

Julia Farwell-Clay is a writer and blogs here.

A longtime resident of New England, she tells far too many stories about her Canadian girlhood for her American friends to believe any more.

spacer