
|
|
 |
|
Tweet
|
|
|
|
|
 |
|
 |
by Amy O'Neill Houck This hat is worked from the crown down to the brim, so the crown will be increased to the full hat circumference. For these increases to spiral, we're simply stacking one round of increases on top of the previous round in the same way that you would stack decreases on a bottom-up knitted hat. You will work the increase (2 sc in the same stitch) in the 2nd stitch of the increase from the round below. Once you're comfortable spotting the increases, you may not need stitch markers, but if it's helpful, you can put a split ring marker (or coil-less safety pin) in the 2nd stitch of each increase, and just move it up each round to keep track. Another advantage of crocheting the crown of this hat is sizing. Starting a circle from the center has the same advantage as building a garment from the neck down. You can try it on and size it as you go. To size the Hybrid Hat, you'll need to measure your head. You'll want a full circumference an inch smaller than what you've measured so the hat will stay on. If you just want to make a basic hat, you can go for a finished circumference of 22 inches which is an average head size. This means you'll increase until the crown measures 21 inches. Measuring the circumference of a piece of fabric can be tricky. It's much easier to measure the diameter. So, we've used a calculator to convert diameter to circumference. You can do the same. Just be sure to measure from one increase point to another. Then do the math to see if your hat is the right size. |
SIZE FINISHED MEASUREMENTS: |
MATERIALS Notions |
| GAUGE |
Since you're crocheting to a particular circumference instead of a number of stitches, you can work this pattern in any gauge. As long as you finish the crown shaping with a full round, then you should end with a multiple of 6 sts and the Filet Round and 2 x 1 ribbing will work out. If you use a different weight of yarn, pick a hook that creates a nice, soft fabric. Choose a needle one size smaller than your hook for the ribbing. |
|
PATTERN NOTES |
Ch: chain For new or newish crocheters, here is some online assistance:
|
|
DIRECTIONS |
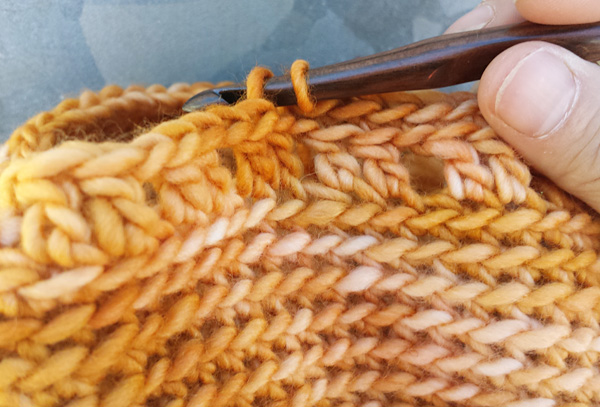
| Crown Using crochet hook chain 4 and join in a ring. Round 1: Ch 1, 6 sc in chain loop, mark start of round with removable marker. Round 2: Inc 6 times. (12 sts) Round 3: (1 sc-blo, inc) 6 times. 18 sts. Round 4: (2 sc-blo, inc) 6 times. 24 sts. Round 5: (3 sc-blo, inc) 6 times. 30 sts. Round 6: (4 sc-blo, inc) 6 times. 36 sts. Round 7: (5 sc-blo, inc) 6 times. 42 sts. Continue increasing evenly until the desired head circumference is reached. You can use this site to help you calculate the correct diameter for your desired finished head size. Lay the crown of the hat flat and measure from increase point to increase point. Remember you want a circumference 1 inch smaller than your head measurement. Sides Ribbing With the needle, pick up and knit 1 st through the back loop of each crochet stitch Count your stitches. You need a multiple of 3 sts for the ribbing. Ribbing round: K1, p1, [k2, p1] to last st, k1. Bind off using Jeni's Surprisingly Stretchy Bind-Off. |
| FINISHING |
Weave in ends and block. |
| ABOUT THE DESIGNERS |
|
Miriam can be found on on the web at miriamfelton.com, and on Twitter @mimknits. Amy O'Neill Houck blogs at thehookandi.com and tweets @plainsight. Amy and Miriam both have patterns on ravelry.com. |
| Pattern & images © 2013 Amy O'Neill Houck + Miriam Felton. Contact Miriam |