Knitty: little purls of wisdom
Title
beauty shot

Tangy

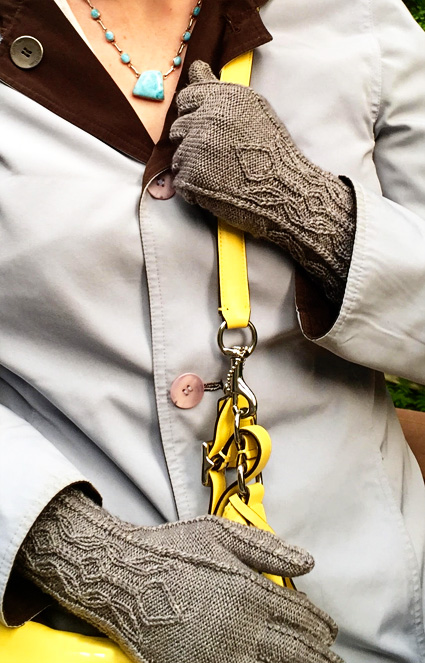
Gloves get a bad rap. I love making them — they're portable projects that are interesting enough to keep my attention — but the standard reaction is, "Gloves? Aren't those hard?"

I'll let you in on a secret: they're really not. If you can knit mittens or fingerless gloves, you can knit gloves. After all, mittens are really just gloves with a thumb and one finger. If one finger, why not four?

This pattern came about because I wanted to work with something thicker and warmer than the fingering weight yarn I generally use, while still creating an air of sophistication. It's perfect for people who love cables and want to try something a little different. The vines along the cuff emerge into a rosebud when they reach the hand, and the narrow cables flow seamlessly to outline the fingers and thumb. (Hence the name of the pattern. The rosebud suggested "Citizen Kane." The twisted cables reminded me of candy canes.)

The cuffs are surprisingly stretchy and have the advantage of being long enough to accommodate even long-armed people like me. The sport weight yarn knits up quickly, making these gloves an ideal Christmas project. However, with a design this nice, don't feel guilty if you decide to keep them for yourself!

spacer model: Lauren Libitz
spacer photos: Susan Guinan, Keith Libitz
 

SIZE
Women's S[L]
to fit 7-7.75[7.75-8.5]-inch circumference at knuckles
shown in size L

FINISHED MEASUREMENTS
Knuckle circumference (unstretched): 6.5[7.5] inches
Length: 9.75[11] inches

spacer

MATERIALS
Yarn

spacer Fleece Artist Sea Wool [70% merino, 30% seacell; 320 m per 112g skein]; color: gray; 1 skein

Recommended needle size
[always use a needle size that gives you the gauge listed below — every knitter's gauge is unique]
spacer 1 set US #1.5/2.5mm double-point needles (recommended; see Pattern Notes)

Notions
spacer stitch marker
spacer waste yarn (for holding stitches)
spacer yarn needle

spacer

GAUGE
32 sts/44 rounds = 4 inches in stockinette stitch
36 sts/44 rounds = 4 inches in cuff pattern stitch


PATTERN NOTES
[Knitty's list of standard abbreviations and techniques can be found here.]

While the gloves can also be worked using two circular needles or Magic Loop, those techniques make it difficult to work the fingers. Therefore, we strongly recommend using only DPNs, or at least switching to DPNs for the fingers.

To start each round with the back of the hand, the fingers on the left and right gloves are knit in a different order. However, as the forefinger and the ring finger are basically the same, this actually makes the pattern easier.

LT: Slip next st to cable needle and hold in front of work; k1, then k1 from cable needle.
LPT: Slip next st to cable needle and hold in front of work; p1, then k1 from cable needle.
RPT: Slip next st to cable needle and hold in back of work; k1, then p1 from cable needle
RT: Slip next st to cable needle and hold in back of work; k1, then k1 from cable needle

Backward Loop Cast-On: Use the e-wrap method, or as follows: Yarn over on left needle. Place tip of right needle as if to purl through back of loop. Slip resulting loop onto right needle. (One stitch created.)

Pick up: On "pick up" in the finger setup: this is not a 'pick up and knit' maneuver. The yarn is not attached, and you're not working a loop; just grab a loop and bring it up onto the needle.

Grafting:
Instructions for grafting can be found here.

spacerCharts
The charts for this pattern are very large. Each fits on a letter-sized page.
Click below and print each resulting page.

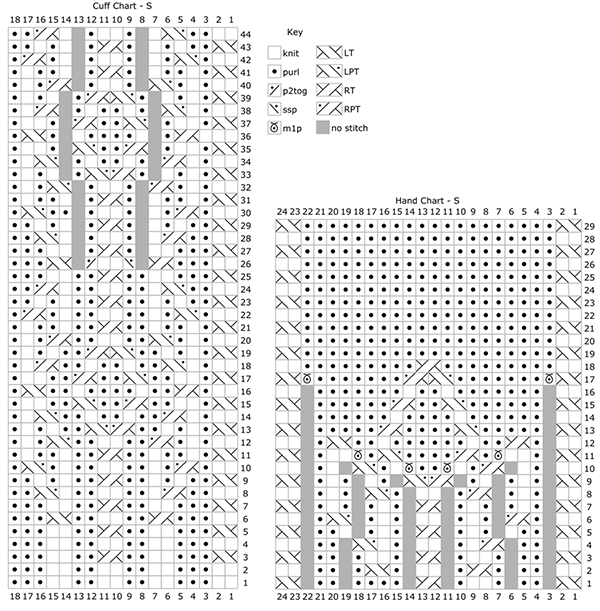
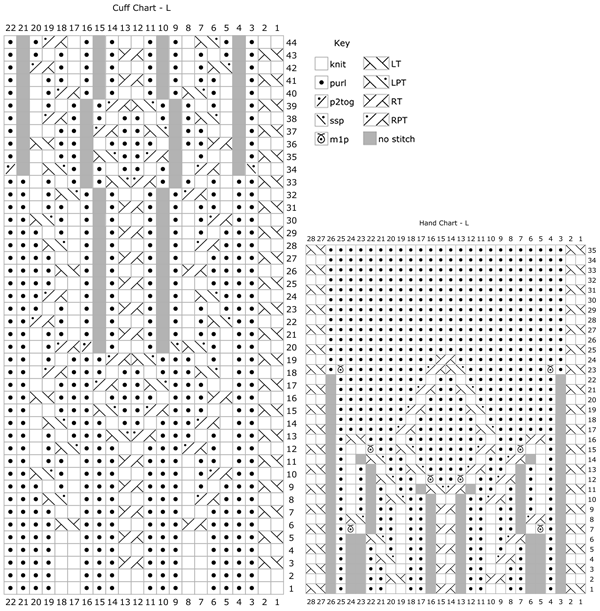
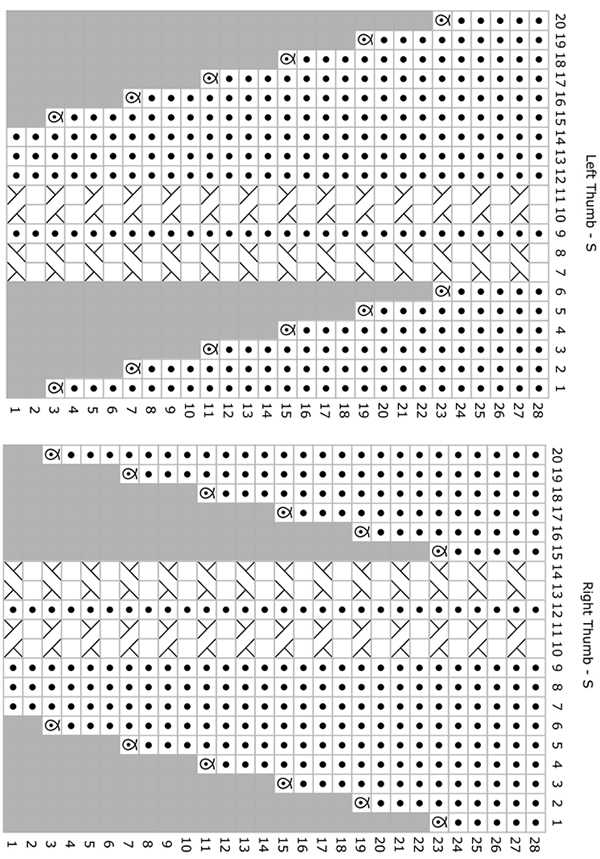
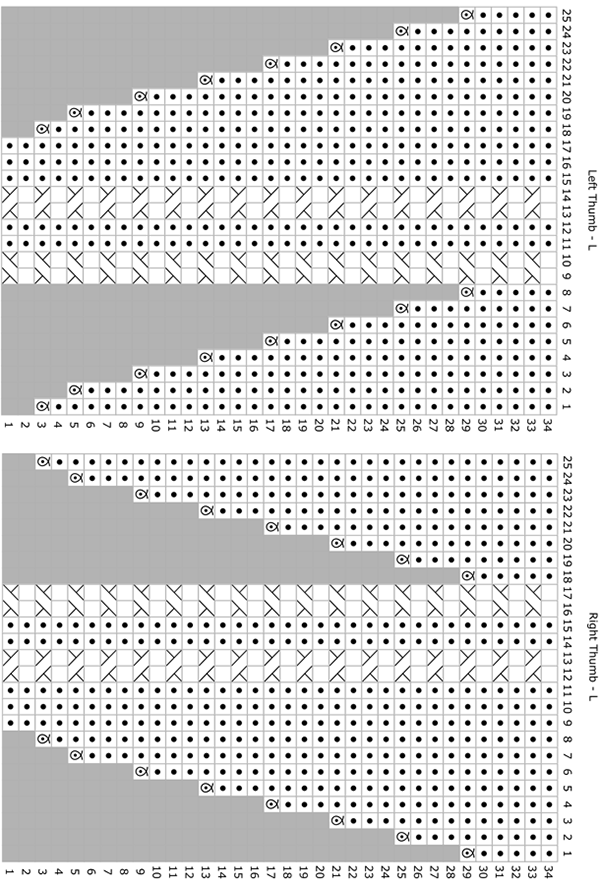
Cuff + hand small | Cuff + hand large | Left + right thumbs small | Left + right thumbs large


DIRECTIONS
LEFT HAND
Cuff
Loosely CO 54[66] sts. Distribute sts across needles as you prefer and join for working in the round. Note or mark start of round.

Cuff round: Work appropriate size Cuff chart 3 times around.

Continue as established until Cuff Chart is complete. 48[54] sts — 6[12] sts dec.

Hand/Thumb Gusset
Setup Rnd 1: Work Row 1 of Hand Chart, p3, k2, p1[2], RT, p1[2], k2, p3, LT, p3, k2, p1[2], work Row 1 of Left Thumb Chart.

Setup Rnd 2: Work Row 2 of Hand Chart, p3, RT, p1[2], k2, p1[2], LT, p3, k2, p3, RT, p1[2], work Row 2 of Left Thumb Chart.

Rnd 3: Work Row 3 of Hand Chart, p22[25], work Row 3 of Left Thumb Chart. (2 sts inc on this rnd.)

Cont as established, working charts as set and rev st st between them, through Rnd 28[34] of Hand and Left Thumb Chart. 66[78] sts — 24[28] sts for Hand Chart and 20[25] for Thumb chart.

Next rnd, separate thumb sts: Work Row 29[35] of Hand Chart, p22[26]. (Note that for Size L only, the final st carries over into the existing thumb sts.) Place next 14[17] sts on waste yarn; using Backward Loop Cast-On, CO 2[1] sts, p to end of rnd. 54[62] sts

Upper Hand
Rnd 1: K2, p20[24], k2, p to end of rnd.
Rnd 2: LT, p20[24], LT, p to end of rnd.
Rep Rnds 1 & 2 twice more, and work Rnd 1 once more.

Next rnd, separate pinky sts: LT, p16[20], k1. Place 11[12] sts on waste yarn; using Backward Loop Cast-On, CO 1[2] sts, p to end of rnd. 44[52] sts on needles.

Next rnd: K2, p16[20], k1, k1 tbl, p1 tbl, p to end of rnd.
Next rnd: LT, p16[20], RT, p to end of rnd.
Next rnd: K2, p16[20], k2, p to end of rnd.

Forefinger
Setup Rnd 1: LT, p4[5], k1; place the next 29[34] sts on waste yarn; using Backward Loop Cast-On, CO 3[2] sts, p8[10] to end of rnd. 18[20] sts.

Setup Rnd 2: K2, p4[5], k1, k1 tbl, p1[2] tbl, p to end of rnd.

Rnd 1: LT, p4[5], RT, p to end of rnd.

Rnd 2: K2, p4[5], k2, p to end of rnd.

Rep Rnds 1 & 2 for 2[2.5] inches or to 0.25 inches less than actual finger length.

Next rnd: LT, p4[5], RT, p to 1 st before end of rnd. This is the new start of round. Rearrange sts as you prefer.

For Size Small Only:
Rnd 1: K2tog, k1, p4, k1, ssk, p2tog, p4, ssp. 14 sts.

Rnd 2: LT, p4, RT, p5. This is the new start of round. Rearrange sts as you prefer.

Rnd 3: K2tog, ssk, p2, k2tog, ssk, p4. 10 sts.

Rnd 4: LT, p2tog, RT, p1, p2tog, p1. 8 sts.

Cut yarn, leaving an 8-inch tail. Place first five sts on one needle. Sl outer st on each side over adjacent st (5 sts to 3 sts). Place last three sts on a second needle. Graft closed.

For Size Large Only:
Rnd 1: K2tog, ssk, p3, k2tog, ssk, p9. 16 sts.
Rnd 2: LT, p3, RT, p8. This is the new start of round. Rearrange sts as you prefer.
Rnd 3: K2tog, ssk, p1, k2tog, ssk, p7. 12 sts.
Rnd 4: LT, p1, RT, p2tog, p3, ssp. 10 sts.
Rnd 5: K2, p1, k2, p2tog, p1, ssp. 8 sts.

Cut yarn, leaving an 8-inch tail. Place first five sts on one needle. Sl outer st on each side over adjacent st (5 sts to 3 sts). Place last three sts on a second needle. Graft closed.

Ring Finger
Leave first 6[8] sts on waste yarn. Return next 7[8] sts to needles, pm (or arrange sts) for beg of rnd; return 8[10] more sts to needles. Leave rem 8 sts on waste yarn.

Join yarn.
Setup Rnd 1: P8[10]; using Backward Loop Cast-On, CO 3[2] sts, k1, p4[5], RT. 18[20] sts.
Set-up Rnd 2: P8[10], p1[2] tbl, k1 tbl. k1, p4[5], k2.

Rnd 1: P10[11], LT, p4[5], RT.
Rnd 2: P10[11], k2, p4[5], k2.
Rep Rnds 1 & 2 for 2[2.5] inches or to 0.25 inches less than actual finger length.

Next rnd: P9[10]. This is the new start of round. Rearrange sts as you prefer.

Work fingertip as for Forefinger.

Middle Finger
Note: Place all Middle Finger sts on needles before you begin the rnd. See Pattern Note re: "Pick up".

Return rem 8 sts from palm side of waste yarn to needles. Pick up 2 sts from lower edge of Forefinger, pm (or arrange sts) for beg of rnd, pick up 1 st from lower edge of Forefinger. Return rem 6[8] sts from other side of waste yarn to needles. Pick up 3 sts from lower edge of Ring Finger. Rearrange sts as you prefer to accommodate the new start of round. 20[22] sts.

Join yarn.
Setup Rnd: LT, p4[6], RT, p2 tbl, p8, p2 tbl.

Rnd 1: K2, p4[6], k2, p to end of rnd.
Rnd 2: LT, p4[6], RT, p to end of rnd.
Rep Rnds 1 & 2 for 2.5[3] inches or to 0.25 inches less than actual finger length, ending with Rnd 1.
Next rnd: LT, p4[6], RT, p to one st before end of rnd. This is the new start of round. Rearrange sts as you prefer.

Work fingertip as follows:

For Size Small Only:
Rnd 1: K2tog, k1, p4, k1, ssk, p2tog, p6, ssp. 16 sts.
Rnd 2: LT, p4, RT, p7. This is the new start of round. Rearrange sts as you prefer.
Rnd 3: K2tog, ssk, p2, k2tog, ssk, p6. 12 sts.
Rnd 4: LT, p2tog, RT, p2, p2tog, p2. 10 sts.
Rnd 5: K2, p1, k2, p2tog, p1, ssp. 8 sts.

Cut yarn, leaving an 8-inch tail. Place first five sts on one needle. Sl outer st on each side over adjacent st (5 sts to 3 sts). Place last three sts on a second needle. Graft closed.

For Size Large Only:
Rnd 1: K2tog, ssk, p4, k2tog, ssk, p10. 18 sts.
Rnd 2: LT, p4, RT, p9. This is the new start of round. Rearrange sts as you prefer.
Rnd 3: K2tog, ssk, p2, k2tog, ssk, p8. 14 sts.
Rnd 4: LT, p2, RT, p2tog, p1, p2tog, p1, ssp. 11 sts
Rnd 5: K2, p2tog, k2, p2tog, p1, ssp. 8 sts.

Cut yarn, leaving an 8-inch tail. Place first five sts on one needle. Sl outer st on each side over adjacent st (5 sts to 3 sts). Place last three sts on a second needle. Graft closed.

Pinky
Note: Place all Finger sts on needles before you begin the rnd. See Pattern Note re: "Pick up".

Return rem 11[12] sts from waste yarn to needles. Pick up 2[3] sts from lower edge of Hand, pm (or arrange sts) for beg of rnd, pick up 1 st from lower edge of Hand. Rearrange sts as you prefer to accommodate the new start of round. 14[16] sts.

Join yarn.
Setup Rnd: RT, p2, LT, p6[7], p2[3] tbl.

Rnd 1: K2, p2, k2, p to end of rnd.
Rnd 2: RT, p2, LT, p to end of rnd.
Rep Rnds 1 & 2 for 1.5[2] inches or to 0.25 inches less than actual finger length, ending with Rnd 1.

Next rnd: K2, p2, k2, p to one st before end of rnd. This is the new start of round. Rearrange sts as you prefer.

Work fingertip as follows:
Rnd 1: K2tog, k1, p2, k1, ssk, p6[7]. 12[14] sts.
Rnd 2: RT, p2, LT, p1, p2tog, ssp, p0[1]. This is the new start of round. Rearrange sts as you prefer. 10[12] sts.
Rnd 3: K2tog, ssk, k2tog, ssk, p2[3]. 6[8] sts.
Rnd 4: RT, LT, p0[1], p2tog. 5[6] sts.

Cut yarn, leaving an 8-inch tail. Place 2[3] sts on one needle. Place 3 sts on a second needle.
Small only: On second needle, sl second st over third st (3 sts to 2 sts).
Graft closed.

Thumb
Note: Place all Thumb sts on needles before you begin the rnd. See Pattern Note re: "Pick up".

Return rem 14[17] sts from waste yarn to needles. Pick up 4[3] sts from lower edge of Hand. This is the new start of round. 18[20] sts.

Join yarn.
Setup Rnd: P6[7], RT, p1[2], LT, p3[4], p4[3] tbl.

Rnd 1: P6[7], k2, p1[2], k2, p to end of rnd.

Rnd 2: P6[7], RT, p1[2], LT, p to end of rnd.

Rep Rnds 1 & 2 for 1.25[1.75] inches or to 0.25 inches less than actual finger length. Finish with Rnd 2.

Work thumb tip as follows:

For Size Small Only:
Rnd 1: P2, p2tog, p2, k2, p1, k2, p2, ssp, p3. (16 sts)

Rnd 2: P5, RT, p1, LT, p6.

Rnd 3: P1, p2tog, p1, k2tog, k1, p1, k1, ssk, p1, ssp, p2. (12 sts)

Rnd 4: P1, p2tog, RT, p1, LT, ssp, ssp. (9 sts)

Rnd 5: P2tog, k1, ssk, k2, ssp. (6 sts)

Cut yarn, leaving an 8-inch tail. Place first three sts on one needle. Place last three sts on a second needle. Graft closed.

For Size Large Only:
Rnd 1: P2, p2tog, p3, k2, p2, k2, p3, ssp, p2. (18 sts)
Rnd 2: P6, RT, p2, LT, p6.
Rnd 3: P2, p2tog, p1, k2tog, k1, p2, k1, ssk, p1, ssp, p2. ( 14 sts)
Rnd 4: P2tog, p2tog, RT, p2, LT, ssp, ssp. (10 sts)
Rnd 5: P2, k1, ssk, k2tog, k1, p2. (8 sts)
Cut yarn, leaving an 8-inch tail. Place first four sts on one needle. Place last four sts on a second needle. Graft closed.

RIGHT HAND
Cuff

Work as for LEFT HAND.

Hand/Thumb Gusset
Setup Rnd 1: Work Row 1 of Hand Chart. Work Row 1 of Right Thumb Chart, p1[2], k2, p3, LT, p3, k2, p1[2], RT, p1[2], k2, p3.

Setup Rnd 2: Work Row 2 of Hand Chart. Work Row 2 of Right Thumb Chart, p1[2], LT, p3, k2, p3, RT, p1[2], k2, p1[2], LT, p3.

Rnd 3: Work Row 3 of Hand Chart, work Row 3 of Right Thumb Chart, p to end of rnd. 2 sts increased.

Cont as established, working charts as set and rev st st to end of rnd, through Rnd 28[34] of Hand and Right Thumb Chart. 66[78] sts — 24[28] sts for Hand Chart and 20[25] for Thumb chart.

Next rnd, separate thumb sts: Work Row 29[35] of Hand Chart, p6[7], place 14[17] sts on waste yarn; using Backward Loop Cast-On, CO 2[1] sts, p to end of rnd. 54[62] sts.

Upper Hand
Rnd 1: K2, p20[24], k2, p to end of rnd.
Rnd 2: LT, p20[24], LT, p to end of rnd.
Rep Rnds 1 & 2 twice more. (6 rnds total).

Next rnd, to separate pinky: K2, p20[24], k2, p to 6 sts before end of rnd, place 11[12] sts on waste yarn; using Backward Loop Cast-On, CO 1[2] sts, k1, p16[20], LT, p24[27], p0[1] tbl. This is the new start of round. Rearrange sts as you prefer. 44[52] sts.

Next rnd: K1 tbl, k1, p16[20], k2, p to end of rnd.
Next rnd: RT, p16[20], LT, p to end of rnd.
Next rnd: K2, p16[20], k2, p to end of rnd.

Ring Finger
Work as for Left Forefinger, substituting RT for LT and vice versa.

Forefinger
Work as for Left Ring Finger, substituting RT for LT and vice versa.

Middle Finger
Work as for Left Middle Finger, substituting RT for LT and vice versa.

Pinky
Return rem 11[12] sts from waste yarn to needles, pm (or arrange sts) for beg of rnd. Pick up 3[4] sts from lower edge of Hand. Rearrange sts as you prefer to accommodate the new start of round. 14[16] sts.

Join yarn.
Setup Rnd: K1 tbl, p2[3] tbl, p 6[7]. This is the new start of round. Rearrange sts as you prefer.

Rnd 1: LT, p2, RT, p to end of rnd.
Rnd 2: K2, p2, k2, p to end of rnd.
Rep Rnds 1 & 2 for 1.5[2] inches or to 0.25 inches less than actual finger length. Finish with Rnd 1, stopping one st before end of rnd. This is the new start of round. Rearrange sts as you prefer.

Work fingertip as for Left Pinky, substituting RT for LT and vice versa.

Thumb
Return rem 14[17] sts from waste yarn to needles, pm (or arrange sts) for beg of rnd. Pick up 4[3] sts from lower edge of Hand. Rearrange sts as you prefer to accommodate the new start of round. 18[20] sts.

Join yarn at start of round.
Setup Rnd: P4[3] tbl, p3[4], LT, p1[2], RT, p6[7].

Rnd 1: P7, k2, p1[2], k2, p to end of rnd.
Rnd 2: P7, LT, p1[2], RT, p to end of rnd.
Rep Rnds 1 & 2 for 1.25[1.75] inches or to 0.25 inches less than actual finger length, ending with Rnd 2.

For Size Small Only:
Rnd 1: P3, p2tog, p2, k2, p1, k2, p2, ssp, p2. 16 sts.
Rnd 2: P6, LT, p1, RT, p5.
Rnd 3: P2, p2tog, p1, k2tog, k1, p1, k1, ssk, p1, ssp, p1. 12 sts.
Rnd 4: P2tog, p2tog, LT, p1, RT, ssp, p1. 9 sts.
Rnd 5: P2tog, k2, k2tog, k1, ssp. 6 sts.
Cut yarn, leaving an 8-inch tail. Place first three sts on one needle. Place last three sts on a second needle. Graft closed.

For Size Large Only:
Work as for LEFT THUMB, substituting RT for LT and vice versa.

spacer

FINISHING
Block and weave in ends. Sew up any holes at the base of fingers. (Note: The ends can often be used for this.)

spacer
ABOUT THE DESIGNER

Meredith is a lifelong baseball fan and knitter who happens to be a sports data scientist with a Ph.D. in astrophysics. She's in the Baseball Hall of Fame for knitting (really!) and loves patterns inspired by science, math, or sports.

You can find her on Ravelry or Twitter.

spacer