Grandma Knitty Home
Knitty: little purls of wisdom
what's the editor up to lately?feature articlesKnitty's generous selection of patternsKnittyspinŽarchive of previous issuesMeet other Knitty readers and chat in our coffeeshop!sign up for the free Knitty newsletterLooking for an ad fromone of our advertisers? Click here!Our tiny, perfect online shopping mallGet yourself a little Knitty treat!read the behind-the-scenes news at Knitty


Find exactly what you're looking for

The answer to your question about Knitty is probably here!

Take home something Knitty today

Advertise with Knitty

Get your cool stuff reviewed in Knitty

Full information about how  to get published in Knitty

Read exactly what FREE PATTERNS really means...respect our designers and authors rights [and thank you]

Knitty is produced in a pro-rabbit environment

© Knitty 2002-2006. All rights reserved. Unauthorized reproduction prohibited. This means you.


<click for more!
 
Knit Purl

This handbag uses Lamb's Pride by Brown Sheep, a wool/mohair blend. It is a heavier worsted weight yarn, and the mohair lends a pleasing sheen and softness to the final bag.

The slip stitch patterns add further rigidity to the final fabric, so you actually CAN make a sturdy bag that sits up on its own with only one strand of yarn.

It is easy to change the dimensions of the bag by adding or subtracting groups of 8 stitches when you cast on, or groups of 16 rows as you knit the base. Then simply make the bag as tall as you like by adding additional solid and multi-color rounds.


photos: Diane Sutliff

SIZE
Sensible shoulder bag
 
FINISHED MEASUREMENTS

Before felting (approximate):
Width: 12 inches
Depth: 6 inches
Height: 15 inches

After felting (approximate):
Width: 8 inches
Depth: 4 inches
Height: 8.5 inches

 
MATERIALS

Brown Sheep Lamb's Pride Worsted [85% wool, 15% mohair; 190 yd/173m per 113g skein]; 1 skein each color
[MC] Color: M29 Jack's Plum
[CC] Color: M191 Kiwi

1 16- or 18-inch US #13/9 mm circular needle
1 16- or 18-inch US #15/10 mm circular needle
8 x 0.25-inch grommets
Grommet setting tool and hammer

 
GAUGE

12 sts = 4 inches
Gauge is not critical for this project.

 
PATTERN NOTES

[Knitty's list of standard abbreviations and techniques can be found here]

The color pattern for this project is worked using a slip stitch technique. This is an easy way to create multi-color patterns because you are only knitting with one strand of yarn at a time. It also adds extra strength and body to the fabric, which is advantageous for a bag.

To keep the fabric of the finished bag consistent between the solid rows and mulit-color rows, slipped stitches are worked throughout the body. The rows with the contrasting squares have groups of four slipped stitches. The solid rows have only single slipped stitches. To keep the tension consistent, the solid-color rows are done using a smaller needle size. The changing of needle sizes throughout the bag ensures a more even gauge throughout the body of the bag, especially if you are a tight knitter.

THE TEST SWATCH
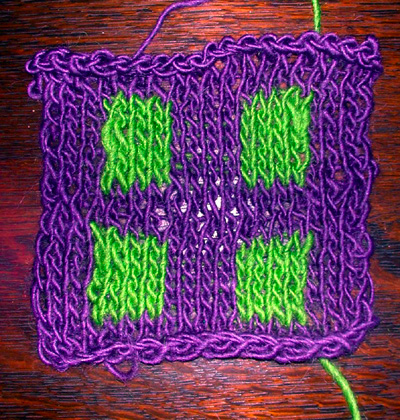
Many years ago, my father bought a toaster oven. He brought it home and plugged it in. He was about to put in a slice of bread to toast when he found a slip of paper in the oven which read, "Honestly now, have you read the instructions?"

So, honestly now, are you going to do a test swatch? Only the cavalier, or people who have worked with this yarn for felting before, would consider skipping this stage. The test swatch seems more complicated than the actual handbag because it is knitted flat, rather in the round. It will only provide a moderately accurate gauge swatch for that reason, but will give you a bit of practice slipping four stitches and maintaining even tension. It also gives a clear picture of how your two colors of yarn will felt together BEFORE you make the whole bag.

Throughout this pattern, all slipped stitches are slipped purlwise, with yarn held to the WS of the work.

Using MC and smaller needle, CO 20 stitches.
Row 1 [RS]: [K1, sl 1] to last 2 sts, k2.
Row 2 [WS]: Sl 1, p to end.
Row 3 [RS]: [Sl 1, k1] to end.
Row 4 [WS]: Sl 1, p to end.

The next section is worked using the larger needle. The work is not always turned at the end of each row; when two RS or WS rows are worked in a row, just slide your work to the other end of the needle. The directions will instruct you to "turn work" or "slide work" accordingly.
Row 5 [RS]: Using larger needle and CC, [sl 4, k4] twice, sl 4. Slide work.
Row 6 [RS]: Using MC, sl 1, k3, [sl 4, k4] twice. Turn work.
Row 7 [WS]: Using CC, [sl 4, p4] twice, sl 4 wyif. Slide work.
Row 8 [WS]: Using MC, Sl 1, p3, [sl 4, p4] twice. Turn work.
Rows 9-12: Repeat Rows 5-8 .
Rows 13-14: Repeat Rows 5-6.
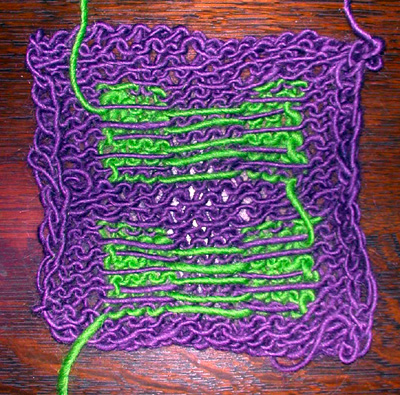
The next section is worked using the smaller needle and MC only. Do not break CC; just carry it loosely along the back of the work.
Row 15 [WS]: Using smaller needle and MC, sl 1, p to end.
Row 16 [RS]: [Sl 1, p1] to end.
Row 17 [WS]: Sl 1, p to end.
Row 18 [RS]: Sl 2, k1, [sl 1, k1] to last st, k1.
Row 19 [WS]: Sl 1, p to end. Slide work.

The next section is worked using the larger needle and both colors.
Row 20 [WS]: Using larger needle and CC, [sl 4, p4] twice, sl 4 wyif. Turn work.
Row 21 [RS]: Using MC, sl 1, k3, [sl 4, k4] twice. Slide work.
Row 22 [RS]: Using larger needle and CC, [Sl 4, k4] twice, sl 4. Turn work.
Row 23 [WS]: Using MC, Sl 1, p3, [sl 4, p4] twice. Slide work.
Rows 24-28: Repeat Rows 20-23.
Rows 29-30: Repeat Rows 20-21. Break CC.
Rows 30-34: Using smaller needle and MC, repeat Rows 15-19. Break MC.
I-Cord Bind Off:
This BO is worked using the larger needle and CC. One MC stitch from the smaller needle is worked together with the last stitch of each row of I-Cord. Be sure to work this BO loosely. I-Cord BO is worked with the RS facing at all times.

Using larger needle and CC, CO 3 sts.

Row 1: K2, sl 1, k1 from smaller needle, psso. Slide work to other end of needle and bring yarn around back of work, ready to work the next row.

Repeat this row until all sts have been bound off. Break CC, draw through sts on needle and pull tight; use tapestry needle to draw yarn tail down through body of I-Cord.

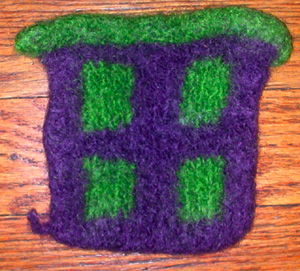
Felt this swatch in the washing machine next time you run a hot load - be sure not to use bleach. Place it in a zippered pillowcase to keep the lint contained, and to reducing staining of your other clothing. Keep track of how long it was in the machine, so you have some idea of how your final felting process will go.

DIRECTIONS

Base
Using smaller needle and CC, CO 32 sts.

Row 1 [RS]: [K1, sl 1] to last 2 sts, k2.

Rows 2, 4, 6, 8 [WS]: Sl 1, p to end.

Rows 3, 7 [RS]: [Sl 1, k1] to end.

Row 5 [RS]: Sl 2, k1, [sl 1, k1] to last st, k1.

Repeat Rows 5-8 six times more.

Next Row [RS]: Sl 1, k1 to end.

Pick up sts around base:

With RS facing, pick up and k 16 sts (1 st in each slipped st) along side edge of work, pick up and k 32 sts along CO edge, pick up and k 16 sts along remaining side edge of base. 96 sts on needle. Place marker on needle; from this point, bag will be worked in the round.

K 2 rounds.
Set CC aside, work next round using MC. When working the body of the bag, it is not necessary to break CC when not in use; it may be carried loosely along the back of the work.

Next Round: [Insert left needle into purl bump at back of st 3 rows below next st, k next st on needle together with picked-up st] to end. This will create a decorative ridge which will give structure to the bottom of the bag.

Bag Body:

Round 1: [K1, sl 1] to end.
Rounds 2, 4
: K all sts.
Round 3:
[Sl 1, k1] to end.

The next section is knit using the larger needle. When working the slip stitch pattern, be sure to push stitches down your right needle after you have knit them, to help ensure that the yarn floats at the back of the work are not too short. It is better for the yarn to be stranded too loosely, than too tightly!

Round 5: Using CC, sl 2, [k4, sl4] to last 2 sts, sl 2.
Round 6
: Using MC, k2, [sl 4, k4] to last 2 sts, k2.
Rounds 7-14
: Repeat Rounds 5-6 four times more. The CC squares will be 5 rows high.

Round 15: Using smaller needle and MC, k all sts.
Repeat Rounds 1-15 four times more, then work Rounds 1-4 once more.

Work I-Cord Bind Off as for swatch. Be sure to work this BO very loosely! If you are a tight knitter, you may wish to use a US #17/12mm needle.

When BO is complete, break yarn and draw through sts on needle. Use yarn tail to sew ends of I-Cord together, creating as smooth a join as possible.

Strap
Using smaller needle and CC, CO 3 sts, leaving a 4-inch tail. Work I-Cord until work measures approx. 9 feet without being stretched. BO all sts and break yarn, leaving a 4-inch tail.

Felting
Place your bag and the I-cord in a zippered pillowcase, or in a regular pillowcase held closed with a ponytail holder. Set a top-loading washer on the smallest load size. Add just a few tablespoons of laundry soap. Set the water temp to hot wash/cold rinse. Place the loaded pillowcase and one or two pairs of jeans in the washer. Do not use towels or other types of fabric, because they will release lint that will lock itself into your felt. Start the washer.

You might want to check on the progress of your felting during the cycle while you become more familiar with the felting process. Fully felted fabric should no longer have visible stitches, and should not stretch much when pulled on the bias.

The cold water rinse gives an additional shock to the wool and helps the felting process along. With Brown Sheep yarns and the hottest water I could muster, the handbags in the photo took two complete cycles.

Some felting guides recommend skipping the spin cycle, because it can create creases in your finished product. These creases can often be steamed out with an iron. If you opt not to use the spin cycle, squeeze the handbag in a thirsty towel to get out as much water as possible, so the bag will dry within your lifetime.

Blocking
To give the bag its distinctive rectangle shape, you need a box that is just the right size. (You can also use books, CDs, VCR tapes, Harry Potter books or anything else at hand to make your form.)

Cover the box(es) with a plastic grocery sack and stretch the damp, shriveled, felted bag over the box. Stretching is good! The snugger the fit, the crisper the shape of the final bag. (You might even decide at this point to run the bag through an additional wash cycle.) Put the bag near a radiator or heat vent and let dry. This might take a few days, depending on how wet your bag is to start.

Stretch out the damp I-cord, and hang it to dry. Really stretch it! Do not cut off the yarn tails at either end of the cord; those ends will help you thread the I-cord through the eyelets.

FINISHING

When the bag is perfectly dry, trim off any excess ends of yarn that have worked free. They will look like little rainbow dreadlocks.

Use the #13 knitting needle to poke holes right through the top edge of the handbag to make pleats at either end (see photo below). Once the holes are made, you can enlarge them by forcing a larger needle through each opening. Following the package instructions, place a grommet/eyelet in each of the eight holes.

Using the tail of yarn on the end, lace the I-cord through the grommets. Tie the two ends together at one end of the bag, and cut the yarn tails. Reinforce this join by sewing over it using CC; adjust the handle so that the join is hidden inside the bag.

Adjust the straps so they are even, and snug up the pleats.

ABOUT THE DESIGNER

Diane is an art teacher in Chicago. She knits in found moments. After being on knitting hiatus for about ten years, it is nice to be back. She still has the baby sweater she made for her now-teenage daughter -- the cardigan where the pattern matched up at the raglan sleeve perfectly and she showed people at the park who did not understand.

You can see some of her other ideas at feltedhandbagworkshop.com