Grandma Knitty Home
Knitty: little purls of wisdom
what's the editor up to lately?feature articlesKnitty's generous selection of patternsKnittyspinŽarchive of previous issuesMeet other Knitty readers and chat in our coffeeshop!sign up for the free Knitty newsletterLooking for an ad fromone of our advertisers? Click here!Our tiny, perfect online shopping mallGet yourself a little Knitty treat!read the behind-the-scenes news at Knitty


Find exactly what you're looking for

The answer to your question about Knitty is probably here!

Take home something Knitty today

Advertise with Knitty

Get your cool stuff reviewed in Knitty

Full information about how  to get published in Knitty

Read exactly what FREE PATTERNS really means...respect our designers and authors rights [and thank you]

Knitty is produced in a pro-rabbit environment

© Knitty 2002-2006. All rights reserved. Unauthorized reproduction prohibited. This means you.


<click for more!
 
City Knits

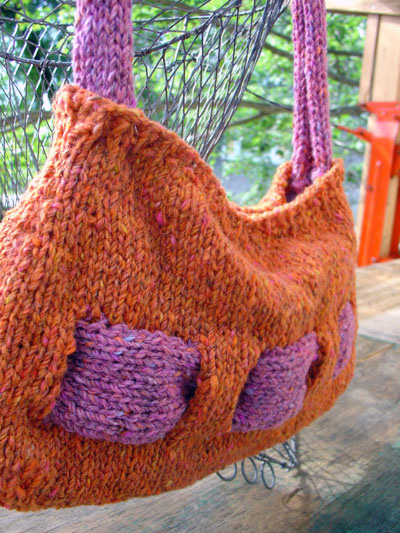
While shopping for the next perfect handbag to fit my wallet and keys I grabbed my hair and screamed at the store associates to stock more purses for the modern grrls. A retro look in a small size, with a bit of style and "puff".

So became the Twiggy Tweed bag, I picked up my trusty Domo-kun topped US #7 needles and the cool new Plymouth Tweed, in two nights I finished my purse and went back to those stores to laugh at the prices of their fugly pleather bags.

Rock your own bag with black and hot pink, bright yellow and blue, or pick the feminine colors we all love to hate.

model: Missa photos: Brian C.

SIZE
One
 
FINISHED MEASUREMENTS

Width: 10.5 inches
Height: 6 inches

 
MATERIALS

Plymouth Tweed [100% Virgin Lambswool; 109 yd/99m per 50g ball]; 1 ball each color
[MC] #5327
[CC] #5328

1 set US #7/4.5mm straight needles
Tapestry needle
Sewing pins
Sewing needle
Sewing thread
1 old t-shirt with neck opening diameter approx. 21 inches (used for lining)
Magnetic closure (optional)

 
GAUGE

20 sts/28 rows = 4 inches in stockinette stitch
Gauge is not critical for this project, but be sure to work at a tight tension to obtain a firm fabric.

 
PATTERN NOTES

[Knitty's list of standard abbreviations and techniques can be found here]

Sewing:
Instructions for Mattress Stitch can be found here.
Instructions for Slip Stitch can be found here.

1x1 Rib (Worked over an even number of sts)
Row 1: [K1, p1] to end.
Repeat this row for 1x1 Rib.

DIRECTIONS

Purse Body
[Make 2]:
Using MC, CO 48 sts.

Work 2 rows in 1x1 Rib.

Beg with a WS row, work 7 rows in stockinette st.

Increase Row [RS]: [K1, kfb] twice, k to last 5 sts, kfb, k1, kfb, k2. 52 sts.

Work 3 rows in stockinette st.

Work Increase Row once more. 56 sts.

Work 5 rows in stockinette st.

Shape Holes
Set-up Row [RS]: K7, [BO 10 sts, k5 (6 sts on right needle)] twice, BO 10 sts, k to end.

Work 9 rows in stockinette st over last 7 sts on needle only. Break yarn and slide this group of sts down the needle, out of the way.

Attach yarn to next group of sts with WS facing and work 9 rows in stockinette st. Break yarn and slide this group of sts down the needle.

Repeat for remaining 2 groups of sts, but do not break yarn when last group of sts is complete.

Joining Row [RS]: K7, [CO 10 sts, k6] twice, CO 10 sts, k7. 56 sts.
Work 7 rows in stockinette st.

Decrease Row [RS]: K2, ssk, k1, ssk, k to last 7 sts, k2tog, k1, k2tog, k2. 52 sts.
P 1 row.
Repeat these 2 rows once more. 48 sts.

BO all sts.

Decorative Panels [Make 2]
Using CC, CO 10 sts.
Work in stockinette st until work measures 11 inches.

BO all sts.

Purse Handle
Using CC, CO 12 sts.
Work in stockinette st until work measures 17 inches.

BO all sts.

FINISHING

Lightly block all pieces.

Position one decorative panel behind holes on one purse body piece, so that WS of body piece is facing RS of panel. Sew ends of panel to edges of body piece using slip stitch. Pin panel to strips between holes, distributing extra fullness of panel evenly between holes. Sew edges of panel to edges of holes using mattress st, catching approx. 2 rows of panel for each st of edge of hole.

Assemble remaining body piece in the same way.

Weave in ends.

Lining
Cut t-shirt open along side seams. Lay it flat so that the front and back of the neck opening line up. (You will need to fold it slightly forward of the shoulder seams, as the front neckline will be cut deeper than the back.) Pin both layers together in several places.

Lay one purse body piece on top of the folded shirt with the top edge of the bag at the neck opening of the shirt. Trace the shape of the bag onto the shirt. Draw a second line approx. 1 inch outside the first line; this will be your cutting line. Cut out the lining, cutting through both layers.

Sew the bottom and side edges of the lining with a 0.5-inch seam allowance. (The lining should be slightly larger than the bag, to account for the depth of the bag.)

Sew bag body pieces together along bottom and side edges. Weave in remaining ends.

Sew lining to inside of bag, around opening. Sew magnetic closure in place.

Sew ends of handle to inside of bag, sewing through both lining and bag body.

ABOUT THE DESIGNER

Missa wants everyone to listen to their yarn. "Start a swatch and see what happens; the yarn will talk to you."

She blogs about yarn, owns a yarn store, and yarns around town in her classic Volvo cars.