|
Finding your waist
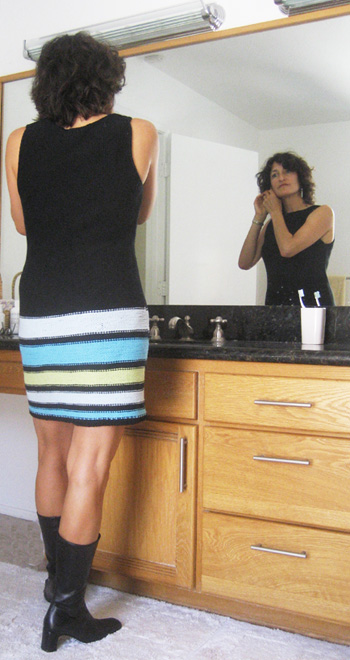
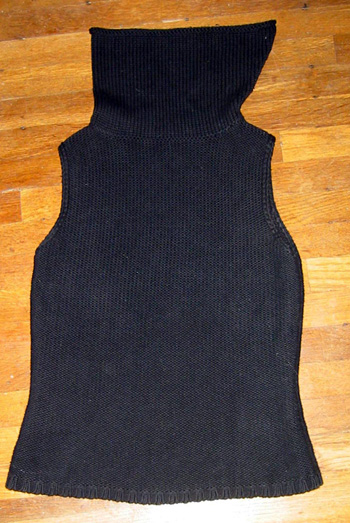
  For this dress I chose to keep most of the
top intact, cutting it off just above the
ribbing which hit at the hips. Depending
on the top you’re working with, your
body and taste, you might decide to have
the bodice of your dress end at your waist
or under the bust for an empire waisted dress. Try
the top on, mark where you’d like to
cut, then take it back off and put in on
the operating table. For this dress I chose to keep most of the
top intact, cutting it off just above the
ribbing which hit at the hips. Depending
on the top you’re working with, your
body and taste, you might decide to have
the bodice of your dress end at your waist
or under the bust for an empire waisted dress. Try
the top on, mark where you’d like to
cut, then take it back off and put in on
the operating table.
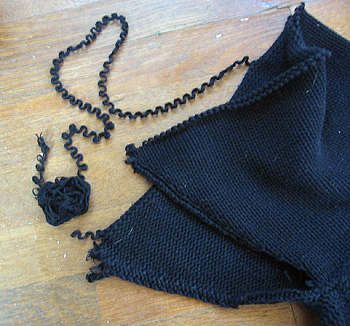
Since most knits are
worked from the bottom up, you’ll be
going against the grain and will not be able
to unravel from the hem up to where you’d
like the waistline. Instead,
you’ll need to place a safety line (if
you’re the nervous sort), then get out
the scissors and cut at the base of the stitches
in the row below your safety line. You
can see pictures and get more how-to on cutting
your sweater and picking up stitches in
an earlier
Frankenknits column and here
on the Knitty-Gritty website.
Reclaiming the yarn
After the surgery is complete, chances are
you have a couple of decent sized pieces
of knitting waiting to be unravelled. Frog
these and make the yarn into skeins, give
them a wash and then hang them to dry. If
you hang the skein on a clothes hanger and
then hang a couple more hangers at the bottom
of the skein, you’ll pull out the kinks
as it dries and have some fresh yarn to complete
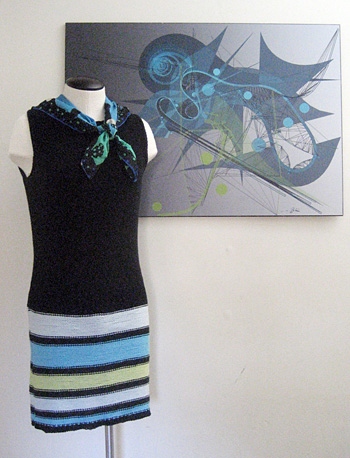
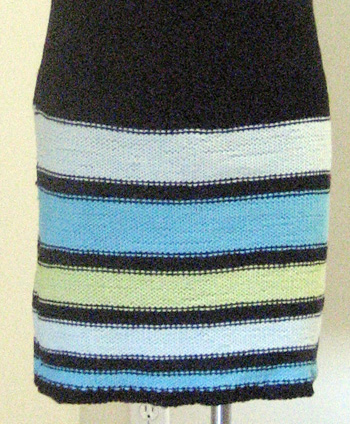
your project. The yarn I salvaged from
the neck and hem of the black top was used
to knit the black stripes at the bottom of
the dress -- that way, I didn’t have
to worry about trying to match the color,
and it gives the whole dress a bit of coherence.
 Knitting the skirt Knitting the skirt
After measuring the gauge on the top, I went
to the yarn shop with my balls of reclaimed
yarn and found a decent match in weight and
texture. If you can’t find a
similar yarn, don’t fret -- contrast
in color, texture or weight will add interest
to your finished dress. And changing
gauge isn’t a big problem. If
your top’s knit at 4.5 stitches per
inch and you’d like to knit the skirt
in a yarn that knits at 5 stitches per inch,
you’ll simply need to do a bit of math:
since the existing garment has 18 stitches
in four inches and the new yarn knits at
20 stitches per 4 inches, you’ll increase
twice in every 18 stitches (that’s
*k9, m1* around) in the first row and continue
on from there.
A tube-shaped skirt
is the easiest design choice. Simply put your live stitches
onto the appropriate sized needle (the appropriate
size being the one you need to knit your new
yarn at the correct gauge), and start knitting
around in circles, changing colors as you please. Remember that you don’t need to stick
to stockinette. Reverse stockinette creates
texture, while any ripple or feather-and-fan
stitch will add visual interest, particularly
when paired with shifts in color.
You might also consider an
A-line dress. To
knit one, just place two markers, one at each
side seam, and increase on either side of the
markers, say every fourth or sixth round, depending
on how much flare you want in your skirt.
Or think of an empire
waisted dress: you might begin with a round
of eyelets (*yo, k2tog* around) to run a
ribbon through later, then continue in a
simple lace pattern. An
easy choice: work your increases as yo, k1,
yo at four or six points evenly spaced around
the skirt, one point at each side seam and
the others evenly spaced from those. How
frequently you work the increase row will control
how wide the bottom of your dress will be,
but somewhere between every 6th row and every
10th row will probably be right for you. Consider
lightweight yarns like mohair if you’d
like to make a long or flowy dress. Cotton
yarn, for instance, will end up quite heavy
if you’re going for a full dress. But
you can use these basic techniques to create
anything from a babydoll top to a full length
gown.
 . .
And speaking of babydolls,
here’s a
fun little dress to make for the wee girl in
your life.
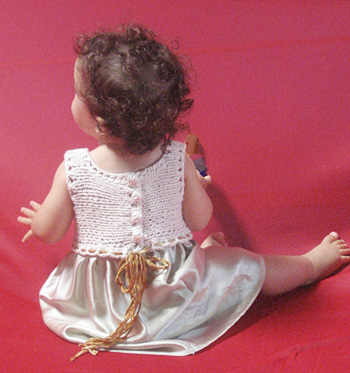
Babydoll Dress
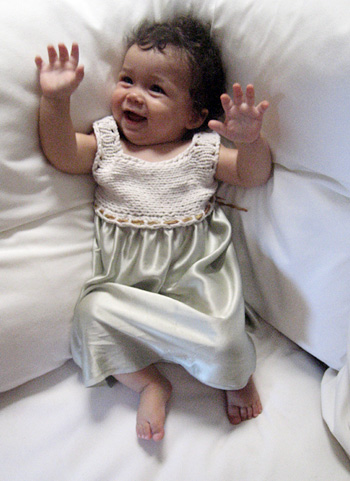 The
body of this dress is knit side-to-side using
the yarn of your choice. This will
sound familiar to knitters of Haiku,
also celebrating its fifth birthday. Since
this is for a youngster, take the care needs
of your yarn into consideration. If you
mean it as an heirloom, go ahead with the hand-dyed
pure silk yarn and taffeta for the skirt. If
you mean it as a playdress, then a cotton-blend
yarn and gingham might be a better choice,
or superwash wool paired with flannel for cooler
months. The
body of this dress is knit side-to-side using
the yarn of your choice. This will
sound familiar to knitters of Haiku,
also celebrating its fifth birthday. Since
this is for a youngster, take the care needs
of your yarn into consideration. If you
mean it as an heirloom, go ahead with the hand-dyed
pure silk yarn and taffeta for the skirt. If
you mean it as a playdress, then a cotton-blend
yarn and gingham might be a better choice,
or superwash wool paired with flannel for cooler
months.
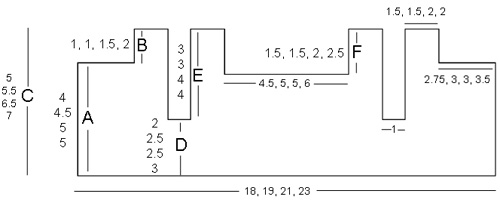
Size
6 mos [12 mos, 2 yrs, 4 yrs]
Chest circumference of finished dress, with
back overlapped 1 inch: 17 [18, 20, 22] inches.
Materials
Yarn of your choice.
Your yardage will
vary.
The sample shown, knit in
12 month size in Debbie Bliss Stella (60% silk,
20% rayon, 20% cotton) at 16 sts/22 rows per
4 inches used 50 yards of yarn.
The 6
month size, knit at 4.5 sts/inch requires 55
yards. Needles needed to knit a fabric you like with
the yarn you’ve chosen.
Calculations
With the yarn and needles you want to use,
knit a swatch in stockinette stitch and measure
the number of stitches per inch carefully. Measure
in several places to be confident of the
number. Wise knitters will take the
time to knit a 4 inch square and then divide
the number of stitches by 4 to come up with
an accurate number. Round fractions
to the quarter inch.
Write your gauge per inch here: _______
You will have to make several calculations
based on your gauge to customize the pattern
to suit your yarn and the size you want to
knit. In all cases, round to the nearest whole
number and jot down your answers to refer to
as you knit.
_______ (A) My gauge per inch times 4[4.5,
5, 5] = cast on number.
_______ (B) My gauge per inch times 1[1,1.5,
2] = back neck depth.
_______ (C) = (A) + (B) = total stitch count,
including straps.
_______ (D) My gauge per inch times 2[2.5,
2.5, 3] = stitches below the armhole.
_______ (E) = (C) - (D) = armhole stitches
_______ (F) My gauge per inch times 1.5[1.5,
2, 2.5] = front neck depth.
Directions
The bodice of the dress is knit side-to-side
in one piece. You’ll start at
the left back with the eyelets that will
later become the buttonholes and work the
shoulder straps, armholes and necklines by
casting on and binding off as you go, finishing
at the right back.
 Left Back Left Back
Begin at the back of the dress, creating a
row of eyelets that will later be used as buttonholes.
Cast on (A) sts. See worksheet above.
Purl 1 row.
Next row (RS): K1, *yo, k2tog, repeat from
*, end k1 if necessary. Next row (WS): Purl.
Next row (RS): K1, yo, ssk, k to last 3 sts,
k2tog, yo, k1.
Next row (WS): Purl.
Repeat these 2 rows until the piece measures
2.75[3, 3, 3.5] inches, ending with a WS row.
Left Back Strap
Cast on (B) additonal sts, using the knitted,
cable or backward-e cast-on for the back
left shoulder strap.
Next row: K1, *yo, k2tog* over (B) sts just
cast on, k to last 3 sts, k2tog, yo, k1.
Next row (WS): Purl.
Next row (RS): K to last 3 sts, k2tog, yo,
k1.
Repeat the last 2 rows until the shoulder strap
measures 1.5[1.5, 2, 2] inches, ending with
a RS row.
Left Armhole
Next row (WS): Purl (D) sts, *yo, p2tog, repeat
from * to end of row (if necessary, end p1).
Next row (RS): Bind off (E) sts, k to last
3 sts, k2tog, yo, 1.
Next row: Purl. Next row (RS): K1, yo, ssk, k to last 3 sts,
k2tog, yo, k1.
Repeat these 2 rows until the piece measures
1 inch (all sizes) from the last bind off,
ending with a WS row.
Left Front Strap
Cast on (E) additonal sts. You will have
(C) sts on the needle.
Next row (RS): K1, *yo, k2tog* over the (E)
sts just cast on, k to last 3 sts, k2tog, yo,
k1.
Next row (WS): Purl. Next row (RS): K to last 3 sts, k2tog, yo,
k1
Repeat these 2 rows until this shoulder strap
measures 1.5[1.5, 2, 2] inches, ending with
a RS row.
 Front Neck Front Neck
Next row (WS): Purl to last (F) sts, *yo, p2tog,
repeat from * to end of row (if necessary,
end p1).
Next row (RS): Bind off (F) sts, k to last
3 sts, k2tog, yo, k1.
Next row (WS): Purl.
Next row (RS): K1, yo, ssk, k to last 3 sts,
k2tog, yo, k1.
Repeat these 2 rows until the front neck measures
4.5[5, 5, 6] inches from the last bind off,
ending with a WS row.
Right Front Strap
Cast on (F) sts.
There are (C) sts on
the needle.
Next row (RS): K1, *yo, k2tog, repeat from
* over (F) sts just cast on, k to last 3 sts,
k2tog, yo, k1.
Next row (WS): Purl.
Next row (RS): K to last 3 sts, k2tog, yo,
k1.
Repeat these 2 rows until this shoulder strap
measures 1.5[1.5, 2, 2] inches ending with
a RS row.
Right Armhole
Next row (WS): Purl (D) sts, *yo, p2tog, repeat
from * to end of row (if necessary, end p1).
Next row (RS): Bind off (E) sts, k to last
3 sts, k2tog, yo, k1.
Next row (WS):Purl.
Next row (RS): K1, yo, ssk, k to last 3 sts,
k2tog, yo, k1.
Repeat the last 2 rows until the piece measures
1 inch from the last bind off, ending with
a WS row.
Right Back Strap
Cast on (E) sts. There are (C) sts on
the needle.
Next row (RS): K1, *yo, k2tog* over the (E)
sts just cast on, k to last 3 sts, k2tog, yo,
k1.
Next row (WS): Purl.
Next row (RS): K to last 3 sts, k2tog, yo,
k1.
Repeat these 2 rows until this shoulder strap
measures 1.5[1.5, 2, 2] inches, ending with
a RS row.
Next row (WS): P to last (B) sts, *yo, p2tog,
repeat from * to end of row, ending p1 if necessary. Next row (RS): Bind off (B) sts, k to last
3 sts, k2tog, yo, k1.
Right Back
Next row: Purl.
Next row: K1, yo, ssk, k to last 3 sts, k2tog,
yo, k1.
Repeat the last 2 rows until the right back
measures almost 2.75[3, 3, 3.5] inches, ending
with a WS row.
Next row (RS): P1, *yo, p2tog, repeat from
* to end of row, ending p1 if neccesary.
Next row: Bind off.
Finishing
Block pieces to measurements given.
When dry, sew the shoulder straps together
using mattress stitch.
Overlap backs by 1 inch and stitch together
along bottom hem if desired -- this will make
it easier to attach the skirt. Alternately,
if you are using a buttoned shirt for the skirt,
leave the back of the dress open and line up
the buttonbands of the bodice and skirt when
you sew them together.
Using eyelets as guides, sew buttons along
opposite side of back.
For
skirt:
Cut fabric 10 -24” long by 25 - 45 inches
wide, depending on the length and width you
desire and the fabric you are using. Lighter
fabrics can be gathered more than heavy fabrics,
for instance. An adult T-shirt, cut off below
the armholes, will be an appropriate skirt
for any size dress. The length of the fabric
can be varied to become anything from a top
to a full length dress.
Match the two short ends of the fabric, with
right sides together, and sew a seam along
the short end, creating a tube.
If necessary, turn under 1/4 inch on one side
of the tube and sew a seam, then turn under
1 inch and sew the hem in place, by hand or
machine.
On the opposite side of the tube, take long
basting stitches by hand or machine, then pull
the ends to gather the skirt so that it is
17[18, 20, 22] inches around. Even out the
gathers around the circumference of the skirt,
then stitch over it again to lock the gathers
in place.
Pin the gathered end of the skirt (RS out)
to the WS of the bodice, then stitch into place,
just above the eyelet row, using needle and
thread.
If desired, run ribbons through the eyelets
around the neck, armholes and bodice. |


 If
you don’t
have luck with this, it may be that the neck
was knit separately from the top down and then
sewn into place. If you can spot this
seam and pull it out, you’ll be on the
road to unraveling. Other necks will
have a seam or even two. In this case,
you’ll have to open the seams and then
unravel the pieces. See more on decapitating
your turtleneck
If
you don’t
have luck with this, it may be that the neck
was knit separately from the top down and then
sewn into place. If you can spot this
seam and pull it out, you’ll be on the
road to unraveling. Other necks will
have a seam or even two. In this case,
you’ll have to open the seams and then
unravel the pieces. See more on decapitating
your turtleneck