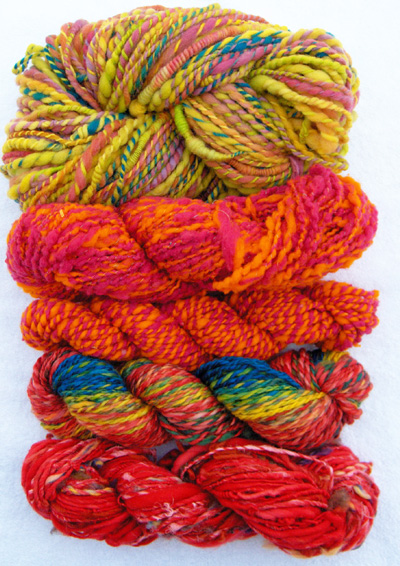
  a plying primer a plying primer
I love spinning. There’s something so relaxing
about yard after yard of gently twisted fiber slipping
over my fingers. It just speaks of peace... reflection...
harmony... Too bad the finished single isn’t
always as wonderful as the spinning experience!
Plying can help cover a myriad
of accidents. By twisting two singles together,
it’s possible
to even-out variations, hide a bit of over-twist,
or disguise slubs. Besides the cosmetic benefits,
plying makes the resulting fiber stronger and
less likely to break when tension is applied.
It also reduces the exposed surface area of
the individual strands which makes them more
durable and less likely to pill.
Plying prevents handspun
yarns from biasing. Bias is the “lean” stitches
have when the twist energy of the single causes
the stitches to appear slanted in the finished
piece. The slant is caused by the individual
loop of each stitch attempting to twist around
itself. It’s prevented by the loop of
the stitch above it, and so it leans, due to
the semi twisted state. While biased yarns
can be used in knitting to achieve a certain
affect, most knitting is better suited to a
nicely balanced yarn.
If you’re a new spinner,
you may not have attempted plying yet. It’s
not hard, but it is different than spinning a
single. If you’re
struggling, keep reminding yourself that you’re
learning something new and it may feel odd or
difficult until you’ve memorized the technique.
If you’re more experienced, read on. You’ll
probably learn something new or at least refresh
your memory.
Set Up
If you have a tensioned lazy kate, use it. It
will prevent your bobbins from rolling and tangling
on the floor. The smoother this operation goes
the better. Don’t have a tensioned kate?
Look
here for
instructions to create your own for about $6.
Another good option is
to wind your singles into center pull balls
and set one on each side of you. Here’s
a good video for hand-winding center pull
balls; an empty paper towel or toilet paper
roll can be substituted for the nostepinne.
You can leave your singles
on the bobbin and place them on an untensioned
kate or on the floor. This method is the hardest
to control and causes tangles. Take a few minutes
to wind the center pull balls – it makes
a world of difference in the finished yarn.
Take Me to Your Leader
Before you even begin, check your leader.
The easiest plying starts on a sturdy leader
with a loop at the end. I highly recommend
using crochet cotton. It wears like iron, handles
the constant twisting and untwisting well,
and makes a smooth start to your yarn. (It’s
even better than your handspun or commercial
knitting yarns.) You can find it cheaply in
the yarn section of most craft stores.
Cut a length of crochet
cotton approximately 3 feet long. Fold it in
half – you should
have one end with a loop and one end with two
tails. Pass the loop under the bobbin, and then
take the tail end up and over the bobbin and
through the loop. You just formed a slip knot;
cinch it down around the grooves in your bobbin.
(If you have a smooth bobbin, cinch it at the
end you prefer.) This slip knot will tighten
up when you place tension on the leader, keeping
it in place when you start to spin. Now form
a loop several inches long by knotting the two
tail ends (treat them as one string). You’re
ready to begin.
Your singles can be any
fiber and any weight, but both need to be spun
in the same direction. If you don’t have
suitable singles on hand, go spin some now.
It’s
much easier to work through the tutorial with
your hands on your wheel. Spin
up a small amount of fiber to ply and use as
a reference sample for later if you don’t
have the patience to fill your bobbins.
Let the Plying Begin
I use both hands to ply. This helps maintain
an even tension on both singles at all times.
Maintaining even tension is key to plying a
smooth yarn. My right hand is my forward hand,
but you can use this method if you use your
left as your forward hand – just do the
opposite of the pictures.
Place
your kate under your chair (or even farther
behind you if you prefer) with one single
on each side of your lap.
If you’re
working with center pull balls, place one
ball on each side of you.
Keep them even
with your thighs so you can deal with any
tangles that might arise.
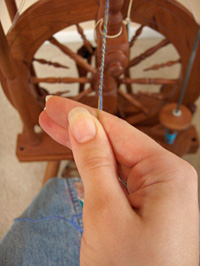
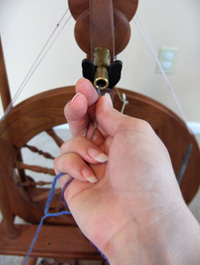
Pass about 1” of
each single through the leader loop. |
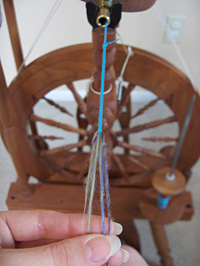 |
Start spinning in
the opposite direction the singles were
spun in.
Spin slowly for about
2 feet. |
 |
Then allow the yarn
to wind on.
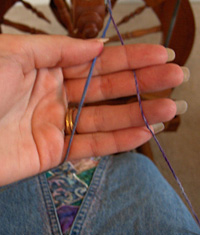
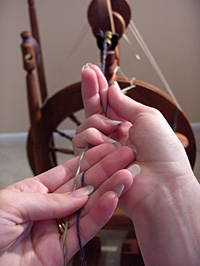
Place your singles in
your forward hand, across your palm, with
your pointer finger sticking straight up
into the air.
The right single should
flow past the right side of your pointer
finger and the left single should be to
the left of your pointer finger. |
 |
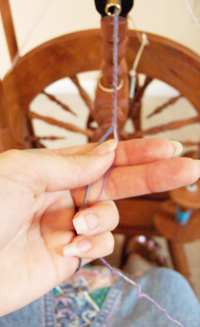
Now close
your fingers lightly around your hand.
Your
pinkie and ring finger should apply slight
pressure to the left single, while your
thumb applies pressure to the single by
pressing gently against your pointer finger.
If
your pinkie and ring finger also close
around the right single, that’s fine.)
This
is a side view of the forward hand closed. |
 |
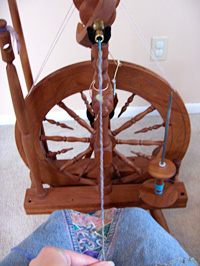
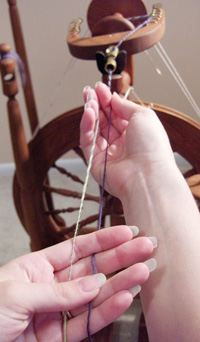
| Arrange your back
hand in the same way as your forward hand,
holding the singles just behind your forward
hand. |
 |
Depending
upon conditions, your back hand may not
apply much tension at all, but it will
prevent the singles from tangling together
as you ply.
It will also assist
the singles, should they get momentarily
stuck.
This happens more in
humid conditions, or if you are plying
from center pull balls. |
 |
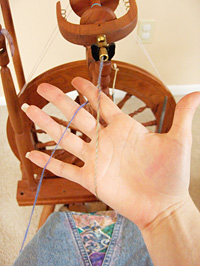
 To
ply, your back hand will stay stationary
over your lap. To
ply, your back hand will stay stationary
over your lap.
Your forward hand will
move back and then forward as you ply,
wind on, ply, and wind on.
Your forward hand should
start near the orifice, your back hand near
your waist.
Gently, with even pressure,
pull your forward hand back as you start
to treadle. |
 |
Your aim is to
coordinate the speed of your hand with
the amount of twist entering the yarn -
the smoother the better.
When your forward
hand reaches your back hand, pinch the
singles hard, so that no more twist enters
(keep treadling) and move your hand forward
so the yarn winds onto the bobbin.
Repeat
until you’ve plied your bobbin full. |
 |
As you get better at
plying, you may find that closing your fingers
around the yarn creates too much tension. This
is especially true if you’re working
with lightweight singles. Feel free to open
your hands, and only apply light pressure with
your pointer finger and the two adjacent fingers.
Holding It All Together
Twist
is what holds a spun yarn together. Technically
speaking, the friction and energy placed into
the yarn by twist is what holds all the fiber
together, but weíre really not going to
go there. I’ll hit the highlights of twist,
and if you’d like more info I highly recommend
the Big Book of Handspinning by Alden Amos. Whether
you love or hate his opinionated style, you won’t
lack for information on how twist influences
the final yarn.
What gauge is to knitting,
so twist is to yarn. The amount of twist you
put into a bunch of fibers is going to influence
its final length, tensile strength, durability,
and feel. With too little twist, your yarn
will lack the friction it needs to hold together.
Add too much and you’ll
find your skein to be a wiry, coiled, mess that
knits up as softly as wire.
Often twist is measured
as Twists Per Inch or TPI. To find a yarn’s TPI, simply count
the number of twists across a known length. It’s
better to measure over more than a single inch,
and divide to find the average TPI; just like
you measure the number of stitches across a 4
inch gauge swatch rather than over a single inch.
TPI is directly affected by how frequently you
treadle as you draft. The larger your whorl,
the fewer twists per inch you’ll add per
treadle. Most spinning wheels add more than a
single twist per treadle. You can increase
or decrease your TPI by speeding up or slowing
down the rate at which you treadle.
It’s really hard to count the number of
twists in a single by sight, and I have better
things to do with my time than squint at my yarn
as the minutes tick by. I suspect you do, too.
It’s far easier to pull out 18-24 inches
of freshly spun single, and ‘ply’ it
by allowing the single to twist back on itself.
Then simply count the number of ‘bumps’ in
the yarn over 2 or three inches. Each bump corresponds
to a single twist. Divide your total bumps by
your total inches, and you’ve successfully
measured the TPI of your yarn. Feel free to use
any unit of measure that’s familiar to
you. TPC or Twist Per Centimeter is just as useful
as TPI.
If all that counting is driving you batty, then
grab your protractor and check out this
article by Pippi.
You can use the self ply method to check the
twist angle, which is another way to measure
the amount of twist in your yarn.
Keep twist in mind as you spin your singles
and embark upon the adventure of plying. Spin
up several sample skeins, with different TPI.
Attach a tag, and place them in a notebook for
handy reference later. A little experimentation
with twist will make you a better spinner, and
give you more success in your hand spinning endeavors.
Finer Points
There are a few finer points to plying which
make the overall result much better. First
off, you need to control the amount of twist
going into your yarn. You may not ply the entire
skein in one sitting, and even if you do ply
all at once, there can be variations along
the length of the skein. Measuring the amount
of twist that goes into the yarn and keeping
notes is one of the best things you can do
for the quality of your yarn.
Keep your chair the same
distance from the wheel. Before you start spinning
in earnest, get comfy with enough room to ply
but not too much that you have to bend or stretch
to wind on. Very often you’ll sit slightly farther away
from your wheel while plying than you would while
spinning singles. Record this distance on your
note card, in case you don’t get it done
all in one shot. You don’t need to measure
with a tape, just jot down a good estimate of
the distance so you can set it up again if need
be. Resist the urge to pull out really
long lengths of singles while plying. Instead
aim to pull out comfortable lengths of a consistent
distance. The yarn will be more even and you’ll
tire less quickly.
Setting the Twist
Setting the twist is an important step in spinning
that often gets overlooked. It improves the
yarn by deactivating the twist energy in the
yarn from spinning. Deactivating the twist
will help prevent twists and tangles of an
active yarn during ball winding and knitting.
It also reveals the true nature of the yarn,
and you can avoid surprises after your finished
piece is washed. You must set the twist before
determining whether or not you have a truly
balanced skein. Unset yarn behaves differently
than set yarn: always set your twist before
evaluating a skein for balance.
To set the twist: tie
your hank loosely with waste yarn or string
in 3 or 4 places. Fill up a sink or large bowl
with hot water: as hot as you can get from
the tap. Submerge your skein, pressing out
any air bubbles. Make sure it’s
thoroughly wet. Leave your skein in the
water for 5 minutes or longer. (I’ve been
known to forget mine for several hours; it really
doesn’t make a difference.) Gently wring
out your skein and hang it to dry. Your twist
is set and you’re done! Enjoy knitting
up your beautifully plied yarn.
|