|


![Read exactly what FREE PATTERNS really means...respect our designers and authors rights [and thank you]](../images/OFFnavLEGAL.gif)

 
|
|
 <click
for more! <click
for more!
 
|

 by Mareike Sattler by Mareike Sattler

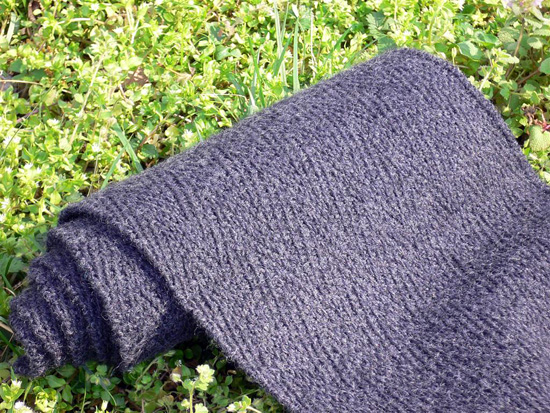
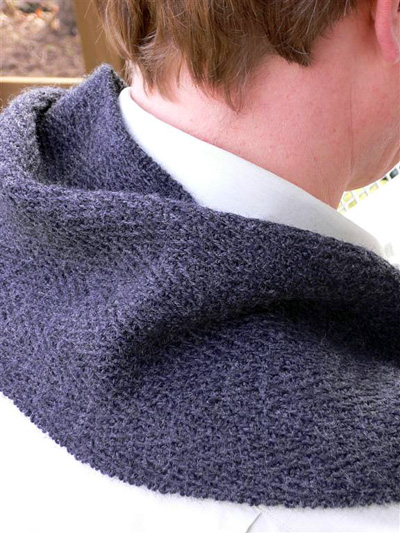
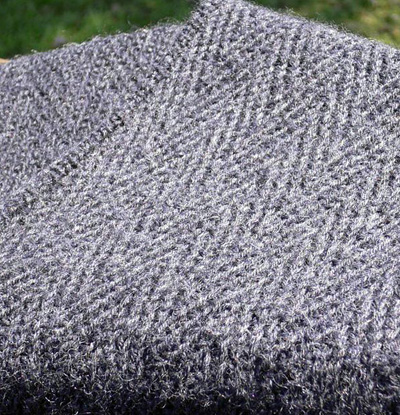
When I offered to knit a scarf for a certain man in my life not long ago, my proposal was met with a weary sigh of cautious expectations. Realizing that not everyone may be as excited as I am about handcrafted articles of clothing but confident in my talent as a knitter, I set out to think up a design that would not look hand knitted at all, and up came Henry. A subtle slip-stitch herringbone pattern on a stockinette background creates a beautiful fabric that appears woven rather than knit, while the lengthwise set-up of the scarf differs from the usual bottom-to-top knit-purl shawl construction. The result is a classic scarf with clean lines and a sophisticated design suitable for anybody, but especially for those who may not necessarily choose to sport a hand knitted item. A larger version of this scarf would also make a fine baby blanket or throw.
The scarf is worked lengthwise. The cast-on and cast-off
rows form the side edges of the finished scarf and are worked as a
round cast-on/bind-off. A three-stitch slipped-stitch edging makes
up the bottom and top border of the finished scarf. The difficulty
of the main pattern is on the mellow side, set-up and finishing require
a little more time and attention, and are therefore tangy. |  model: Ted Fischer photos: Mareike Sattler model: Ted Fischer photos: Mareike Sattler
| | | |
|
| One |
Length: 60 inches
Width: 8 inches | |
|
Jaeger Matchmaker Merino 4-ply [100% Merino Wool; 200yd/183m per 50g ball]; color: Anthracite; 4 balls
1 US #2/2.75mm circular needle, 32 inches or longer
1 US #3/3.25mm circular needle, 32 inches or longer
Approx. 4 yd smooth waste yarn of similar gauge/weight to working yarn, in contrasting color
Tapestry needle | |
|
| 28 sts/36 rows= 4 inches in stockinette stitch using US#3/3.25mm needle | |
|
[Knitty's list of standard abbreviations and techniques can be found here] |
If substituting yarn, choose a fingering
or sock-weight yarn, as the stitch pattern produces a fairly dense
fabric. You're trying to create a soft fabric that drapes well with
just enough substance to hold its own shape and show off the pattern.
Because
of the large number of stitches on the needle, check your work often
to be sure the stitch pattern is lining up correctly. They’re long rows to work backwards if you make a mistake!
If changing the number of sts in the scarf (to make the scarf longer or shorter), be sure you have a multiple of 4 sts. When casting on using the waste yarn, CO half of the desired number of sts, plus 1.
The stitch pattern, Woven Transverse Herringbone, is taken from Barbara
Walker's Treasury of Knitting Patterns, pg. 96.
Wyif: With yarn held to front of work
Wyib: With yarn held to back of work |
|
|
 Set-up Rows: Set-up Rows:
Using waste yarn and smaller needle, CO 227 sts.
Using working yarn, work as follows:
Row
1 [WS]: K1, [k1, yo] to last st, k1.
Row 2 [RS]: [Sl 1 wyif, k1] to end. [452
sts]
Row 3 [WS]: Sl 1 wyif, k1, sl 1 wyif, p to last 3 sts, sl 1 wyif, k1, sl 1 wyif.
Scarf Body:
Using larger needle, proceed as follows:
Row
1 [RS]: K1, sl 1 wyif, k3, [sl 2 wyif, k2] to last 3 sts, k1, sl 1 wyif, k1.
Row 2 [WS]: Sl 1 wyif, k1, sl 1 wyif, p1, [sl 2 wyib, p2] to last 4 sts, p1, sl 1 wyif, k1, sl 1 wyif.
Row 3 [RS]: K1, sl 1 wyif, k1, [sl 2 wyif, k2] to last 5 sts, sl 2 wyif, k1, sl 1 wyif, k1.
Row 4 [WS]: Sl 1 wyif, k1, sl 1 wyif, p3, [sl 2 wyib,
p2] to last 6 sts, sl
2 wyib, p1, sl 1 wyif, k1, sl 1 wyif.
Rows 5-12: Repeat Rows 1-4 twice more.
Row 13 [RS]: Work as for Row 3.
Row 14 [WS]: Work as for Row 2.
Row 15 [RS]: Work as for Row 1.
Row 16 [WS]: Work as for Row 4.
Rows 17-24: Repeat Rows 13-16 twice more.
Repeat Rows 1-24 six times more.
Ending Rows:
Using smaller needle, proceed as follows:
Row
1 [RS]: K1, sl 1 wyif, k to last 2 sts, sl 1 wyif, k1.
Row
2 [WS]: [Sl 1 wyif, k1] to end.
Row
3 [RS]: [Sl 1 wyif, k1] to end.
 Binding Off: Binding Off:
The scarf is bound off using a tubular bind off. Break the yarn, leaving a tail of a comfortable working length; approx. 2yd is recommended. You will need to join a new length of yarn at some point during the bind-off, but a tail of sufficient length to bind off all sts would be cumbersome and prone to tangling. Thread the yarn tail on the tapestry needle.
Read through the following steps before
beginning. Turn needle to have WS facing. There are
two types of sts on the needle: purl sts and knit sts. The
purl sts are the knit sts from previous row. The knit sts
are the slipped sts from previous row. The first st on the
needle as you begin should be a purl sts followed by a knit
st.
Step 1: Insert tapestry needle from right to left
through first 2 sts on left needle (a purl st and a knit
st).
Drop sts on tapestry needle from left needle and draw yarn
through.
Step 2: Next st on left needle should be a purl
st. Insert tapestry needle through slipped st from left to
right and draw yarn through. Do not drop from left needle.
Step 3: Insert tapestry needle from right to left through last st dropped from left needle (at end of Step 1), then through second st on left needle (a knit st). Draw yarn through; do not drop any sts from left needle.
Step 4: Insert tapestry needle from right to left through first st on left needle. Draw yarn through and drop 2 sts from left needle.
Repeat Steps
2-4 until all sts have been bound off. |
|
Carefully
remove waste yarn from CO edge. Work will not unravel;
the tubular CO edge will match the BO edge.
Weave in all ends.
Soak scarf in soapy water, rinse carefully and squeeze
gently to remove excess water.
Stretch fabric out on a flat surface to desired dimensions.
I did not use pins for blocking, though you may wish
to do so.
Allow to dry completely. The stitch pattern will even
out beautifully.
| |
 Mareike learned to knit from her mom at a young age back in Germany. After moving to the South of the United States, where the climate does not inspire the design and use of woolen accessories, knitting gave way to other interests, but not for long. Mareike learned to knit from her mom at a young age back in Germany. After moving to the South of the United States, where the climate does not inspire the design and use of woolen accessories, knitting gave way to other interests, but not for long.
Mareike feels uncomfortable without a pair of
needles in her hands. |
| Pattern & images © 2007 by
Mareike Sattler.
Contact Mareike |
|
|
|
|
|