BRIOCHE
STITCH TERMINLOGY & ABBREVIATIONS
Brk (Brioche Knit - also known as a bark): Knit the stitch that was slipped in the previous row together with its yarnover (see yos, below).
Yos (Yarnover, Slip 1 purlwise): Bring the
working yarn between the needles to the front of the work. Slip the next stitch purlwise. Bring the yarn over the right needle to the back of the work, ready to work the next stitch. This paired slipped stitch and yarnover are counted as 1 stitch.
Yos2 (Yarnover, slip 2 purlwise): Bring the
working yarn between the needles to the front of the work. Slip the next 2 stitches purlwise. Bring the yarn over the right needle to the back of the work, ready to work the next stitch. This counts as 2 stitches.
Brk2tog (Bark 2 stitches together):
If the next 2 stitches on the left needle are a yos and a brk, knit these 2 stitches together, including the yarnover from the yos.
If the next 2 stitches on the left needle are a yos2, reach the right needle under the yarnover and knit the 2 stitches together without knitting the yo.
Brssk (Slip 2 stitches knitwise, bark them together):
If the next 2 stitches on the left needle are a brk and a yos, slip the brk, then the yo from the yos, then the slipped st from the yos, knitwise to the right needle. Insert the left needle, from left to right, into the fronts of these 3 loops and knit them together.
If the next 2 stitches on the left needle are a yos2, reach the right needle under the yarnover and ssk the 2 stitches together without knitting the yo.
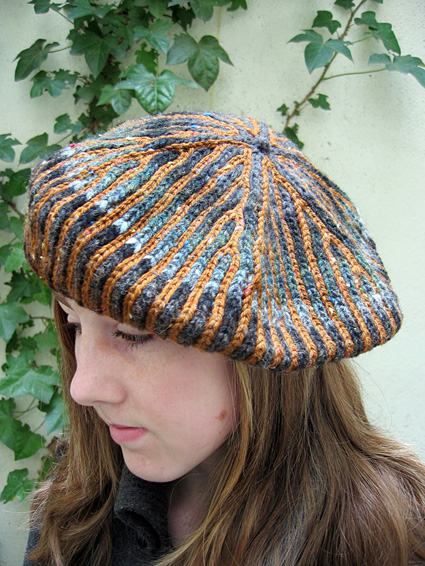
TIPS FOR MAKING THE BERET
The first few rounds can be tedious to work because you have so few stitches. Do your best to plow through them because it quickly gets easier and very enjoyable.
Counting rounds: Each round is worked twice. Half of the stitches are worked using MC the first time the round is worked, and the other half (the stitches that were slipped the first time) are worked using CC the second time the round is worked. When counting rounds, count the columns of MC stitches.
Don't cross the strands of yarn when changing colors at the beginning
of a round (as you would if working stranded colorwork).
At the end of a MC round, your last stitch will be a yos. Bring the strand of MC between the needles to the front of the work after working the yarnover, and let it hang there. Pick up the strand of CC hanging at back of the work, and work next round.
The last stitch at the end of a CC round will be a bark stitch. Since the MC is hanging to the front, you should be able to maintain the MC yo to work this last brk. Then, keeping the CC strand at the back of the work, pick up MC and bring it between the needles to the back of the work, ready to work the next round.
If at some point you need to frog, unravel as needed then pick up the stitches using a smaller circular needle than the one you have been working with. This will make the stitches easier to pick up, and you can work the next round off of this needle onto your working needle.
I-Cord
Using a double-point needle, CO required number of sts.
Next Row: Instead of turning work around to work back on the WS, slide all sts to other end of needle, switch needle back to your left hand, bring yarn around back of work, and start knitting the sts again. I-Cord is worked with the RS facing at all times.
Repeat this row to form I-cord. After a few rows, work will begin to form a tube.
Notes on Yarn Substitution:
If you use other yarns for this beret, you will need to pay special attention to the measurements.
Make sure you use needles a few sizes smaller than the yarn calls for. For example, the yarns I used called for a size US #7/4.5mm needle, and I used a US #4/3.5mm needle.
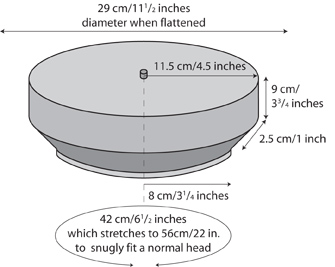
If using a thinner yarn, you will need to work more rounds (including
increase rounds), until you have a radius of approx. 11.5cm/4.5
inches. You will also need to work more rounds afer the increases
are complete, to build up the height of the hat. You will need
to measure your gauge and to calculate the number of decreases
needed to make the beret fit snugly around your head.
Fewer rounds and increases will be needed if you are using thicker yarns, but the top should be worked to the same radius. |
Beret is worked in the round from the center out, from the top down to the brim.
Switch to circular needle when you have enough sts to fit comfortably on needle.
Using double-point needle and CC, CO 4 sts.
Work 3 rounds in I-Cord.
Next Round: Continuing in I-Cord, [k1, yo, k1] in each st. 12 sts.
Round 1 [MC]: [K1, yos] to end. Sew MC yarn tail into I-Cord nub to keep it from getting in the way.
Divide sts between 3 double-point needles to begin working in the
round.
In the next round, the brioche pattern will begin. Place a safety pin or
split ring marker in work to indicate beginning of round.
Round
1 [CC]: [Yos, brk] to end. There are still 12 sts.
Round 2 [MC]: [(Brk, yo, brk) into next st, yos] to
end. 24 sts.
Round
2 [CC]: [Yos, k1, yos, brk] to end.
Round 3 [MC]: [Brk, yos] to end.
Round
3 [CC]: [Yos, brk] to end.
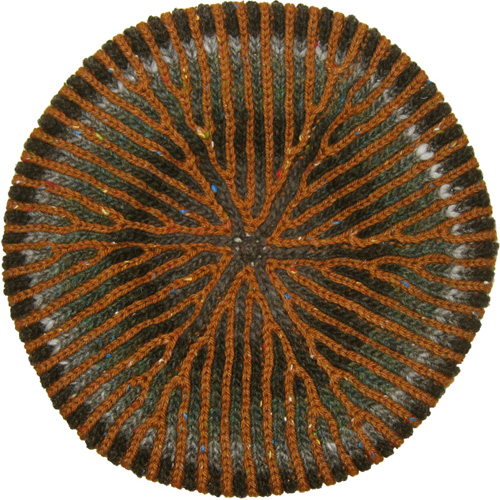
Top of beret is composed of 6 wedge-shaped sections, each of which
currently has 4 sts. In the next round, markers will be placed between
sections.
Round 4 [MC]: [Brk, yos, (brk, yo, brk) into next st,
yos, place marker] to end. 36 sts.
Round
4 [CC]: [Yos, brk, yos, k1, yos, brk] to end.
Round 5: Work as for Round 3.
Round 6 [MC]: [(Brk, yo, brk) into next st, yos, (brk,
yos) to marker] to end. 48 sts.
Round
6 [CC]: [Yos, k1, (yos, brk) to marker] to end.
Round 7: Work as for Round 3.
Round 8 [MC]: [(Brk, yos) 3 times, (brk, yo, brk) into
next st, yos] to end. 60 sts.
Round
8 [CC]: [(Yos, brk) 3 times, yos, k1, yos, brk] to end.
Rounds 9 & 10: Work as for Round
3.
Round 11 [MC]: [(Brk, yo, brk) into next st, yos, (brk,
yos) to marker] to end. 72 sts.
Round
11 [CC]: [Yos, k1, (yos, brk) to marker] to end.
Rounds 12 & 13: Work as for Round
3.
Round 14 [MC]: [(Brk, yos) 5 times, (brk, yo, brk) into
next st, yos] to end. 84 sts.
Round
14 [CC]: [(Yos, brk) 5 times, yos, k1, yos, brk] to end.
Rounds 15-16: Work as for Round
3.
Round 17 [MC]: [(Brk, yo, brk) into next st, yos, (brk,
yos) to marker] to end. 96 sts.
Round
17 [CC]: [Yos, k1, (yos, brk) to marker] to end.
Rounds 18-19: Work as for Round
3.
Round 20 [MC]: [(Brk, yos) 7 times, (brk, yo, brk) into
next st, yos] to end. 108 sts.
Round
20 [CC]: [(Yos, brk) 7 times, yos, k1, yos, brk] to end.
Rounds 21-22: Work as for Round
3.
Round 23 [MC]: [(Brk, yo, brk) into next st, yos, (brk,
yos) to marker] to end. 120 sts.
Round
23 [CC]: [Yos, k1, (yos, brk) to marker] to end.
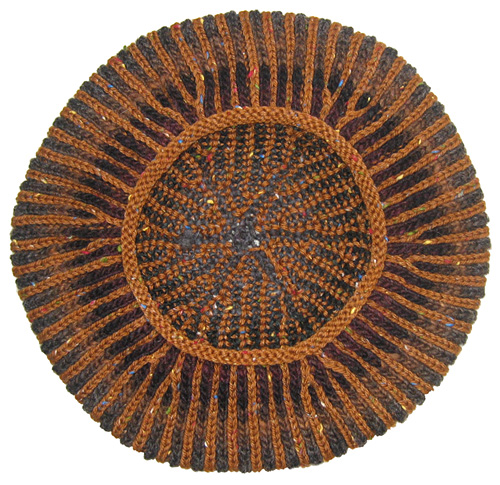
Increases are complete. From center, work should measure 4.5-5 inches.
Rounds 24-43: Work as for Round 3.
Round 44 [MC]: [Brk, brk2tog, (yos, brk) 6 times, yos,
brssk, brk, yos] to end. 108 sts.
Round
44 [CC]: [Yos2, (brk, yos) 6 times, brk, yos2, brk] to end.
Round 45 [MC]: [Brk2tog, (yos, brk) 6 times, yos, brssk,
yos] to end. 96 sts.
Round
45 [CC]: [Yos, brk] to end.
Rounds
46-47: Work as for Round 3.
Break CC.
Round 48 [MC]: [Brk, k1] to end.
K 4 rounds.
Loosely BO all sts.
|