Grandma Knitty Home
Knitty®: little purls of wisdomKnitty®: little purls of wisdom
sponsor

Find exactly what you're looking for

spacer

The answer to your question about Knitty is probably here!

spacer

Take home something Knitty today

spacer

Advertise with Knitty

spacer

Get your cool stuff reviewed in Knitty

spacer

Full information about how to get published in Knitty

spacer

Read exactly what FREE PATTERNS really means...respect our designers and authors rights [and thank you]

spacer

Read exactly what FREE PATTERNS really means...respect our designers and authors rights [and thank you]

sidebarwhiterule

Knitty is produced in a pro-rabbit environment

spacer

© Knitty 2002-2008. All rights reserved. Unauthorized reproduction prohibited. This means you.spacer
 

Patterns<click for more!
Print With Images Print Without Images
upperLeft upperRight
lowerLeft lowerRight
Pink Needles
Got Yarn
TITLEmaple
mapleBEAUTY
spacer photos: James Todhunter, Susan Todhunter

Tangy

I’d just finished a big, complicated intarsia project and wanted to relax! There was some yarn left over from the big project – two pretty Cascade 220 greens (great for felting) and a gorgeous Malabrigo in rusty tones. The Malabrigo was just the shade of a maple leaf in late autumn… "Hmm," I thought, "I wonder how that Malabrigo would felt…"

The bag requires no sewing; pieces are joined as they are worked. The bag’s strap (which also forms the sides and base) is worked first, circularly. Stitches are picked up from the edges of the strap as the front and back of the bag are worked. The flap is formed as a continuation of the back. The maple leaf is worked in intarsia and embellished with backstitching. The bag’s closure is added after felting.

SIZE
One
 
FINISHED MEASUREMENTS
Note: Measurements taken after felting. Your bag’s measurements may vary slightly, as differences between washing machines will affect felting results.
Width at top of bag: 7 inches
Width at base of bag: 8 inches
Height: 6.5 inches
Depth: 1.5 inches
Strap length: 22 inches
 
MATERIALS
Cascade 220 [100% Peruvian Highland Wool; 220yd/200m per 3.5oz/100g skein]
spacer [MC] #9407; 1 skein
spacer [CC1] #9338; 1 skein

spacer [CC2] Malabrigo Merino Worsted [100% Merino Wool; 216yd/197m per 3.5oz/100g skein]; color: #161 Rich Chocolate; 1 skein

Recommended needle size:
spacer 1 US #8/5mm circular needle, 24 or 32 inches long
[always use a needle size that gives you the gauge listed below -- every knitter's gauge is unique]

spacer 2 safety pins
spacer 2 stitch markers
spacer Tapestry needle

spacer Optional closure:
spacer Velcro and fabric glue
OR
Large sew-on snap, sewing needle and thread to match MC
 
GAUGE
16 stitches/24 rows = 4 inches in stockinette stitch before felting
 
PATTERN NOTES
[Knitty's list of standard abbreviations and techniques can be found here]

MapleCHTAll slipped sts should be slipped purlwise.

Attach last st: When directed to attach last st, use left needle to pick up 1 st from edge of strap/gusset piece, then k this st together with last st through back loops.

Intarsia
This pattern involves the Intarsia method of color work. When working in this way, different sections of each row are worked with different colors. Use a separate length of yarn for each area of color.
When beginning with a new color, tie the strand of the new color in a slip knot around the strand of the old color. Slide the knot up close to the needle, then proceed with the new color.
When switching from one color to the next within each row, drop the color you have been knitting with, and bring the yarn for the next color up under the yarn of the previous color before you continue knitting. This will twist the 2 yarns around each other. It is very important to do this; if you do not wrap the yarns in this way, the areas of color will not be joined, and you will have holes in your work.

Instructions for Backstitch can be found here.

 
DIRECTIONS
mapleHANGINGblank
STRAP AND GUSSET
Using CC1, CO 208 sts. Place marker and join to begin working in the round, being careful not to twist. After the first round or two have been worked, mark beginning of round on CO edge using safety pin.
Round 1: K all sts.
Round 2: P all sts.
Repeat these 2 rounds 6 times more.

Loosely BO all sts. Mark beginning of round on BO edge using safety pin.

FRONT

**On CO edge of strap/gusset piece, count 22 CO sts to the right of the marked beginning of the round. Beginning from this point, using MC and with RS facing, pick up and k 44 sts along CO edge (this will be 22 sts before and 22 sts after marked beginning of round). Remove safety pin.

Next Row [WS]: K to last st, attach last st (see Pattern Notes).
Repeat this row 5 times more (on both RS and WS rows). 3 sts are attached at each side of work.

Next Row [WS]: K3, p to last 3 sts, k2, attach last st.
Next Row [RS]: K to last st, attach last st.
These 2 rows set pattern for front.

Work 9 more rows in pattern, ending with a WS row.
Decrease Row [RS]: K3, ssk, k to last 5 sts, k2tog, k2, attach last st.
Repeat these 10 rows 4 times more. 34 sts.**

Work 5 rows in garter st, attaching last st of every row.
BO all sts.

mapleBACKPREFELT

BACK
Working along BO edge of strap/gusset, work from ** to ** as for front.
Work 4 more rows in pattern, attaching last st of each row.

FLAP
Note: From this point, do not attach the last st of each row.

Row 1 [WS]: Sl 1, k1, kfb, p to last 3 sts, k1, kfb, k1. 36 sts.
Row 2 [RS]: Sl 1, k to end.
Row 3 [WS]: Sl 1, k3, p to last 4 sts, k4.
Rows 2 and 3 set pattern for flap.
Work 12 more rows in pattern.

MapleDiagramNote: See Pattern Notes re. the Intarsia method of color work.

Next Row [RS]: Sl 1, k7, place marker, work Row 1 of chart over next 22 sts, place marker, k to end.
Continue in pattern, working chart over 22 sts betwen markers, until Row 27 of chart is complete.

Work 3 more rows in pattern, removing markers and ending with a WS row.

Next Row [RS]: Sl 1, k3, ssk, k to last 6 sts, k2tog, k4.
Next Row [WS]: Sl 1, k to end.
Repeat these 2 rows twice more. BO remaining 30 sts.

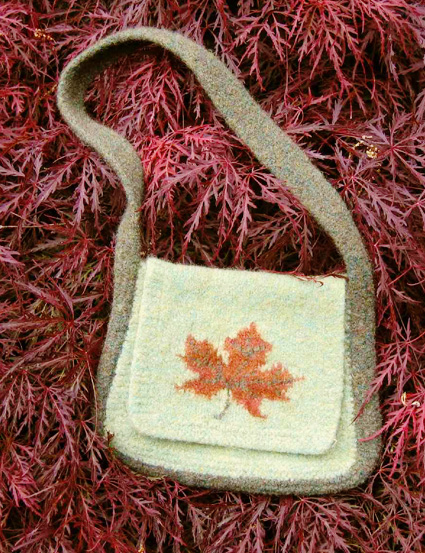
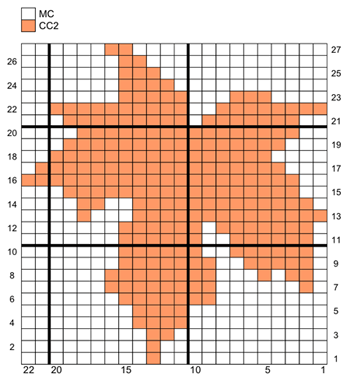
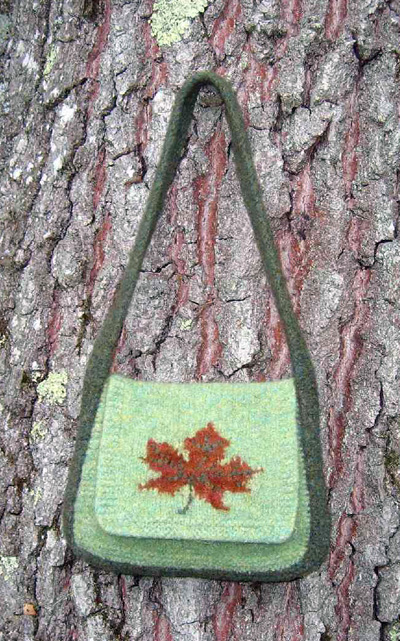
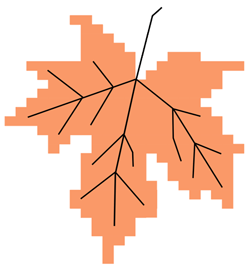
Using Backstitch, with CC1 and tapestry needle, embroider leaf detail and stem, using diagram at right --> and photos as guides.

 
FINISHING
Felt bag: Place bag in zippered pillowcase to protect washing machine mechanism from becoming entangled in wool fibers. Set machine to shortest regular cycle (about 4 minutes), hot wash/cold rinse. Add two towels or a pair of jeans and let machine go through entire wash and rinse cycle. Remove bag and check size and density. If necessary, run bag through cycle again. Remove bag, stretch, smooth and shape as necessary. Lay flat to dry, and allow to dry completely.

If desired, attach velcro or snap to bag, attaching one side to underside of flap and other side to bag front.

 
ABOUT THE DESIGNER
designernameBlank
Susan designs in Metrowest Massachusetts and knits and buys yarn everywhere she can. Her background is in art and education. She enjoys designing knitted garments with pieces than join themselves as they are worked, and don’t require sewing to finish.