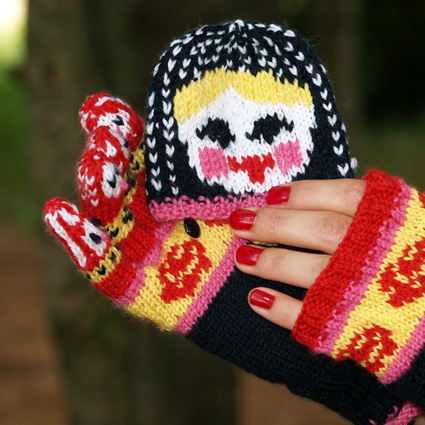
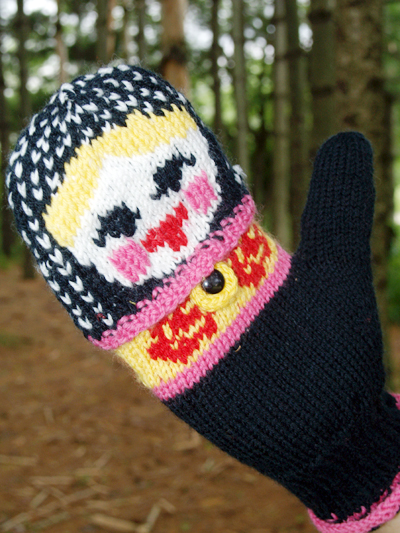
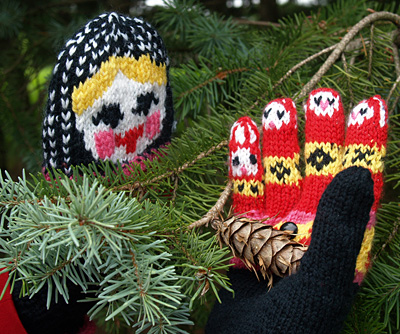
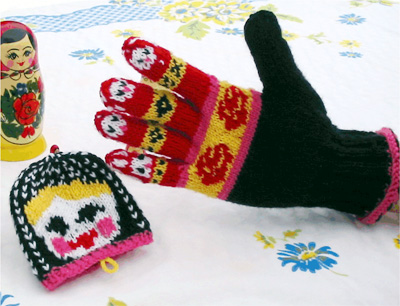
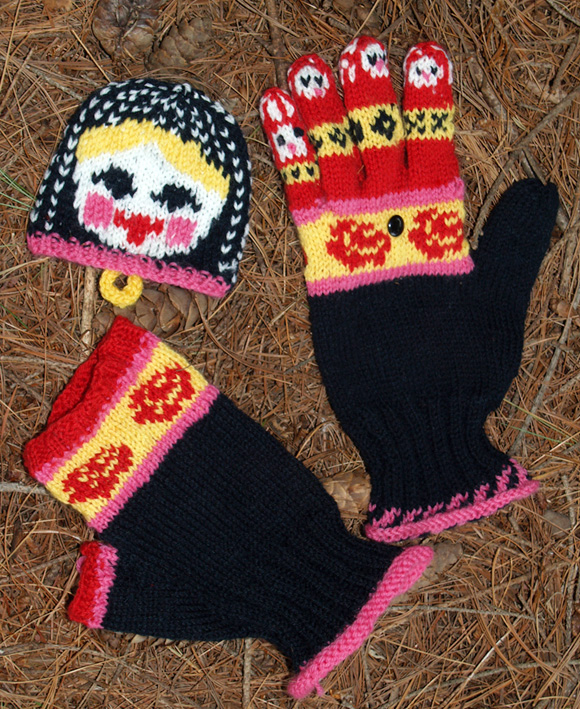
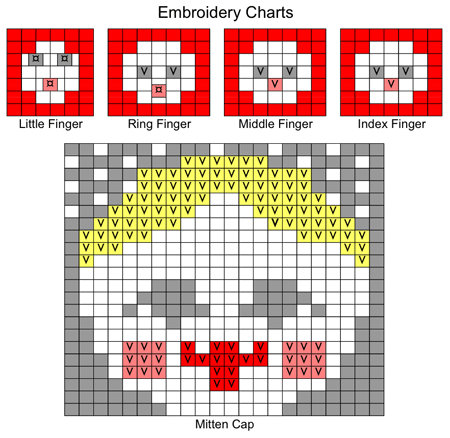
MITTEN CAP (Make 2)
Using CC2, CO 56 sts. Divide sts between needles and join to begin working in the round, being careful not to twist.
Work 3 rounds in 1x1 Rib. Break CC2.
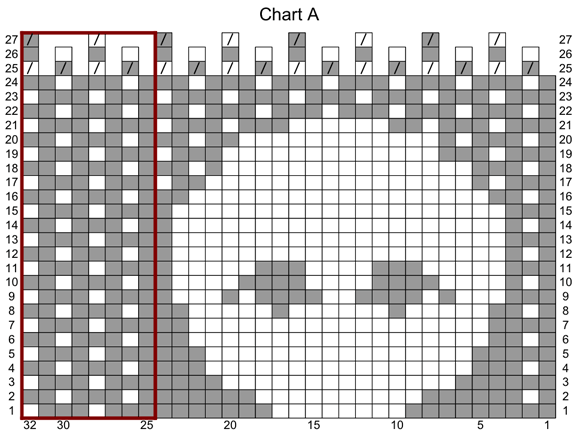
Work Rounds 1-27 of Chart A, decreasing as shown in Rounds 25 and 27.
Break yarn and draw through remaining 14 sts, pull to close. Thread yarn once more through last round of sts, then weave in ends securely.
RIGHT GLOVE
Cuff:
Using CC2, CO 52 sts. Divide sts between needles and join to begin working in the round, being careful not to twist.
K 2 rounds.
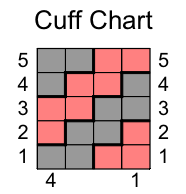
Work Rounds 1-5 of Cuff Chart.
Break CC2.
Using MC, work 18 rounds in 2x2 Rib.
Thumb Gusset:
Round 1: M1, place marker, [k16, m1] twice, k17. 55 sts.
Rounds 2-3: K all sts.
Round 4: M1, k to marker, m1, slip marker, k to end of round.
Repeat Rounds 2-4 ten times more. 77 sts.
Slip the 23 sts of the thumb gusset (sts between beginning of round and marker) to waste yarn, removing marker. Using Backward Loop method, CO 2 sts and join to continue working in the round. 56 sts.
K 1 round. Break MC.
Using CC2, k 3 rounds. Break CC2.
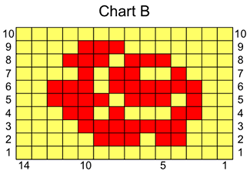
Join CC4 and work Rounds 1-10 of Chart B; chart will be repeated 4 times in each round.
Break CC4.
Using CC2, k 2 rounds.
Little Finger:
Next Round: K21 and place these sts on waste yarn; k next 13 sts; place remaining 22 sts on waste yarn. Using Backward Loop method, CO 1 st and join to continue working in the round, positioning needles so that beginning of round is after CO st. 14 sts. Break CC2.
Using CC3, k 4 rounds.
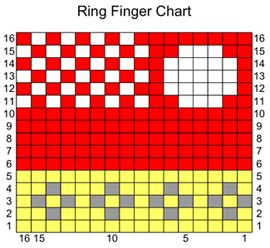
Work Rounds 1-16 of Little Finger Chart.
Next Round: Using CC3, [k2tog] seven times. Break yarn, draw through remaining 7 sts and pull tight.
Continue Hand:
Place 43 held sts on needles. Using CC2, pick up and k 1 st in CO st at base of little finger; k22 (to side of hand). 44 sts. Break CC2.
Join CC3 and k 1 round.
Ring Finger:
Next Round: K14 and place these sts on waste yarn; k next 15 sts; place remaining 15 sts on waste yarn. Using Backward Loop method, CO 1 st and join to continue working in the round, positioning needles so that beginning of round is after CO st. 16 sts.
K 7 rounds.
Work Rounds 1-16 of Ring Finger Chart.
Next Round: Using CC3, [k2tog] eight times. Break yarn, draw through remaining 8 sts and pull tight.
Middle Finger:
Place 7 held sts next to Ring Finger on palm of glove on one needle, and 8 sts from back of hand on another needle. 14 sts remain on hold. Join CC3 to palm sts.
Next Round: K7, pick up and k 1 st in CO st at base of finger, k8; using Backward Loop method, CO 2 sts and join to continue working in the round, positioning needles so that beginning of round is after CO sts. 18 sts.
K 8 rounds.
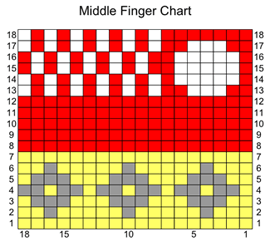
Work Rounds 1-18 of MIddle Finger Chart.
Next Round: Using CC3, [k2tog] nine times. Break yarn, draw through remaining 9 sts and pull tight.
Index Finger:
Place remaining 14 held sts on needles. Using CC3, pick up and k 2 sts at base of Middle Finger, then k first 6 held sts; this point will be beginning of round. Divide sts between needles. 16 sts.
K 8 rounds.
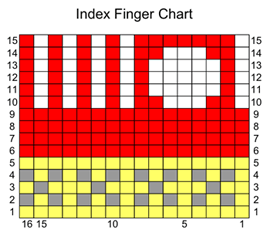
Work Rounds 1-15 of Index Finger Chart.
Next Round: Using CC3, [k2tog] eight times. Break yarn, draw through remaining 8 sts and pull tight.
Thumb:
Place 23 held sts of thumb gusset on sts.
Round 1: Using MC, pick up and k 2 sts in CO edge at top of thumb gusset; k23. 25 sts.
Round 2: K2tog, k23. 24 sts.
K 14 rounds, or until thumb reaches base of wearer's thumbnail.
Next Round: [K6, k2tog] three times. 21 sts.
K 5 rounds, or until thumb reaches just past tip of wearer's thumb.
Next Round: [K2tog] twelve times.
Next Round: [K2tog] six times. Break yarn, draw through remaining 6 sts and pull tight.
LEFT GLOVE
Work Cuff as for right glove.
Thumb Gusset:
Round 1: K8, m1, k16, place marker, m1, place marker, k17, m1, k8. 55 sts.
Rounds 2-3: K all sts.
Round 4: K to marker, slip marker, m1, k to next marker, m1, slip marker, k to end of round.
Repeat Rounds 2-4 ten times more. 77 sts.
Next Round: K to marker, slip the 23 gusset sts of the thumb gusset (sts between markers) to waste yarn, removing markers; using Backward Loop method, CO 2 sts and join to continue working in the round, k to end of round. 56 sts. Break MC.
Using CC2, k 3 rounds. Break CC2.
Join CC4 and work Rounds 1-10 of Chart B; chart will be repeated 4 times in each round. Break CC4.
Using CC2, k 2 rounds.
Little Finger:
Next Round: K7, place next 43 sts on waste yarn; using Backward Loop method, CO 1 st and join to continue working in the round, k6. 14 sts. Break CC2.
Using CC3, k 4 rounds.
Work Rounds 1-16 of Little Finger Chart.
Next Round: Using CC3, [k2tog] seven times. Break yarn, draw through remaining 7 sts and pull tight.
Continue Hand:
Place 43 held sts on needles. Using CC2, pick up and k 1 st in CO st at base of little finger; k all sts. 44 sts. Break CC2. Picked-up st is first st of round.
Join CC3 and k 1 round.
Ring Finger:
Next Round: K8, place next 29 sts on waste yarn; using Backward Loop method, CO 1 st and join to continue working in the round, k7. 16 sts. Position needles so that beginning of round is after picked-up st.
K 7 rounds.
Work Rounds 1-16 of Ring Finger Chart.
Next Round: Using CC3, [k2tog] eight times. Break yarn, draw through remaining 8 sts and pull tight.
Middle Finger:
Place 7 held sts next to Ring Finger on palm of glove on one needle, and 8 sts from back of hand on another needle. 14 sts remain on hold.
Next Round: Using CC3, pick up and k 1 st in CO st at base of finger, k7; using Backward Loop method, CO 2 sts and join to continue working in the round, k8. 18 sts. Position needles so that beginning of round is after picked-up sts.
K 8 rounds.
Work Rounds 1-18 of Middle Finger Chart.
Next Round: Using CC3, [k2tog] nine times. Break yarn, draw through remaining 9 sts and pull tight.
Index Finger:
Place remaining 14 held sts on needles.
Next Round: Using CC3, pick up and k 2 sts at base of Middle Finger, k14. 16 sts. Position needles so that beginning of round is at center of picked-up sts.
K 8 rounds.
Work Rounds 1-15 of Index Finger Chart.
Next Round: Using CC3, [k2tog] eight times. Break yarn, draw through remaining 8 sts and pull tight.
Thumb:
Work Thumb as for right glove.
FINGERLESS GLOVES
For each hand, work as for Gloves through completion of Chart B.
Using CC2, k 3 rounds. Break CC2.
Using CC3, work 6 rounds in 2x2 Rib. BO all sts loosely in pattern.
Thumb:
Place 23 held sts of thumb gusset on sts.
Round 1: Using CC2, pick up and k 2 sts in CO edge at top of thumb gusset; k23. 25 sts.
Round 2: K2tog, k23. 24 sts.
Round 3: K all sts. Break CC2.
Using CC3, work 6 rounds in 1x1 Rib. BO all sts loosely in pattern.
|