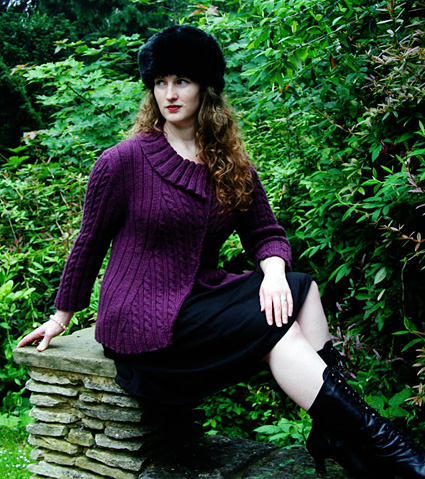
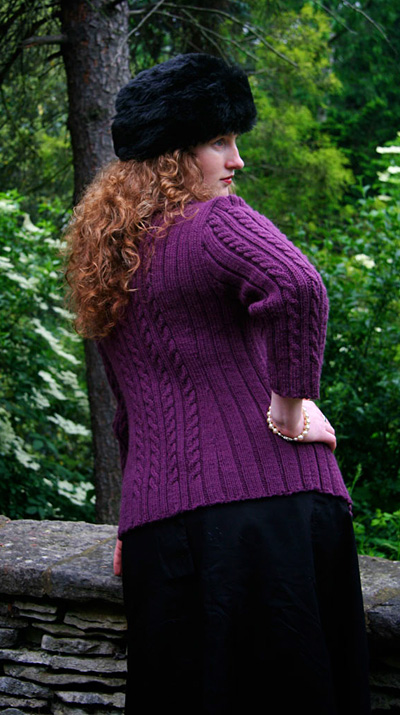
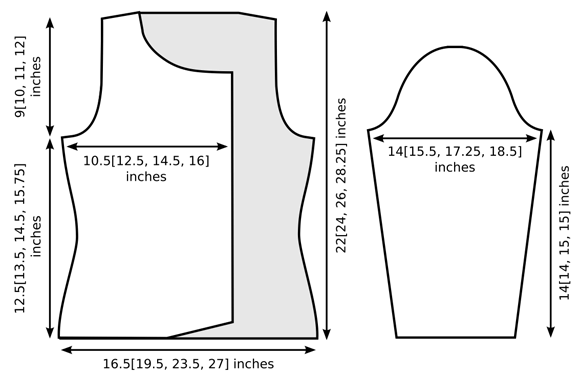
BACK
Using straight needles, CO 88[104, 122, 140] sts.
Size A Only:
Set-up Row [WS]: P4, [k1, p3] 4 times, k1, p1, place marker, p3, [k2, p4, k2, p2] 4 times, p1, place marker, p1, [k1, p3] 4 times, k1, p4.
Size B Only:
Set-up Row [WS]: P3, [k2, p4] 4 times, k2, p1, place marker, p3, [k2, p4, k2, p2] 4 times, p1, place marker, p1, [k2, p4] 4 times, k2, p3.
Size C Only:
Set-up Row [WS]: P3, [k3, p5] 4 times, k3, p1, place marker, p3, [k2, p4, k2, p2] 4 times, p1, place marker, p1, [k3, p5] 4 times, k3, p3.
Size D Only:
Set-up Row [WS]: P3, [k2, p4] 7 times, k2, p1, place marker, p3, [k2, p4, k2, p2] 4 times, p1, place marker, p1, [k2, p4] 7 times, k2, p3.
All Sizes:
Set-up Row establishes rib pattern for Back.
Work 14 more rows in pattern, ending with a WS row. From this point, begin working Back Cable Pattern between markers.
Note: For size B only, waist shaping and cable pattern both begin on Row 15.
Work 10[0, 4, 9] more rows in pattern. 25[15, 19, 24] rows have been worked.
Shape Waist:
Size D Only:
Next Row [WS]: Work 36 sts in pattern (to 12 sts before beginning of cable panel), place marker, work 68 sts in pattern (to 12 sts past end of cable panel), place marker, work in pattern to end.
All Sizes:
Waist Decrease Row [RS]: Work in pattern to 2 sts before first marker, k2tog, work in pattern to last marker, ssk, work in pattern to end.
Work 7[7, 5, 7] rows in pattern.
Repeat these 8[8, 6, 8] rows 2[4, 6, 4] times more, then work Waist Decrease Row once more. 80[92, 106, 128] sts.
Work 11 rows in pattern.
Note: Read ahead. Armhole shaping for all sizes except A begins before waist increases are complete.
Waist Increase Row [RS]: Work in pattern to 1 st before first marker, m1, work in pattern to 1 st after last marker, m1, work in pattern to end.
Work 5[5, 3, 5] rows in pattern.
Repeat these 6[6, 4, 6] rows 3[5, 7, 5] times more.
AT THE SAME TIME: On the first RS row after the 4th[4th, 6th, 5th] Waist Increase Row, begin armhole shaping as follows:
BO 3[3, 5, 5] sts at beginning of next 2 rows.
Decrease Row 1 [RS]: K1, w2tog, work in pattern to last 3 sts, w2tog tbl, k1.
Decrease Row 2 [WS]: P1, w2tog tbl, work in pattern to last 3 sts, w2tog, p1.
Repeat these 2 rows 0[1, 1, 2] times more.
Work Decrease Row 1. Work 1 row in pattern.
Repeat these 2 rows 2[2, 5, 7] times more.
Work Decrease Row 1. Work 3 rows in pattern.
Repeat these 4 rows 0[0, 1, 2] times more, then work Decrease Row 1 once more. 68[80, 86, 94] sts.
Work 43[47, 43, 41] more rows in pattern, ending with a WS row. 58[64, 70, 78] rows have been worked from beginning of armhole.
Shape Shoulders:
Row 1 [RS]: BO 9[11, 12, 13] sts, work in pattern to end.
Row 2 [WS]: BO 9[11, 12, 13] sts, work in pattern to last st, turn work.
Row 3 [RS]: Sl 1, PSO, BO 8[11, 11, 12] sts more, work in pattern to last st, turn work.
Row 4 [WS]: Sl 1, PSO, BO 8[11, 11, 12] sts more, work in pattern to end. Place remaining 32[34, 38, 42] sts on st holder.
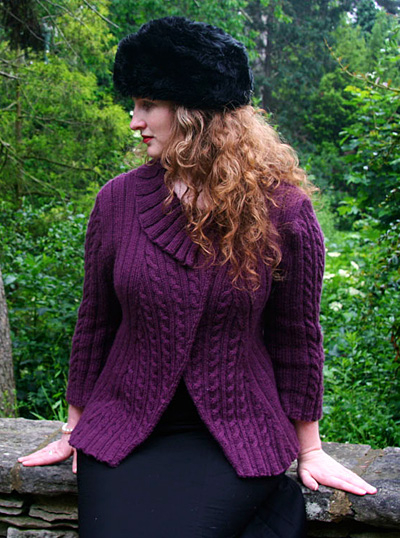
RIGHT FRONT
Using straight needles, CO 74[84, 95, 102] sts.
Size A Only:
Set-up Row [WS]: P4, [k1, p3] 4 times, k1, p1, place marker, p2, k1, p3, place marker, p1, [k2, p2, k2, p4] 4 times, k2, p3.
Size B Only:
Set-up Row [WS]: P3, [k2, p4] 4 times, k2, p1, place marker, p3, k2, p3, place marker, p1, [k2, p2, k2, p4] 4 times, k2, p3.
Size C Only:
Set-up Row [WS]: P3, [k3, p5] 4 times, k3, p1, place marker, p4, k3, p3, place marker, p1, [k2, p2, k2, p4] 4 times, k2, p3.
Size D Only:
Set-up Row [WS]: P3, [k2, p4] 5 times, k2, p1, place marker, p3, [k2, p4] twice, k2, p3, place marker, p1, [k2, p2, k2, p4] 4 times, k2, p3.
All Sizes:
Set-up Row establishes rib pattern for Back.
Work 2 more rows in pattern as set.
Front Panel Shaping Row [RS]: K3, m1, work 41 sts in pattern (to 2 sts before first marker), p1, k2tog; work in rib pattern as set to end. The first 46 sts of this row form the Front Panel.
Front Panel is worked in rib as set for first 15 rows, increasing and decreasing as in Front Panel Shaping Row every RS row. On 16th row and every following 6th row, work [C4F] over every column of 4 sts in panel, continuing to increase and decrease as set, until piece is complete.
Shape Waist:
Work 21[11, 15, 21] more rows in pattern. 25[15, 19, 25] rows have been worked.
All Sizes:
Waist Decrease Row [RS]: Work in pattern to second marker, ssk, work in pattern to end.
Work 7[7, 5, 7] rows in pattern.
Repeat these 8[8, 6, 8] rows 2[4, 6, 4] times more, then work Waist Decrease Row once more. 70[78, 87, 96] sts.
Work 11 rows in pattern.
Note: Read ahead. Armhole shaping for all sizes except A begins before waist increases are complete.
Waist Increase Row [RS]: Work in pattern to 1 st after second marker, m1, work in pattern to end.
Work 5[5, 3, 5] rows in pattern.
Repeat these 6[6, 4, 6] rows 3[5, 7, 5] times more.
AT THE SAME TIME: On the first WS row after the 4th[4th, 5th, 5th] Waist Increase Row, begin armhole shaping as follows:
Next Row [WS]: BO 3[3, 5, 5] sts, work in pattern to end.
Decrease Row 1 [RS]: Work in pattern to last 3 sts, w2tog tbl, k1.
Decrease Row 2 [WS]: P1, w2tog tbl, work in pattern to end.
Repeat these 2 rows 0[1, 1, 2] times more.
Work Decrease Row 1. Work 1 row in pattern.
Repeat these 2 rows 2[2, 5, 7] times more.
Work Decrease Row 1. Work 3 rows in pattern.
Repeat these 4 rows 0[0, 1, 2] times more, then work Decrease Row 1 once more, removing second marker. 64[72, 77, 79] sts.
Work 3[7, 3, 1] rows in pattern. 17[23, 29, 37] rows have been worked from beginning of armhole.
Shape Neckline and Buttonhole:
Note: For right front, instead of binding off sts to shape first few rows of neckline, groups of sts will be slipped to a st holder.
Row 1 [RS]: K3, p1, BO 2 sts, work in pattern to 2 sts before marker, k2tog, work to end.
Row 2 [WS]: Work in pattern to bound-off sts, CO 3 sts, k1, p3.
Row 3 [RS]: Work 5[5, 8, 8] sts in pattern and sl them to st holder; work in pattern to 2 sts before marker, k2tog, work to end. 58[66, 68, 70] sts.
Even-Numbered Rows 4-8 [WS]: Work in pattern to end.
Row 5 [RS]: Work 4[4, 7, 7] sts in pattern and slip them to st holder; work in pattern to 2 sts before marker, k2tog, work to end. 53[61, 60, 62] sts.
Row 7 [RS]: Work as for Row 5. 48[56, 52, 54] sts.
Row 9 [RS]: K1, w2tog, work in pattern to 3 sts before marker, k2tog, k1, k to end.
Row 10 [WS]: Work in pattern to last 3 sts, w2tog, p1. 45[53, 49, 51] sts; 27[27, 18, 18] sts remain in Front Panel.
Repeat Rows 9-10 4[8, 5, 5] times more. 33[29, 34, 36] sts; 15[3, 3, 3] sts remain in Front Panel.
Size A Only:
Next Row [RS]: Work as for Row 9.
Work 1 row in pattern.
Repeat these 2 rows 4 times more. 23 sts; 5 sts remain in Front Panel.
Next Row [RS]: K1, k3tog, k1, work in pattern to end. 21 sts.
Work 1 row in pattern.
All Sizes:
Removing marker on next row, continue as follows:
Decrease Row [RS]: K1, w2tog, work in pattern to end.
Work 3[1, 1, 1] rows in pattern.
Repeat these 4[2, 2, 2] rows 1[4, 8, 8] times more, then work Decrease Row once more. 18[23, 24, 26] sts.
Work 2[4, 2, 2] rows in pattern, ending with a RS row.
Shape Shoulder:
Row 1 [WS]: BO 9[11, 12, 13] sts, work in pattern to end. 9[12, 12, 13] sts.
Row 2 [RS]: Work in pattern to last st, turn work.
Row 3 [WS]: Sl 1, PSO, BO remaining sts.
LEFT FRONT
Using straight needles, CO 74[84, 95, 102] sts.
Size A Only:
Set-up Row [WS]: P3, [k2, p4, k2, p2] 4 times, k2, p1, place marker, p3, k1, p2, place marker, p1, k1, [p3, k1] 4 times, p4.
Size B Only:
Set-up Row [WS]: P3, [k2, p4, k2, p2] 4 times, k2, p1, place marker, p3, k2, p3, place marker, p1, k2, [p4, k2] 4 times, p3.
Size C Only:
Set-up Row [WS]: P3, [k2, p4, k2, p2] 4 times, k2, p1, place marker, p3, k3, p4, place marker, p1, k3, [p5, k3] 4 times, p3.
Size D Only:
Set-up Row [WS]: P3, [k2, p4, k2, p2] 4 times, k2, p1, place marker, p3, k2, [p4, k2] twice, p3, place marker, p1, k2, [p4, k2] 5 times, p3.
All Sizes:
Set-up Row establishes rib pattern for Back.
Work 2 more rows in pattern as set.
Front Panel Shaping Row [RS]: Work in rib pattern as set to second marker; ssk, p1, work 41 sts in pattern (to last 3 sts), m1, k3. The last 46 sts of this row form the Front Panel.
Front Panel is worked in rib as set for first 15 rows, increasing and decreasing as in Front Panel Shaping Row every RS row. On 16th row and every following 6th row, work [C4B] over every column of 4 sts in panel, continuing to increase and decrease as set, until piece is complete.
Shape Waist:
Work 21[11, 15, 21] more rows in pattern. 25[15, 19, 25] rows have been worked.
All Sizes:
Waist Decrease Row [RS]: Work in pattern to 2 sts before first marker, k2tog, work in pattern to end.
Work 7[7, 5, 7] rows in pattern.
Repeat these 8[8, 6, 8] rows 2[4, 6, 4] times more, then work Waist Decrease Row once more. 70[78, 87, 96] sts.
Work 11 rows in pattern.
Note: Read ahead. Armhole shaping for all sizes except A begins before waist increases are complete.
Waist Increase Row [RS]: Work in pattern to 1 st before first marker, m1, work in pattern to end.
Work 5[5, 3, 5] rows in pattern.
Repeat these 6[6, 4, 6] rows 3[5, 7, 5] times more.
AT THE SAME TIME: On the first RS row after the 4th[4th, 5th, 5th] Waist Increase Row, begin armhole shaping as follows:
Next Row [RS]: BO 3[3, 5, 5] sts, work in pattern to end.
Work 1 row in pattern.
Decrease Row 1 [RS]: K1, w2tog, work in pattern to end.
Decrease Row 2 [WS]: Work in pattern to last 3 sts, w2tog, p1.
Repeat these 2 rows 0[1, 1, 2] times more.
Work Decrease Row 1. Work 1 row in pattern.
Repeat these 2 rows 2[2, 5, 7] times more.
Work Decrease Row 1. Work 3 rows in pattern.
Repeat these 4 rows 0[0, 1, 2] times more, then work Decrease Row 1 once more, removing first marker. 64[72, 77, 79] sts.
Work 4[8, 4, 2] rows in pattern. 19[25, 31, 39] rows have been worked from beginning of armhole.
Shape Neckline and Buttonhole:
Continue to work decrease as set at beginning of Front Panel. Stitch numbers given in this section will take these decreased sts into account.
Row 1 [WS]: BO 5[5, 8, 8] sts, work in pattern to end. 59[67, 69, 71] sts.
Even-Numbered Rows 2-4 [RS]: Work in pattern to last st, turn work.
Row 3 [WS]: SL 1, PSO, BO 3[3, 6, 6] more sts, work in pattern to end. 54[62, 61, 63] sts.
Row 5 [WS]: Work as for Row 3. 49[57, 53, 55] sts.
Row 6 [RS]: Work in pattern to marker, ssk, work in pattern to last 3 sts, w2tog tbl, k1.
Row 7 [WS]: P1, w2tog tbl, work in pattern to end. 46[54, 50, 52] sts; 28[28, 19, 19] sts remain in Front Panel.
Repeat Rows 6-7 4[8, 5, 5] times more. 34[30, 35, 37] sts; 16[4, 4, 4] sts remain in Front Panel.
Size A Only:
Next Row [RS]: Work as for Row 6.
Work 1 row in pattern.
Repeat these 2 rows 5 times more. 22 sts; 4 sts remain in Front Panel.
All Sizes:
Next Row [RS]: Work in pattern to marker, remove marker, sssk, k1. 20[28, 33, 35] sts.
Work 3[1, 1, 1] rows in pattern.
Decrease Row [RS]: Work in pattern to last 3 sts, w2tog tbl, k1.
Repeat these 4[2, 2, 2] rows 1[4, 8, 8] times more. 18[23, 24, 26] sts.
Work 3[5, 3, 3] rows in pattern, ending with a RS row.
Shape Shoulder:
Row 1 [RS]: BO 9[11, 12, 13] sts, work in pattern to end. 9[12, 12, 13] sts.
Row 2 [WS]: Work in pattern to last st, turn work.
Row 3 [RS]: Sl 1, PSO, BO remaining sts.
SLEEVES (Make 2)
Note: As written, sleeve is bracelet length, approx. 14[14, 15, 15] inches long to underarm. If you wish to have longer sleeves, work more rows before beginning increases.
Using straight needles, CO 58[62, 66, 68] sts.
Size A Only:
Set-up Row [WS]: P2, [k1, p3] twice, place marker, [k2, p4, k2, p2] 3 times, k2, p4, k2, place marker, [p3, k1] twice, p2.
Size B Only:
Set-up Row [WS]: P6, k2, p4, place marker, [k2, p4, k2, p2] 3 times, k2, p4, k2, place marker, p4, k2, p6.
Size C Only:
Set-up Row [WS]: P6, k3, p5, place marker, [k2, p4, k2, p2] 3 times, k2, p4, k2, place marker, p5, k3, p6.
Size D Only:
Set-up Row [WS]: P3, [k2, p4] twice, place marker, [k2, p4, k2, p2] 3 times, k2, p4, k2, place marker, [p4, k2] twice, p3.
All Sizes:
Set-up Row establishes rib pattern for Back.
Work 8 more rows in pattern as set, slipping first st of each row.
Next Row [RS]: Sl 1, k1, m1, work in pattern to last 2 sts, m1, k2. 60[64, 68, 70] sts.
Work 5 rows in pattern, slipping first st of each row and working increased sts into 3x1[4x2, 5x3, 4x2] Rib pattern as set.
Increase Row [RS]: K2, m1, work in pattern to first marker, [p2, C4B, p2, k2] twice, p2, C4F, p2, k2, p2, C4F, p2, work in pattern to last 2 sts, m1, k2. From this point on, do not slip first st of each row. Work cables as set every 6th row until piece is complete. 62[66, 70, 72] sts.
Work 5 rows in pattern, working increased sts into pattern as set.
Work Increase Row.
Repeat these 6 rows 6[8, 10, 12] times more. 76[84, 92, 98] sts.
Continue in pattern until sleeve measures 14[14, 15, 15] inches or desired length to underarm, ending with a WS row.
Shape Sleeve Cap:
BO 3[3, 5, 5] sts at beginning of next 2 rows.
Decrease Row 1 [RS]: K1, w2tog, work in pattern to last 3 sts, w2tog tbl, k1.
Decrease Row 2 [WS]: P1, w2tog tbl, work in pattern to last 3 sts, w2tog, p1. 66[74, 78, 84] sts.
Work Decrease Row 1. Work 1 row in pattern.
Repeat these 2 rows 6[7, 8, 10] times more. 52[58, 60, 62] sts.
Work Decrease Row 1. Work 3 rows in pattern.
Repeat these 4 rows 2[2, 2, 3] times more. 46[52, 54, 54] sts.
Work Decrease Row 1. Work 1 row in pattern.
Repeat these 2 rows 6[8, 7, 6] times more. 32[34, 38, 40] sts.
Work Decrease Row 1. Work Decrease Row 2.
Repeat these 2 rows once more. 24[26, 30, 32] sts.
BO sleeve cap as follows:
Row 1 [RS]: BO 4 sts, work in pattern to last st, turn work.
Row 2 [WS]: Sl 1, PSO, BO 3 more sts, work in pattern to last st, turn work.
Rows 3-4: Work as for Row 2. 8[10, 14, 16] sts.
Row 5 [RS]: Sl 1, PSO, BO remaining sts. |