Knitty: little purls of wisdom
Phat Fiber
Title
beauty shot

Tangy

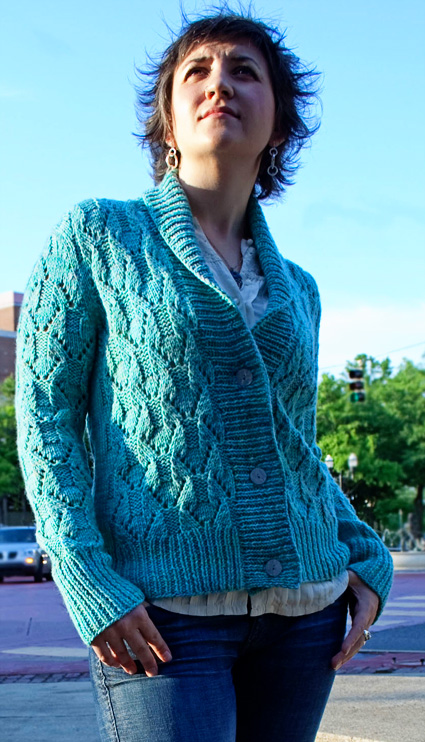
Like the faithful assistant it’s named after, Girl Friday is a wear-everywhere cardigan that gets the job done, with ease and grace. Relaxed enough to feel comfortable on the weekend over blue jeans, but just tailored enough to stay flattering.

The lace pattern is simple to memorize after a couple of repeats, and shaping is kept to the bare minimum to keep a trim fit. 

A few buttons provide a front closure, or omit them for a kimono style open front.

spacer model: Mercedes Tarasovich-Clark spacer photos: Mercedes Tarasovich-Clark

SIZE
XS [S, M, L, 1X, 2X, 3X] (shown in size M)

spacer

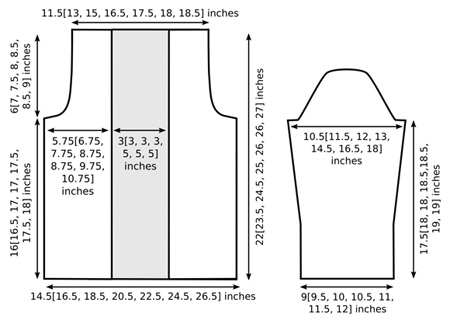
FINISHED MEASUREMENTS
Chest: 29[33, 37, 41, 45, 49, 53] inches
Length: 22[23.5, 24.5, 25, 26, 26, 27] inches

spacer

MATERIALS
Yarn

spacer Aqua version [shown above]: Kitchen Sink Dyeworks Eco Merino worsted [100% organic merino, 210yds per 4oz. skein]; color: Jade; 4[5, 5, 6, 7 ,7, 8] skeins
spacer Indigo version [shown below]: Kitchen Sink Dyeworks Merino Worsted [100% superwash merino, 245yds per 100g skein]; color: Cyanotype; 4 [4, 5, 5, 6, 7, 7] skeins

Recommended needle size
[always use a needle size that gives you the gauge listed below -- every knitter's gauge is unique]
spacer 1 set US #8/5mm straight needles
spacer 1 US #8/5mm circular needle, 40 inches or longer (used for working collar and front band)

Tools
spacer Stitch markers
spacer Yarn needle
spacer Locking st markers or safety pins
spacer Buttons (optional): Buy buttons after sweater is complete to ensure correct size and number.

spacer

GAUGE
17 sts/22 rows = 4 inches in Folding Diamond Lace pattern, after blocking
18 sts/24 rows = 4 inches in stockinette st and in 1x1 Rib, after blocking

spacer

PATTERN NOTES
[Knitty's list of standard abbreviations and techniques can be found here.]

Cardigan is shown with no wearing ease. If you would like a more relaxed fit, choose a size larger than your actual bust measurement. Alternately, you can block the lace pattern out by a few inches, since it is very flexible and stretchy.

Though the kimono-style neck opening looks narrow, the large ribbed collar and stretchy lace patterning on the body will conform to fit.

The first and last sts of each row are designated selvedge sts, and should be worked in stockinette stitch. These stitches are not included in finished measurements given, as they will be taken up by seams.

Maintaining stitch pattern when shaping:
When there are not enough stitches to complete both a yo and its paired decrease, work these stitches in stockinette stitch. This will happen when stitches are decreased or increased, when shaping armholes and sleeves.

When increasing for sleeves, sts at each side of central panel of lace pattern will be worked in stockinette st. When you have increased enough sts that there are 9 or more sts worked in stockinette st at each side of lace pattern panel, 7 sts at each side can be added to lace pattern panel.

chartM1L (left-leaning increase): Insert left needle, from front to back, under horizontal strand of yarn running between last stitch on left needle and first stitch on right needle; knit this stitch through back loop. 1 stitch increased.

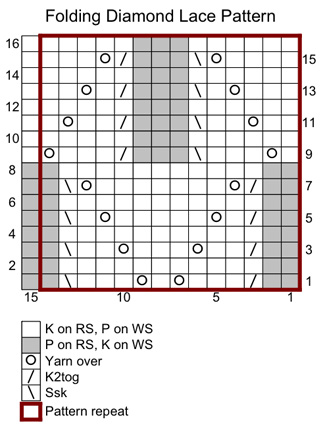
M1R (right-leaning increase): Insert left needle, from back to front, under horizontal strand of yarn running between last stitch on left needle and first stitch on right needle; knit this stitch through front loop. 1 stitch increased.

ssp: Slip next 2 sts knitwise, one at a time, to right needle. Slip them both, purlwise, back to left needle. Purl them together through their back loops.

1x1 Rib: (Worked over an odd number of sts):
Row 1 [RS]: K1, [p1, k1] to end.
Row 2 [WS]: P1, [k1, p1] to end.
Repeat these 2 rows for 1x1 Rib.

Directions for the Knitted Cast On method (“knitting on”) can be found here.

Chart: Click for the Left and Right front charts for sizes XS, L and 2X Only;[other sizes do not need these charts] they will print together on a single letter-sized page.

spacer

DIRECTIONS

1 across spacer
BACK
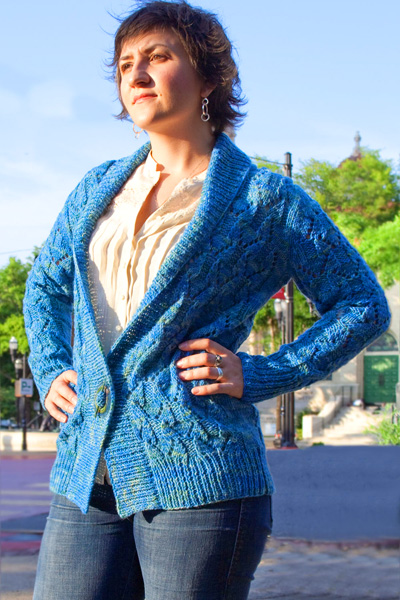
CO 63[75, 81, 89, 97, 107, 117] sts. Work in 1x1 Rib until work measures 4[4, 4, 4, 4.5, 4.5, 4.5] inches, ending with a WS row. 

Set-up Row [RS]: K3[2, 5, 2, 6, 4, 2], place marker, work Row 1 of chart over next  57[71, 71, 85, 85, 99, 113] sts, place marker, k3[2, 5, 2, 6, 4, 2].

This row sets pattern for back: sts between markers are worked in chart pattern, all other sts are worked in stockinette st.

Continue in pattern until work measures 16[16.5, 17, 17, 17.5, 17.5, 18] inches or desired length to underarm, ending with a WS row.

Shape Armholes:
BO 4[5, 5, 5, 6, 8, 10] sts at beginning of next 2 rows. 55[65, 71, 79, 85, 91, 97] sts.

Note: See Pattern Notes re. maintaining stitch pattern while shaping.

Next Row [RS]: K2, k2tog, work in pattern to last 4 sts, ssk, k2.
Work 1 row in pattern.
Repeat these 2 rows 2[4, 3, 4, 4, 6, 8] times more. 49[55, 63, 69, 75, 77, 79] sts.

Continue in pattern, maintaining 2 sts at each edge in stockinette st, until work measures 6[7, 7.5, 8, 8.5, 8.5, 9] inches from beginning of armhole, ending with a WS row.

BO all sts.

LEFT FRONT
CO 25[31, 35, 39, 39, 43, 49] sts. Work in 1x1 Rib until work measures 4[4, 4, 4, 4.5, 4.5, 4.5] inches, ending with a WS row.

Note: For sizes XS, L and 2X only, use separate Left Front chart. All other sizes, use main Folding Diamond Lace Chart as for Back.

Set-up Row [RS]: K2[1, 5, 2, 6, 3, 2], place marker, work Row 1 of chart over next  22[29, 29, 36, 29, 36, 43] sts, place marker, k1[1, 1, 1, 4, 4, 4].
This row sets pattern for left front: sts between markers are worked in chart pattern, all other sts are worked in stockinette st.

Continue in pattern until work measures same as back to underarm, ending with a WS row.

Shape Armhole:
Next Row [RS]: BO 4[5, 5, 5, 6, 8, 10] sts, work in pattern to end. 21[26, 30, 34, 33, 35, 39] sts.

Work 1 row in pattern.
Next Row [RS]: K2, k2tog, work in pattern to end.
Repeat these 2 rows 2[4, 3, 4, 4, 6, 8] times more. 18[21, 26, 29, 28, 28, 30] sts.

Continue in pattern, maintaining 2 sts at armhole edge in stockinette st, until work measures same as back to shoulder, ending with a WS row.
BO all sts.

RIGHT FRONT
CO 25[31, 35, 39, 39, 43, 49] sts. Work in 1x1 Rib until work measures 4[4, 4, 4, 4.5, 4.5, 4.5] inches, ending with a WS row.

Note: For sizes XS, L and 2X only, use separate Right Front chart. All other sizes, use main Folding Diamond Lace Chart as for Back.

Set-up Row [RS]: K1[1, 1, 1, 4, 4, 4], place marker, work Row 1 of chart over next  22[29, 29, 36, 29, 36, 43] sts, place marker, k2[1, 5, 2, 6, 3, 2].
This row sets pattern for right front: sts between markers are worked in chart pattern, all other sts are worked in stockinette st.

Continue in pattern until work measures same as back to underarm, ending with a RS row.

Shape Armhole:
Next Row [WS]: BO 4[5, 5, 5, 6, 8, 10] sts, work in pattern to end. 21[26, 30, 34, 33, 35, 39] sts.

Next Row [RS]: Work in pattern to last 4 sts, ssk, k2.
Work 1 row in pattern.
Repeat these 2 rows 2[4, 3, 4, 4, 6, 8] times more. 18[21, 26, 29, 28, 28, 30] sts.

Continue in pattern, maintaining 2 sts at armhole edge in stockinette st, until work measures same as back to shoulder, ending with a WS row.
BO all sts.

1 across spacer

SLEEVES (Make 2)
CO 39[41, 43, 45, 47, 49, 51] sts. Work in 1x1 Rib until work measures 5[5, 5, 6.5, 6.5, 6.5, 7] inches, ending with a WS row.

Set-up Row [RS]: K5[6, 7, 1, 2, 3, 4], place marker, work Row 1 of chart over next  29[29, 29, 43, 43, 43, 43] sts, place marker, k5[6, 7, 1, 2, 3, 4].
This row sets pattern for sleeve: sts between markers are worked in chart pattern, all other sts are worked in stockinette st.

Continue in pattern until work measures 8.75[9, 9, 9.25, 9.25, 7, 8.5] inches, ending with a WS row.

Note: As written, sleeve is 17.5[18, 18, 18.5,18.5, 19, 19] inches long to underarm. If you wish to lengthen or shorten the sleeve, work more or fewer rows now. Note that sleeves are intended to be quite long, as shown in photos.

Increase Row [RS]: K2, M1R, work in pattern to last 2 sts, M1L, k2.
Work 11[9, 9, 7, 5, 5, 3] rows in pattern.
Repeat these 12[10, 10, 8, 6, 6, 4] rows 2[3, 3, 4, 6, 9, 12] times more, working increased sts into lace pattern when possible (see Pattern Notes for notes on this).
Work Increase Row once more. 47[51, 53, 57, 63, 71, 79] sts.

Continue in pattern until work measures 17.5[18, 18, 18.5,18.5, 19, 19] inches or desired length to underarm, ending with a WS row.

Shape Sleeve Cap:
BO 4[5, 5, 5, 6, 8, 10] sts at beginning of next 2 rows. 39[41, 43, 47, 51, 55, 59] sts.

When shaping sleeve caps as directed below, work Decrease Rows as follows:

RS Decrease Rows: K2, k2tog, work in pattern to last 4 sts, ssk, k2.
WS Decrease Rows: P2, ssp, work in pattern to last 4 sts, p2tog, p2.

Work 1[2, 3, 3, 3, 3, 1] rows in pattern.
Work Decrease Row.
Repeat these 2[3, 4, 4, 4, 4, 2] rows 10[8, 2, 3, 3, 1, 15] times more.
17[23, 37, 39, 43, 51, 27] st.

Sizes M, L, 1X, 2X Only:
Work -[-, 2, 1, 1, 1, -] rows in pattern. Work Decrease Row.

Repeat these -[-, 3, 2, 2, 2, -] rows -[-, 5, 6, 7, 11, -] times more. -[-, 25, 25, 27, 27, -] sts.

All Sizes:
BO remaining 17[23, 25, 25, 27, 27, 27] sts.

spacer

FINISHING
Weave in ends and block pieces to measurements shown in schematic. Sew shoulder seams.

Front Bands and Collar:
Measure 3 inches down from shoulder seam along each front edge. Use safety pins to mark these points; when picking up sts, place markers at these points and remove safety pins.
If working buttonholes, use additional safety pins to mark desired positions of buttonholes along right front edge. Do not place top buttonhole higher than 12 inches from CO edge of front, or it will be obscured by collar fold.

With RS facing, using circular needle and beginning at lower right front corner, pick up and k 2 sts for every 3 rows along right front edge, 1 st in every bound off st along back neck edge, and 2 sts for every 3 rows along left front edge, ending at lower left front corner. Count sts. You should have an odd number of sts; if you have an even number, increase 1 st at center back of neck when working first row. Be sure you have the same number of sts below safety pin for each front edge; move markers if necesary.

Shape Collar:
Row 1 [WS]: Work in 1x1 Rib along left front edge and back neck to second marker or 1 st before second marker, ending with a p st. Turn work.
Row 2 [RS]: Sl 1, work in 1x1 Rib across back neck to marker or 1 st before marker, ending with a p st. Turn work.

Next Row: Sl 1, work in 1x1 Rib to slipped st from previous short row, work slipped st, k1, p1. Turn work.
Repeat this row 21 times more, ending with a RS row. When measured from back neck, work measures 4 inches from picked-up sts.

Next Row [WS]: Sl 1, work in 1x1 Rib as set to end of row, removing markers.

If not working buttonholes, proceed to section marked “Both Versions”, below."
If working buttonholes, work as follows:
Continue in 1x1 Rib until band measures 1.5[1.5, 1.5, 1.5, 2.5, 2.5, 2.5] inches when measured from lower front edge.

Next Row: [Work in pattern to 1 st before desired position of buttonhole, BO 3 sts] until all desired buttonholes have been worked, work in pattern to end.
Next Row: [Work in pattern to set of bound off sts, CO 3 sts using knitted CO] until all buttonholes have been worked, work in pattern to end.

Both Versions:
Continue in 1x1 Rib until band measures 3[3, 3, 3, 5, 5, 5] inches when measured from lower front edge. Loosely BO all sts in pattern.

Sew sleeves into armholes. Sew sleeve seams and side seams.
Weave in remaining ends. Lightly steam block band/collar and seams.

spacerschematic
ABOUT THE DESIGNER

designernamespacer Mercedes Tarasovich-Clark spends her days dyeing a spectrum of yarns for her indie dye company, Kitchen Sink Dyeworks, and her evenings thinking up new projects to play with all of those colors.  She lives in the land of kudzu with her husband Chris, three dogs, two cats, and a ferret.

spacer