
|
|
 |
|
|
|
 |
Translated by Franklin Habit from "Nursery
Elephant of Wool," anonymously published c. 1930-1949,
with revisions c. 1950 by Sue Rothschild.
|
 |
|
FINISHED MEASUREMENTS |
Length: approx. 10 inches |
|
MATERIALS Notions |
|
GAUGE |
24 sts/32 rows = 4" in stockinette
stitch |
|
PATTERN NOTES |
Flo is worked entirely in garter stitch (knit all stitches) on two needles. Because the fabric is reversible, no RS or WS is noted. For the Sides and Ears, both right and left sides are worked in the same way; the RS of one piece will be the same as the WS of the other piece. The original pattern called for feet worked in crochet; instructions for these are included below, along with a knitted alternative (shown). inc1: The increase used for this pattern is the backward loop increase. It is the first increase shown here, referred to as m1. This increase is different from the m1 increase used in most Knitty patterns. Instructions for the Cable Cast On can be found here. Instructions for Blanket Stitch can be found here. Instructions for Mattress
Stitch can be found here. Instructions for Lazy Daisy Stitch can be
found here. |
|
DIRECTIONS |
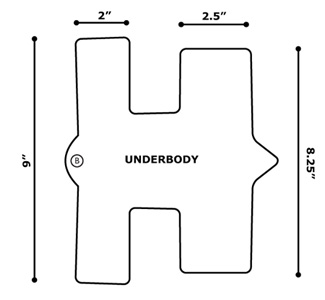
SIDES (Make 2): Trunk: Lower Body and Legs: K 13 rows, ending with yarn at tail end. Front Leg: Back Leg: UNDERBODY Lower Neck: Front Legs: Belly: Back Legs: Join yarn to remaining 9 sts. Use safety pin or split ring marker to mark CO end of work; this point is designated Point B in schematic. EAR (Make 2) Row 9: K1, inc1, k to end. 29 sts. Row 16: [K1, k2tog] twice, k to end. 28 sts. Row 22: K1, k2tog, k to end. 23 sts. Row 29: BO 8 sts, k to end. 12 sts. FEET (Make 4 of either knitted or crocheted version): Knitted Version: Crocheted Version: TAIL
|
|
FINISHING Assembly Pin Side pieces together along top edges. Beginning at Point A (see schematic) and working toward head, sew pieces together using mattress stitch. Continue seam over head and down top of trunk, around tip of trunk (leave yarn tail at tip of trunk hanging on RS of work), and up underside of trunk, ending at third garter st ridge below upper inside edge of trunk (Point B on Side schematic). Firmly stuff head and trunk. Join Point B of Underbody to Point
B of Sides. Sew side and leg seams, leaving bottoms of legs
open. Finish stuffing body through leg openings. Note that stuffing
must be firm enough for toy to hold its shape after squeezing.
(Give it a test hug – it should bounce back.)
Sew ears securely to sides of head from Points C (3 inches from front seam and 2 inches from top seam) to D, indicated on Side schematic. Thread the yarn end at the tip of the trunk onto yarn needle and run it into and up along inside of trunk, causing trunk to curl upwards. Bring end of yarn to outside of piece and fasten securely, just about where Flo’s chin would be if she had one. Using CC, embroider eyes as shown. If desired, use CC to edge
feet and ears with blanket stitch. |
| ABOUT THE DESIGNER |
| Franklin Habit is the proprietor of the
popular knitting blog The
Panopticon and
author of It
Itches: A Stash of Knitting Cartoons He lives in Chicago, near the zoo, which has no elephants. |
| Pattern & images © 2010. Franklin Habit. |
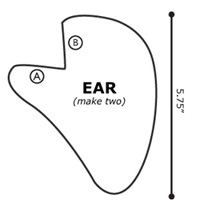 Finish ears by sewing edges A and B together
(see schematic).
Finish ears by sewing edges A and B together
(see schematic).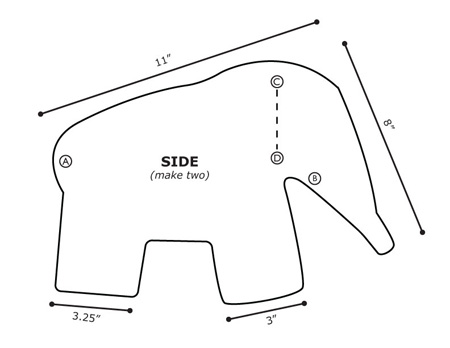
 Beginning at BO end, roll tail piece tightly, so that it forms
a small, firm log shape, with CO edge at outside of roll. Sew
CO edge in place, sew one end of roll to secure, then sew other
end to rump of elephant.
Beginning at BO end, roll tail piece tightly, so that it forms
a small, firm log shape, with CO edge at outside of roll. Sew
CO edge in place, sew one end of roll to secure, then sew other
end to rump of elephant.