Knitty: little purls of wisdom
Lorna’s Laces
Title
beauty shot

Tangy

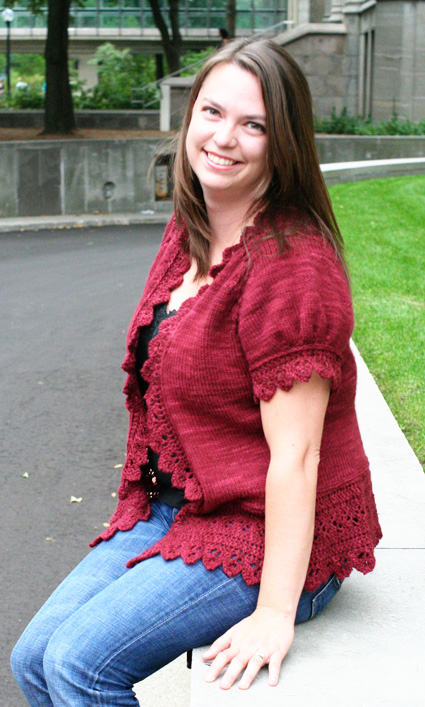
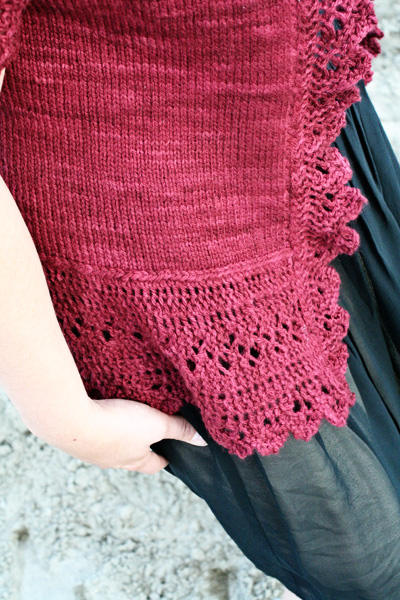
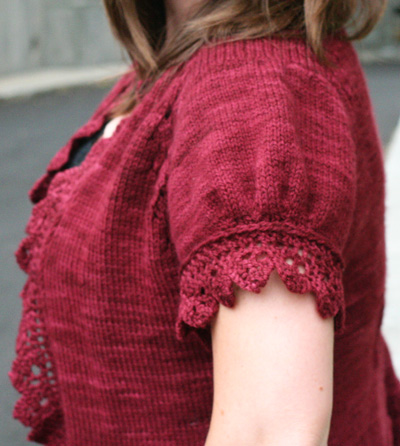
Brunello was inspired by my love for this time of the year: not-quite-summer, not-quite-autumn, and full of days with the potential to wear these kinds of romantic and flirty layers. This is a sweater for beach-walking, for evening-deck-lounging and for enjoying a glass of red while watching the sunset.

This pattern uses texture and gauge to help shape the size and fit of the fabric. You’ll be working several knit-on borders in ways that either create a gentle flare, such as around the bottom of the garment, or help pull in the fabric, such as around the sleeves and top of the neck.

You’ll begin by casting on for the neck and working raglan-style increases using an eyelet pattern. After splitting off the sleeves, tucks will be worked across the center back to provide shaping. Then, you’ll knit a sideways bottom border of wide lace. Finally, you’ll work a small sawtooth border around the front and neck edges.

spacer model: Amy Swenson spacer photos: Sandra Tiano

SIZE
XS[S, M, L, 1X, 2X, 3X] (shown in size L)

spacer

FINISHED MEASUREMENTS
Chest: 28[31, 35, 39, 43.5, 48.5, 51.5] inches
Length: 23[24, 25, 25, 26, 26.5, 27] inches from shoulder
Note: Chest measurement is based on back width. Combined fronts are several inches narrower than back, to allow for width of edging.

spacer

MATERIALS
Yarn

spacer Lorna’s Laces Green Line DK [100% Organic Merino; 145yd/133m per 57g skein]; color: Manzanita; 5[6, 7, 7, 8, 9, 10] skeins

Recommended needle size
[always use a needle size that gives you the gauge listed below -- every knitter's gauge is unique]
spacer 1 US #7/4.5mm circular needle, 32 inches or longer
spacer 1 set US #7/4.5mm double-point needles

Notions
spacer Yarn needle
spacer Stitch markers
spacer Stitch holders or waste yarn

spacer

GAUGE

spacer20 sts/27 rows = 4" in stockinette stitch

PATTERN NOTES
[Knitty's list of standard abbreviations and techniques can be found here.]

Single Join: Sl last st of edging , p next st of sweater, pass slipped st over.

Double Join: Sl last st of edging, p next 2 sts of sweater together, pass slipped st over.

Tuck 4: Insert tip of right needle into back loops of first and fourth sts on left needle; k these sts together, but do not drop sts from left needle; drop first st off left needle, k next 2 sts, k next st through front loop.

Tuck 5: Insert tip of right needle into back loops of first and fifth sts on left needle; k these sts together, but do not drop sts from left needle; drop first st off left needle, k next 3 sts, k next st through front loop.

spacer
kfbf: Knit into front, then back, then front again, of next st. 1 st increased to 3 sts.

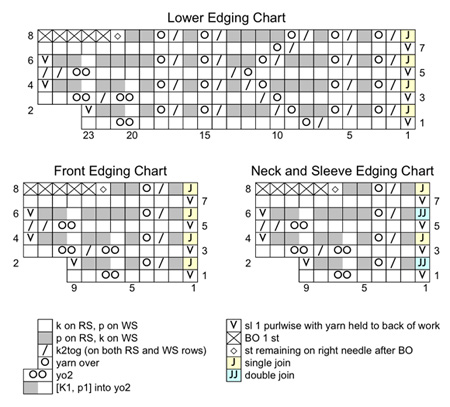
k3tog: Knit next 3 sts together. 2 sts decreased.

k4tog: Knit next 4 sts together. 3 sts decreased.

yo2: Yarn over twice (wrap yarn twice around right needle, from front to back).

The lower edging of this sweater uses a provisional cast on. Use your preferred provisional cast on technique; directions for one technique may be found here.

Instructions for the Backward Loop Cast On can be found here.

DIRECTIONS

spacer
YOKE
Using circular needle, CO 64[67, 69, 71, 79, 83, 87] sts.

Note: Read ahead! Raglan shaping and neckline shaping are worked at the same time.

Set-up Row [WS]: P6[6, 6, 6, 8, 8, 8], place marker, p10, place marker, p32[35, 37, 39, 43, 47, 51], place marker, p10, place marker, p6[6, 6, 6, 8, 8, 8].

Row 1 [RS]: [K to 3 sts before marker, yo, ssk, yo, k1, slip marker, k1, yo, k2tog, yo] four times, k to end. 8 sts increased.

Rows 2, 4, 6 [WS]: P all sts.

Row 3 [RS]: [K to 2 sts before marker, yo, k2, slip marker, k2, yo] four times, k to end. 8 sts increased.

Row 5 [RS]: (Note: Neckline shaping begins on this row for sizes XS and 3X.)
[K to 1 st before marker, yo, k1, slip marker, k1, yo] four times, k to end. 8 sts increased.

Row 7 [RS]: (Note: Neckline shaping begins on this row for sizes S, M, L, 1X, 2X.)
[K to marker, remove marker, yo2] four times, k to end. 8 sts increased.

Row 8 [WS]: [P to yo2, k first yo, place marker, p second yo] four times, p to end.

Repeat Rows 1-8 once more, then work Rows 1-2 once more. (Note: While shaping yoke, remember to work neckline shaping as directed below.) 142[143, 145, 147, 155, 159, 165] sts.

Puffed Sleeve Increase Row [RS]:  *K to 2 sts before marker, yo, k2, slip marker, k2, yo, k4, [kfbf, k2] five times, kfbf, k4, yo, k2, slip marker, k2, yo; repeat from * once, k to end. 174[175, 177, 179, 187, 191, 197] sts.

Work Rows 4-8, then work Rows 1-8 0[1, 2, 3, 4, 4, 5] times more.
For sizes XS and 2X only, work Rows 1-4 once more.

AT THE SAME TIME: The first time you work Row 5[7, 7, 7, 7, 7, 5], begin neckline shaping as follows:  

Neckline Increase Row [RS]: K2, m1, work in pattern to last 2 sts, m1, k2.
Work 5[7, 7, 7, 7, 7, 5] rows in pattern.
Repeat these 6[8, 8, 8, 8, 8, 6] rows 2[2, 4, 4, 4, 4, 6] times more, then work Neckline Increase Row once more. Total of 4[4, 6, 6, 6, 6, 8] sts have been increased at each front edge.

208[227, 265, 299, 339, 359, 383] sts when all raglan and neckline shaping rows have been worked: 24[26, 32, 36, 42, 44, 48] sts for each front, 50[54, 62, 70, 78, 82, 86] sts for each sleeve, and 60[67, 77, 87, 99, 107, 115] sts for back.

Continue in stockinette st until work measures 7[7.5, 8, 8.5, 9, 9.5] inches, measured at center back, ending with a WS row.

spacer
LOWER BODY
Note: As you work the next row, remove markers as you come to them.

Dividing Row [RS]: K to first marker, place next 50[54, 62, 70, 78, 82, 86] sts (all sts to second marker) on waste yarn, CO 10[10, 10, 10, 10, 14, 14] sts using backward loop method, k to third marker, place next 50[54, 62, 70, 78, 82, 86] sts on waste yarn, CO 10[10, 10, 10, 10, 14, 14] sts, k to end. 128[139, 161, 179, 203, 223, 239] sts.

Continue in stockinette st until work measures 3[3.5, 4, 4, 4.5, 4.5, 4.5] inches from underarm, ending with a RS row.

Note: At this point, sweater length should be approx. 1.5 inches above level of waist. This is a good time to slip all sts to waste yarn and try on sweater, adjusting length if necessary before proceeding to waist shaping.

Next Row [WS]: P48[49, 60, 69, 81, 82, 90], place marker, p32[41, 41, 41, 41, 59, 59], place marker, p48[49, 60, 69, 81, 82, 90].

Shape Waist:
Row 1 [RS]: K to first marker, [Tuck 5, k4] 3[4, 4, 4, 4, 6, 6] times, Tuck 5, k to end.
Even-Numbered Rows 2-18 [WS]: P all sts.
Rows 3, 5: Work as for Row 1.
Row 7 [RS]: K to first marker, [Tuck 5, Tuck 4] 3[4, 4, 4, 4, 6, 6] times, Tuck 5, k to end.
Rows 9, 11, 13: Work as for Row 7.
Rows 15, 17, 19: Work as for Row 1.

When all rows of waist shaping are complete, remove markers. Continue in stockinette st until work measures 9[9.5, 10, 10, 10.5, 10.5, 10.5] inches from underarm or 7 inches less than desired length to lower edge, ending with a RS row.

LOWER EDGING
Continuing from end of last row and using a provisional cast on method, CO 21 sts. These 21 sts will form the lower edging. As the edging is worked, sts of the edging will be worked together with sts of the sweater.
Set-up Row [WS]: K20, sl 1, p1, pass slipped st over (last st of edging passed over first st of sweater).

Work sts of edging following Lower Edging Chart, joining edging together with sts of sweater as indicated, until all sts of sweater have been worked; end with a WS row. Count edging sts.
Next Row [RS]: Sl 1, k to end, evenly decreasing if necessary so that you end up with 21 sts.
Break yarn. Place all sts on a double-point needle.

spacer
FRONT AND NECK EDGING
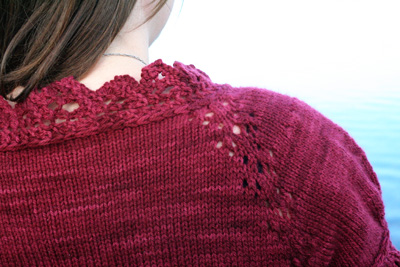
Carefully remove waste yarn from provisional CO edge of lower edging, and place resulting 21 live sts on circular needle; join yarn with RS facing, k21. Continuing from these sts, pick up and k 51[55, 59, 59, 63, 63, 67] sts along right front edge (approx. 1 st for every 2 rows; see note below), place marker, pick up and k 60[66, 66, 66, 78, 78, 86] sts along CO neckline edge (approx. 1 st in each CO st), place marker, pick up and k 52[56, 60, 60, 64, 64, 68] sts along left front edge, k held sts of lower edging.

Note: Don't worry if you don't get the exact number of picked-up sts indicated above, especially if you have changed the length of the garment. Count sts in each section (right front edge, neck edge, left front edge), and make a note of the number of sts in each section. (Sts of lower edging count as front edge sts). Ideally, you should have the following:
Right front edge: multiple of 4 sts
Neckline edge: multiple of 6 sts
Left front edge: multiple of 4 sts + 1 st
You may find that just moving the markers over 1 or 2 sts will give you the right number of sts in each section.

spacer
If the number of sts does not work out to be the number you need, make a note of how many extra sts you have in each section. When working the edging over that section, work a double join (instead of a single join) for each extra st you have; if you need to work more than one extra double join in a section, be sure to space them out so that the fabric does not pucker.

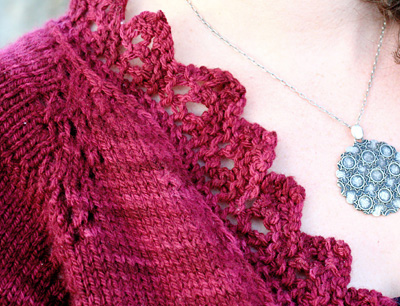
Note that the edging is joined at a more frequent rate over the neckline than it is over the front edges; this will help the neckline sit properly, and will prevent the edging from flaring out.

Edging:
Continuing from end of picked-up sts, CO 7 sts using backward loop Continuing from end of picked-up sts, CO 7 sts using backward loop method.
Set-up Row [WS]: K6, sl 1, p1, pass slipped st over.
Work sts of edging following Front Edging Chart, joining edging together with sts of sweater as indicated, to first marker; work Neck and Sleeve Edging Chart to next marker; work Front Edging Chart until all sts have been worked, ending with a WS row.
BO all sts.

spacer
SLEEVES
Note: When picking up sts along underarm edge, pick up and k 1 st in each CO st and 1 st at each corner between CO sts and held sts.

Place 50[54, 62, 70, 78, 82, 86] held sts of one sleeve on double-point needles. With RS facing, using a new needle and beginning at center of CO underarm edge, pick up and k 6[6, 6, 6, 6, 8, 8] sts to beginning of held sts, k all held sts, pick up and k 6[6, 6, 6, 6, 8, 8] sts to center of underarm. 62[66, 74, 82, 90, 98, 102] sts. Place marker and join to begin working in the round.

Round 1: K15[17, 21, 25, 29, 33, 35], place marker, k32, place marker, k15[17, 21, 25, 29, 33, 35].
Round 2: K all sts.
Round 3: K to marker, [k2, k4tog, k2] four times, k to end. 50[54, 62, 70, 78, 86, 90] sts.
Round 4: K all sts.
Round 5: K to marker, [k1, k3tog, k1] four times, k to end. 42[46, 54, 62, 70, 78, 82] sts.

Sizes XS, S, M, 1X, 2X Only:
K 1 round, evenly increasing 1[3, 1, -, 3, 1, -] sts and removing markers. 43[49, 55, -, 73, 78, -] sts.

Sizes L, 3X Only:
K 1 round, evenly decreasing -[-, -, 1, -, -, 3] sts and removing markers. -[-, -, 61, -, -, 79] sts.

All Sizes:
Continuing from end of last round, CO 7 sts using backward loop method. Turn work so that WS is facing.
Set-up Row [WS]: K6, sl 1, p1, pass slipped st over.

Work sts of edging following Neck and Sleeve Edging Chart, joining edging together with sts of sweater as indicated until all sts have been worked, ending with a WS row.

BO all sts.
spacer

FINISHING
Sew CO and BO edges of sleeve edging together at underarms. Weave in ends. Lightly steam block or wet block as desired.

spacer
ABOUT THE DESIGNER

designernamespacer Amy Swenson lives a yarn-filled life in Toronto. She spends far too much time on her website at indigirl.com where she blogs and showcases her modern and flattering designs for knitting and crochet.

She’s been designing for Knitty since 2003.

spacer