Knitty: little purls of wisdom
The Loopy Ewe
Title
beauty shot

Tangy

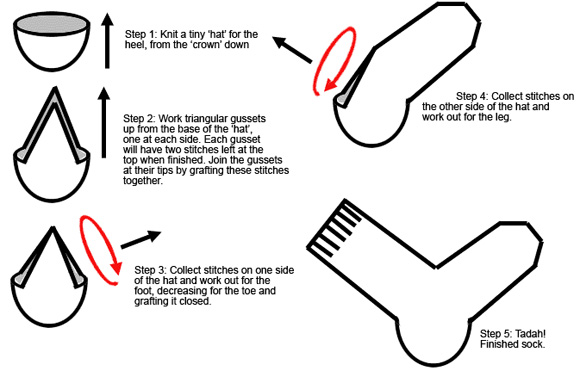
Some time ago, I devised a different way of doing socks: heel-out. You start by making what is essentially a tiny hat for your heel, then two gussets which are like earflaps for the ‘hat’. Each gusset tapers to a point at the top of the instep, and you join the points of the two gussets together. You work stitches around one side of the gussets to make the foot, and then work stitches around the other side of the gussets to make the leg (see illustration below). I called this construction the Hat-heel Sock.

I love this way of making socks, and churned out loads of pairs. However, they were all in plain stockinette stitch, and I wanted to be able to make fancier socks – spice up the basic construction by using cables, lace, colorwork, etc.


But I also wanted to use these techniques in such a way that they took advantage of how the socks are put together.

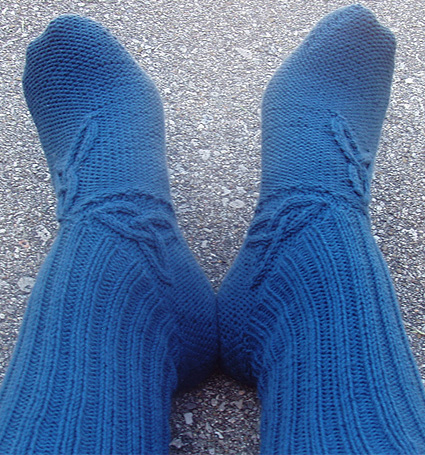
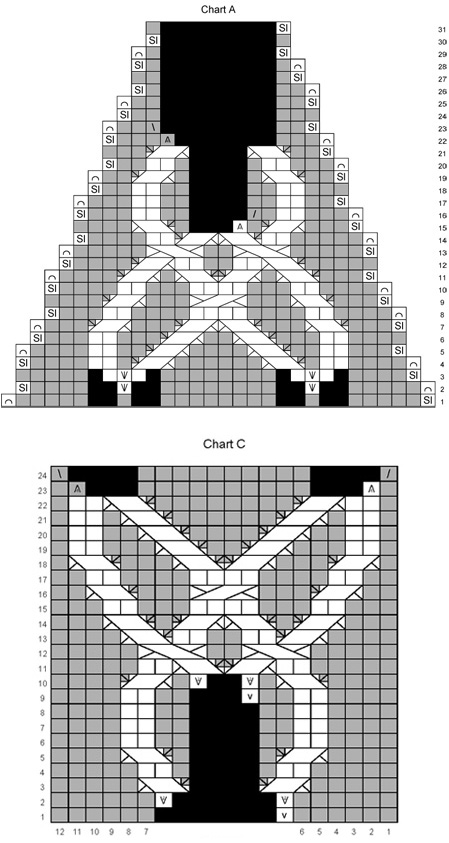
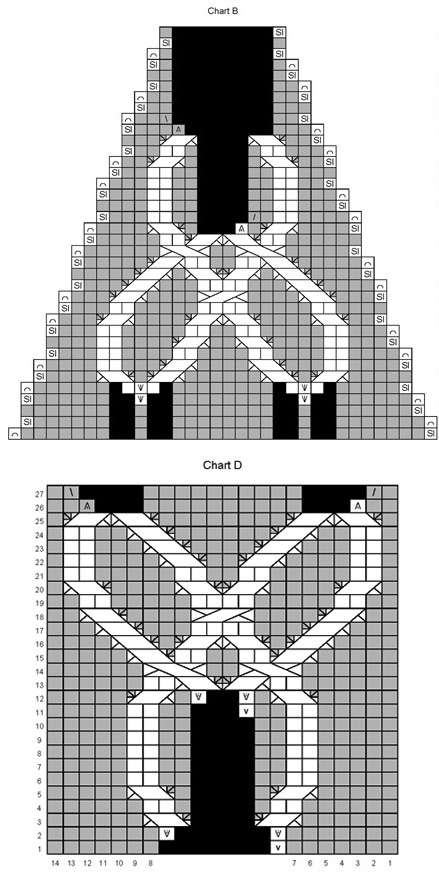
This is the first such variation: the triangular gussets at the sides of the foot contain triangular cable motifs. I think this makes the socks fancy in an understated way. And if you want more fanciness, there’s an optional additional cable pattern you can do on top of the foot, which will give the sock a triskelion of triangles: three tri-pointed cabled motifs, all meeting at a point at the top of the instep.

Another difference from the original hat-heel pattern is the method of gusset shaping: short rows instead of decreases. This makes the socks much stretchier around the gusset sides. Thanks very much to Chris Wass, whose modification of the original hat-heel was the inspiration for this change.

These socks have the added advantage of being mostly reverse stockinette stitch all over the foot, which means that you have the smooth stockinette stitch side on the inside, touching your skin – very comfortable!

spacer photos: Kathleen Sperling

SIZE
woman [man]

spacer

FINISHED MEASUREMENTS
Foot circumference: 7 [8] inches

spacer

MATERIALS
Yarn

spacer Kollage Luscious [63% cotton, 37% nylon elastic; 345yd per 100g skein]; color: Sea, 1 skein

Recommended needle size
[always use a needle size that gives you the gauge listed below -- every knitter's gauge is unique]
spacer 1 set US #1.5/2.5mm double-point needles
OR
spacer 1 32 inch or longer US #1.5/2.5mm circular needle for magic loop method
OR
spacer 2 short #1.5/2.5mm circular needles for two-circulars method
If using circular needle(s), you will also need a single US #1.5/2mm DPN to work initial cast-on

Notions
spacer Cable needle
spacer 4 spare 10-inch lengths of yarn in a contrasting color
spacer 2 safety pins
spacer 2 short stitch holders
spacer Stitch marker, safety pin, or whatever else you use to mark the beginning of rounds
spacer 2 stitch markers
spacer Yarn needle

spacer

GAUGE

32 sts/44 rounds = 4 inches in stockinette stitch

PATTERN NOTES
[Knitty's list of standard abbreviations and techniques can be found here.]

The construction of this sock is unique, and involves collecting stitches in a very particular way to start the foot and the leg. The following diagram should help clarify the idea if you get stuck during the pick-up:


step 1

step 2

step 3

SKP: Sl1, K1, PSSO.


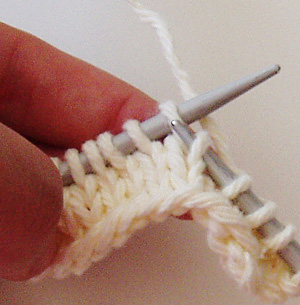
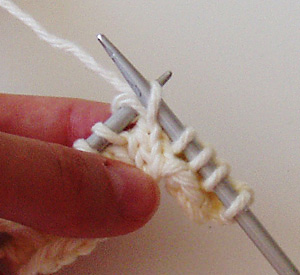
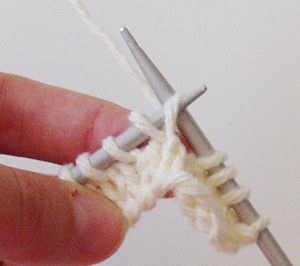
M1: From back-to-front, insert the right-hand needle into the stitch below the next stitch on the left-hand needle (see step 1 photo at right), and transfer it directly onto the left-hand needle (see step 2); K this new st through the back loop (see step 3)

Judy’s Magic Cast-on is recommended to start with.

This pattern is very specific about how stitches are held – some stitches are slipped to scrap yarn, some to safety pins, and some to stitch holders. Follow these instructions carefully, as they are to help you identify which stitches you’re working with at specific times.

The majority of the stitches in the heel and foot of these socks are purls (reverse stockinette stitch). Since it is generally considered easier to knit in the round rather than purl in the round, you will be working a lot of the sock inside-out, with the WS facing you (i.e. the knit stitches), and the RS on the inside of the sock (i.e. the purl stitches). This can make things a little tricky, so be sure to read instructions carefully and pay close attention to the difference between RS instructions and WS instructions on the chart legend.

Additionally, there are instances where you will work a chart opposite to the usual direction. These are noted in the instructions.

Because these socks are mostly reverse stockinette stitch, the gusset seams can end up looking a bit messy depending on how the stitches are picked up. Best results were achieved using Theresa Vinson Stenersen’s technique for picking up along a slipped-stitch edge.

There are two options for doing the foot on these socks – with a third cable motif at the top, or without. This is noted in the pattern.

This pattern recommends grafting the work closed at the toe. Grafting is also referred to as the Kitchener Stitch.

Jeny’s Surprisingly Stretchy Bind-off is recommended for casting off at the top of the sock legs.

spacerCharts
The charts for this pattern are very large. Each fits on a letter-sized page.
Click the chart name below and print the resulting page.

Chart A + CChart B + D


DIRECTIONS
Heel
CO 8 stitches using Judy’s Magic Cast-on, knitting 1 round as part of the cast-on.

Divide the 8 sts across your needles however you prefer, note or mark the beginning of the round, and begin working in the round as follows:

Round 1: Knit all sts.

Round 2: [M1, k1] 8 times. 16 sts.

Round 3: Knit all sts.

Round 4: [M1, k2] 8 times. 24 sts.

Round 5: Knit all sts.

Round 6: [M1, K3] 8 times. 32 sts.

Rounds 7-9: Knit all sts.

Round 10: [M1, K4] 8 times. 40 sts.

Rounds 11-13: Knit all sts.

Round 14: [M1, K5] 8 times. 48 sts.

Rounds 15-17: Knit all sts.

Round 18: [M1, K6] 8 times. 56 sts.

Rounds 19-21: Knit all sts.

Round 22: [M1, K7] 8 times. 64 sts.

Man size only:
Rounds 23-25: Knit all sts.

Round 26: [M1, K8] 8 times. 72 sts.

Both sizes:
Work 3 more rounds even.

Gussets
Note: Remember, when reading the gusset chart, that when the knit side of the work is facing you, you are looking at the WS, and when the purl side of the work is facing you, you are looking at the RS. For RS rows, you will be reading the chart lines right-to-left, and for WS rows, you will be reading the chart lines left-to-right.

The gusset chart requires you to cable on both RS and WS rows, while simultaneously doing short rows on two out of every three rows. You will therefore need to devote a fair bit of concentration to reading the chart accurately. To help you follow the chart, it is recommended that you slip the unworked stitches from the short rows onto two spare lengths of yarn (one length of yarn for each side of the gusset) as you go. Once you’re done with each gusset, tie the ends of each length in a loose knot so the stitches don’t slide off.

First Gusset (worked flat)
Gusset set-up [WS]: K5, slip these 5 sts you just worked to a stitch holder, then, continuing to work from the left needle, k22[26], turn.

*Row 1 [RS]: Reading from right-to-left, work row 1 of Chart A[B].
Row 2 [WS]: Reading from left-to-right, work row 2 of Chart A[B].
Continue to work flat in pattern as set until all 31[37] rows of Chart A[B] are complete.
Place remaining 2 sts on a separate safety pin. Break yarn, leaving about an 8-inch tail.*

Second Gusset (worked flat)
With WS (stockinette stitch side) facing, and starting with the stitch to the immediate left of the gusset you just finished, rejoin yarn and (still with WS facing), continue work as follows:
Gusset set-up [WS]: K10, slip these 10 sts you just worked to a stitch holder, then continuing to work from the left needle, k22[26], turn.
Repeat instructions from * to *.

With WS (stockinette stitch) facing, and starting with the stitch to the immediate left of the gusset you just finished, rejoin yarn and (still with WS facing), K5.
Place these last 5 sts you just worked onto a stitch holder.
Do NOT break yarn.

**Slide the sts on the safety pins at the tops of the gussets to two DPNs or the two ends of your long needle for magic loop (i.e. 2 sts from one safety pin onto one needle or end, 2 sts from the other safety pin onto the other needle or end. With WS (stockinette stitch) facing, use one of the 8-inch tails of yarn to graft these 4 sts together snugly.

Foot
You will now be working in the round again, still with WS facing, and starting from where you left off at ** (the next st to work is the one to the immediate left of the st which has the working yarn trailing from it). 

The first step is to prepare the sts you'll need for working the foot in the round; if you get stuck during this process, refer to step 3 in illustration above. It is quite fiddly work. Some of the sts you will use in the foot will come from stitch holders; some will come from spare lengths of yarn; and some will need to be picked up. Note that because you are still working with the WS facing, you need to pick up sts so that they look good from the other side!

Setup round:
The next 5 sts are on a stitch holder -- place those sts onto a needle and k them. 5 sts worked in this round so far.
You are now at the base of the first gusset. The 10[12] sts running up the right side of this gusset are on a spare length of yarn – transfer them to a needle but don’t work them yet!

Pick up and k 2 sts in between the last st you just worked and the first of the sts from the side of the gusset. 7 sts worked in this round so far.

[K1 of the gusset side sts from the needle, pick up 2 sts in between the last st you just worked and the next st and k them tog tbl, k1 of the gusset side sts from the needle, pick up and k 1 st in between the last st you just worked and the next st] 5[6] times. 27[31] sts worked in this round so far.

Pick up and k 1 st at top of first gusset. 28[32] sts worked in this round so far. (Setup round is now halfway done.)

The 10[12] sts running down the side of the second gusset are on a spare length of yarn – transfer them to a needle but don’t work them yet!

Pick up and k 1 st at top of second gusset. 29[33] sts worked in this round so far.

[Pick up 2 sts in between the last st you just worked and the next gusset side st and k them tog tbl, k1 of the gusset side sts from the needle, pick up and k 1 st in between the last st you just worked and the next st, k1 of the gusset side sts from the needle] 5[6] times. 49[57] sts worked in this round so far.
You are now at the base of the second gusset. The next 5 sts are on a stitch holder – place those sts onto a needle.

Pick up and k 2 sts in between the last st you just worked and the next st. 51[59] sts worked in this round so far.

K the last 5 sts from the needle. Round is complete. 56[64] sts on needles.

Mark beginning of the round.  This is the center bottom of the foot.
K 2 rounds even. Optional foot cabling ONLY
Note: Because you’re working the foot cable motif exclusively from the WS, it’s recommended that you regularly monitor the RS as you’re working the chart, to make sure it’s coming out correctly.

Round 1 [WS]: K22[25], pm; reading from left-to-right, work row 1 of Chart C[D], pm, k22[25]. For ease of working, rearrange your sts so that your Chart C[D] stitches are all on the same needle – just make sure that the location of the beginning of the round stays in the same place. The markers are there to indicate the beginning and end of the chart sts. If you don’t need the markers, remove them.

Round 2 [WS]: K22[25], slip marker; reading from left-to-right, work row 2 of Chart C[D], slip marker, k22[25].

Round 3 [WS]: K22[25], slip marker; reading from left-to-right, work row 3 of Chart C[D], slip marker, k22[25].

Continue pattern as set until all 24[27] rows of Chart C[D] have been worked. 56[64] sts.

K 1 round even, removing any stitch markers as you come to them.

Both options
K every round even until foot (from the back of the heel to the most recent round worked) is 14[16] rounds short of the desired full length of the foot – at correct round gauge, this will be 1.25[1.5] inches less than the desired length of the foot.

Set up for Toe Decreases
Remove existing marker for beginning of rounds, k14[16], and replace marker to indicate new beginning of rounds.

Initial Decreases
Toe round 1: [SKP, k24[28], k2tog] twice.
Toe round 2: K.
Toe round 3: [SKP, k22[26], k2tog] twice.
Toe round 4: K.
Toe round 5: [SKP, k20[24], k2tog] twice.
Toe round 6: K.
Toe round 7: [SKP, k18[22], k2tog] twice.
Toe round 8: K.

Woman size only: proceed to Secondary Decreases.

Toe round 9: [SKP, k-[20], k2tog] twice.
Toe round 10: K.

Secondary Decreases
Woman size only:
Toe round 9: [SKP, k16[-], k2tog] twice.
Toe round 10: [SKP, k14[-], k2tog] twice.
Toe round 11: [SKP, k12[-], k2tog] twice.
Toe round 12: [SKP, k10[-], k2tog] twice.
Toe round 13: [SKP, k8[-], k2tog] twice. 20 sts rem.

Man size only:
Toe round 11: [SKP, k-[18], k2tog] twice.
Toe round 12: [SKP, k-[16], k2tog] twice.
Toe round 13: [SKP, k-[14], k2tog] twice.
Toe round 14: [SKP, k-[12], k2tog] twice.
Toe round 15: [SKP, k-[10], k2tog] twice. 24 sts rem.

Toe completion:
Break yarn, leaving a 12-inch tail.
Still with WS facing, close the toe by grafting the remaining 20[24] sts.

Leg
Turn the work inside-out so that the RS is facing outwards. From this point on, you will be working in the round with the RS facing.

The first step is to get all the sts ready that you will need for working in the round; if you get stuck during this process, refer to step 4 in illustration above. It is quite fiddly work. As with the setup round for the foot, some of the sts you will use for the leg will come from stitch holders; some will come from spare lengths of yarn; and some will need to be picked up.

Note
: because you are now working with the RS facing, you need to pick up sts so that they look good from the side you are looking at!

Setup round:
At the open end of the tube (the closed end of the tube is where the toe is), there are 10 sts on a stitch holder in between the two gussets. With RS facing, place the left-most 5 of these sts on a needle leaving the right-most 5 sts still on the stitch holder. Rejoin yarn and k these 5 sts which you just put on a needle. 5 sts worked in this round so far.

You are now at the base of the first gusset. The 10[12] sts running up the right side of this gusset are on a spare length of yarn – transfer them to a needle but don’t work them yet!

Pick up and k 2 sts in between the last st you just worked and the first of the gusset side sts. 7 sts worked in this round so far.

[K1 of the gusset side sts from the needle, pick up and k 1 st in between the last st you just worked and the next gusset side st, k1 of the gusset side sts from the needle, pick up 2 sts in between the last st you just worked and the next st and k them tog] 5[6] times. 27[31] sts worked in this round so far.

Pick up and k 1 st at top of first gusset. 28[32] sts worked in this round so far. (Setup round is now halfway done.)

The 10[12] sts running down the side of the second gusset are on a spare length of yarn – transfer them to a needle but don’t work them yet!

Pick up and k 1 st at top of second gusset. 29[33] sts worked in this round so far.

[Pick up and k 1 st in between the last st you just worked and the next gusset side st, k1 of the gusset side sts from the needle, pick up 2 sts in between the last st you just worked and the next st and k them tog, k1 of the gusset side sts from the needle] 5[6] times. 49[57] sts worked in this round so far.
You are now at the base of the second gusset. The next 5 sts are on a stitch holder – place those sts onto a needle.

Pick up and k 2 sts in between the last st you just worked and the next st. 51[59] sts worked in this round so far.

K the last 5 sts from the needle. Round is complete. 56[64] sts on needles.

Mark for beginning of the round.  This is the center back of the heel.

Round 1 [RS]: [K1, p2, k1] 14[16] times.
Repeat this round until leg length is to your taste. Just make sure that by the time you finish the cast-off for the leg, you have not used up more than half your available yarn (assuming, of course, that you are making two socks).

Cast off in established 2x2 rib pattern using Jeny’s Surprisingly Stretchy Bind-off.

spacer

FINISHING
Weave in all ends.

spacer
ABOUT THE DESIGNER

Kathleen hasn’t knitted “regular” socks for almost two years.  She continues to look for new variations for hat-heel socks and hopes others will do the same. She is also trying valiantly but fruitlessly to keep her WIPs under some semblance of control.

She blogs to keep track of it all at wipinsanity.blogspot.com


spacer