Knitty: little purls of wisdom
Kollage yarns
Title
beauty shot

Tangy

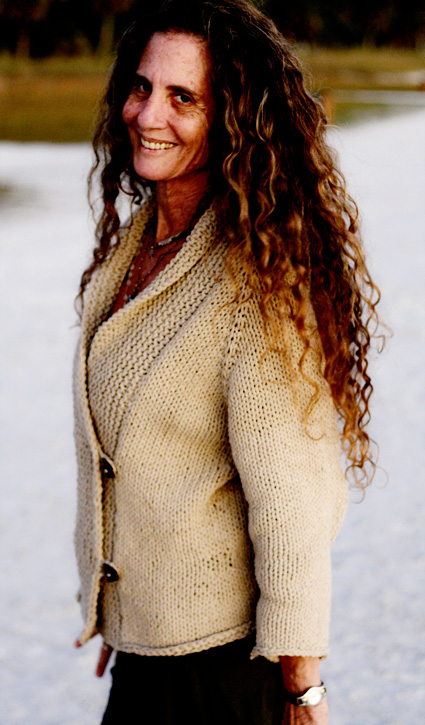
I knit this cardigan for my holiday. It was designed to be loose, casual and in a neutral color so that I could wear it with everything. I like to pack light and going to Florida, I didn’t want to bring more than one warm cover up.

However all did not go according to plan. I did bring this cardigan on holiday with me and I also took some very nice photos on the beach with it. What I wasn’t planning on, though, was my sister-in-law. Nicki came to visit, picked up the cardigan and tried it on. It was a perfect match and I just had to give it to her.

As you will probably agree from the photos, this cardigan was most definitely made for Nicki.

spacer model: Nicki spacer photos: Joseph Feller

SIZE
XS[S, M, L, 1X, 2X, 3X] (shown in size medium)

spacer

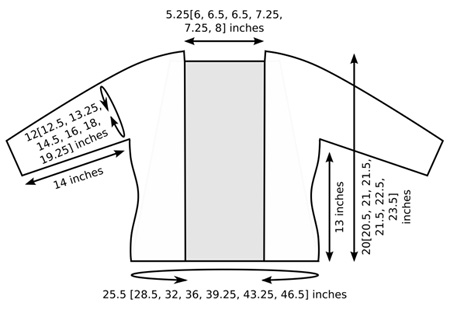
FINISHED MEASUREMENTS
Chest: 30.5[34.5, 38.5, 42.5, 46.5, 50.5, 54.5] inches, with front bands overlapped
Length: 20[20.5, 21, 21.5, 21.5, 22.5, 23.5] inches
Note: Choose a size that is 2-4 inches larger than actual bust measurement for recommended loose fit.

spacer

MATERIALS
Yarn

spacer GarnStudio ‘Drops Ice’ [55% cotton, 45% acrylic; 49yd/45m per 50g skein]; color: #04 Beige (04); 12[13, 15, 16, 18, 20, 22] skeins


Recommended needle size
[always use a needle size that gives you the gauge listed below -- every knitter's gauge is unique]
spacer 1 set US #11/8mm double-point needles
spacer 1 US #11/8mm circular needle, 32 inches or longer (longer needle recommended for larger sizes)

Notions
spacer Crochet hook, approx. size US #J/10 / 6mm
spacer Stitch markers
spacer Waste yarn
spacer Yarn needle
spacer 2 locking stitch markers or safety pins
spacer 2 large buttons
spacer 2 large plastic snaps

spacer

GAUGE

spacer12 sts/16 rows = 4" in stockinette st

PATTERN NOTES
[Knitty's list of standard abbreviations and techniques can be found here.]

M1L (left-leaning increase): Insert left needle, from front to back, under strand of yarn which runs between last stitch on left needle and first stitch on right needle; knit this stitch through back loop. 1 stitch increased.

M1R (right-leaning increase): Insert left needle, from back to front, under strand of yarn which runs between last stitch on left needle and first stitch on right needle; knit this stitch through front loop. 1 stitch increased.

W&T (Wrap & Turn; worked in garter st):
Knit to point specified in pattern, bring yarn to front of work between needles, slip next stitch to right-hand needle, bring yarn around this stitch to back of work, slip stitch back to left-hand needle, turn work to begin knitting back in the other direction.
Bring yarn between needles to back of work, and pull snugly before working next st. Wrapping st in this way will ensure most invisible and attractive result.
If you have worked short rows before, you may be used to working wraps together with wrapped sts on subsequent rows. This is not necessary for this project; the wrapped sts will not detract from the appearance of the piece.

Instructions for the Backward Loop Cast On can be found here.

Crochet Stitches:

sl st (slip stitch)

ch (chain)

DIRECTIONS
YOKE
Using circular needle, CO 36[34, 32, 28, 30, 30, 32] sts.

Set-up Row [RS]: Kfb, place marker, kfb, k6[4, 2, 0, 0, 0, 0], kfb, place marker, kfb, k16[18, 20, 20, 22, 22, 24], kfb, place marker, kfb, k6[4, 2, 0, 0, 0, 0], kfb, place marker, kfb. 44[42, 40, 36, 38, 38, 40] sts.

P 1 row.

Raglan Increase Row [RS]: [K to 1 st before marker, kfb, slip marker, kfb] four times, k to end. 8 sts increased.

Repeat these 2 rows 12[13, 14, 15, 15, 17, 19] times more. 148[154, 160, 164, 166, 182, 200] sts.

Divide Body from Sleeves:
P 1 row.

Dividing Row [RS]: *K to marker, remove marker, slip next 36[36, 36, 36, 36, 40, 44] sts (all sts to next marker) to waste yarn, remove marker; using backward loop method, CO 0[2, 4, 8, 12, 14, 14] sts; repeat from * once more; k to end. 76[86, 96, 108, 118, 130, 140] sts: 15[16, 17, 18, 18, 20, 22] sts for each front,  0[2, 4, 8, 12, 14, 14] sts for each underarm, 46[50, 54, 56, 58, 62, 68] sts for back.

Next Row [WS]: P15[17, 19, 22, 24, 27, 29], place marker (indicates center of underarm), p46[52, 58, 64, 70, 76, 82], place marker, p15[17, 19, 22, 24, 27, 29].

LOWER BODY
Work in stockinette st until work measures 2 inches from underarm, ending with a WS row.

Waist Decrease Row [RS]: [K to 3 sts before marker, ssk, k1, slip marker, k1, k2tog] twice, k to end. 72[82, 92, 104, 114, 126, 136] sts.
Work 7 rows in stockinette st.
Repeat these 8 rows once more, then work Waist Decrease Row once more. 64[74, 84, 96, 106, 118, 128] sts.

Work 5 rows in stockinette st.
Waist Increase Row [RS]: [K to 1 st before marker, M1R, k1, slip marker, k1, M1L] twice, k to end. 68[78, 88, 100, 110, 122, 132] sts.
Repeat these 6 rows twice more. 76[86, 96, 108, 118, 130, 140] sts.

Note: This sample was knit using a cotton-blend yarn which does not curl excessively in stockinette st.  If you are working with an animal fiber yarn, you may wish to work the lower 2 inches of the body in garter st to prevent curling.

Continue in stockinette st until work measures 13 inches from underarm or desired length. BO all sts.

SLEEVES
Using double-point needles and beginning at center of one underarm, pick up and k 0[1, 2, 4, 6, 7, 7] sts along CO underarm edge, k 36[36, 36, 36, 36, 40, 44] held sleeve sts, pick up and k 0[1, 2, 4, 6, 7, 7] sts along remaining half of CO underarm edge. 36[38, 40, 44, 48, 54, 58] sts.

K 15[15, 15, 15, 11, 11, 7] rounds.

Sleeve Decrease Round: K1, k2tog, k to last 3 sts, ssk, k1. 34[36, 38, 42, 46, 52, 56] sts.

Repeat these 16[16, 16, 16, 12, 12, 8] rounds 1[1, 1, 1, 2, 3, 5] times more. 32[34, 36, 40, 42, 46, 46] sts.

Continue in stockinette st until sleeve measures 14 inches from underarm or desired length. BO all sts.

Note: As for lower body, if you are working with an animal fiber yarn, you may wish to work the lower 2 inches of the sleeve in garter st to prevent curling.

Work other sleeve in the same way.

COLLAR
Using circular needle, with RS facing and beginning at lower right front corner, pick up and k 3 sts for every 4 rows along right front edge, place marker, pick up and k 1 st in each CO st along neckline edge, place marker, pick up and k 3 sts for every 4 rows along left front edge, ending at lower left front corner.

K 1 WS row.

Collar is shaped using short rows, which raise collar at back of neck. All short rows are turned between the two markers.

Short Row 1 [RS]: K to 6 sts before second marker, W&T.
Short Row 2 [WS]: K to 6 sts before marker, W&T.
Short Rows 3-4: K to 4 sts before marker, W&T.
Short Rows 5-6: K to 2 sts before marker, W&T.
Short Rows 7-8: K to marker, W&T.
Next Row [RS]: K to end, removing markers.

Continue in garter st until collar measures 5.25[6, 6.5, 6.5, 7.25, 7.25, 8] inches. Be sure to measure collar depth from picked-up sts along front edge, not in short-rowed section.

Note: At this point, it is a good idea to transfer all sts to a generous length of waste yarn and try on sweater, to be sure the collar is deep enough to overlap completely when worn. If necessary, work more rows before binding off.


Loosely BO all sts.

FINISHING
Weave in ends.
Try on cardigan to determine desired placement of button loops along right front edge, and mark using locking st markers or safety pins. Front bands should overlap completely.

Make each button loop as follows: Use sl st to join yarn to edge, slightly above marker; work a crochet chain long enough to fit snugly around button; use sl st to join yarn to edge, slightly below marker; fasten off.

Sew buttons to left front, opposite button loops. Sew one half of each snap to RS of left front band, near edge. Sew remaining half of each snap to corresponding positions on WS of right front band.

spacer
ABOUT THE DESIGNER

Carol Feller is an independent knitwear designer living in Cork, Ireland. Trained as both an artist and a structural engineer, she has found a real "home" in knitting and design -- work which allows her to combine the best of both those worlds. As a busy mother of four, finding time to design is not always easy, but she does her best.

To see her self-published patterns visit stolenstitches.com.

spacer