
|
|
 |
|
|
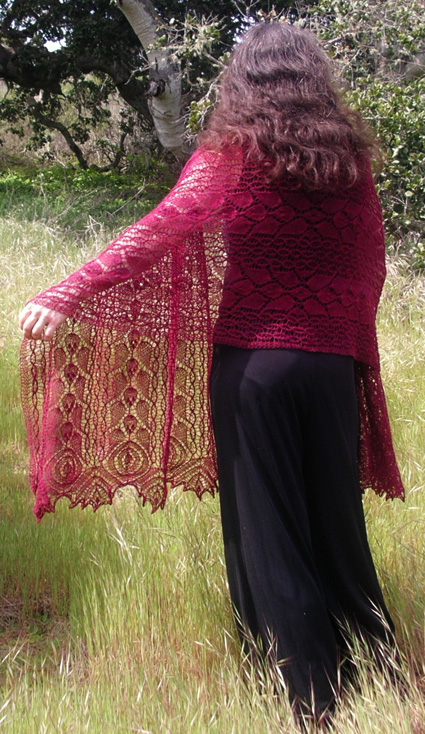
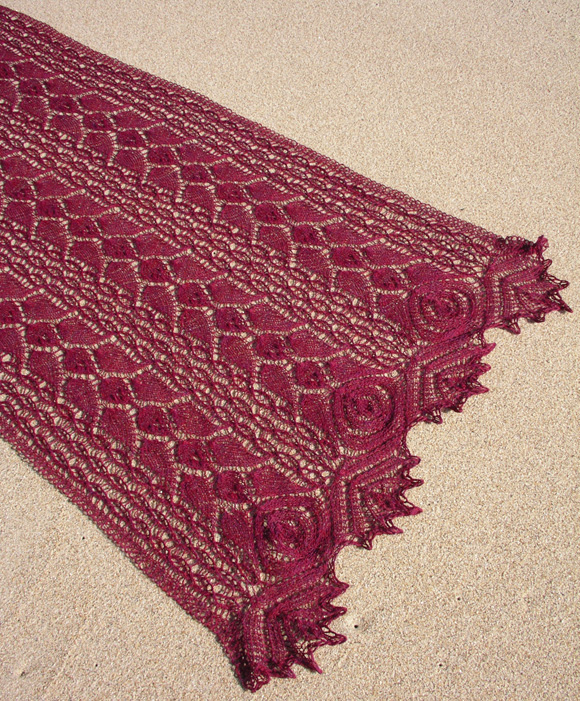
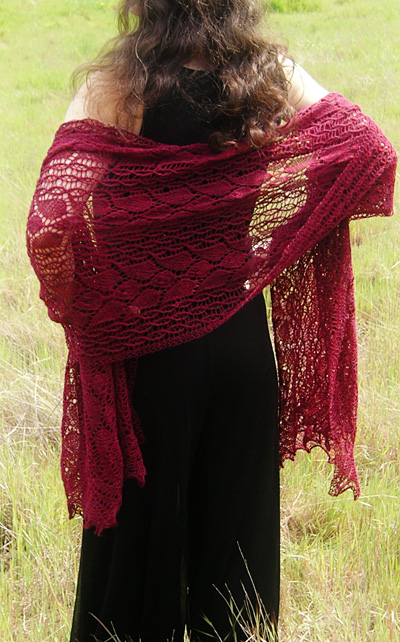
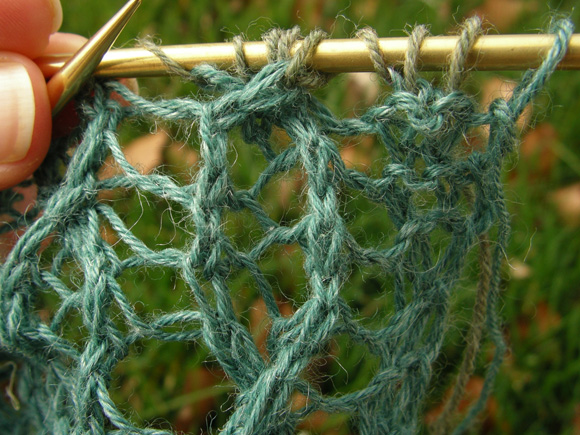
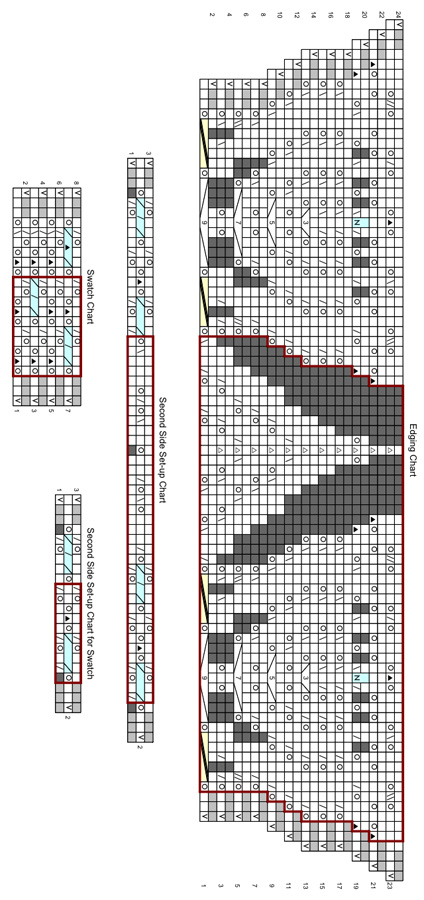
Ancient trees and wrought iron trellis work. Climbing rose buds twining sedately skyward burst into sudden audacious flower. Rhodion begins with a provisional cast on, and then grows in both directions. The trellis work is formed by a cable lace stitch with patterning every row. The wrong side patterning in the cable lace is unchanging, making this a good introduction to every row lacework. Cable crossings in lace weight are a challenge, particularly since lacework is incorporated into the cable crossing itself. Instructions are given for working this stitch both with and without a cable needle. When turning to work the second side, set up rows incorporate yarn overs and decreases so that the trellis work flows seamlessly the length of the stole. |
||
|
|
Tweet
|
|
|
SIZE |
|
|
FINISHED MEASUREMENTS |
|
MATERIALS Notions |
|
GAUGE |
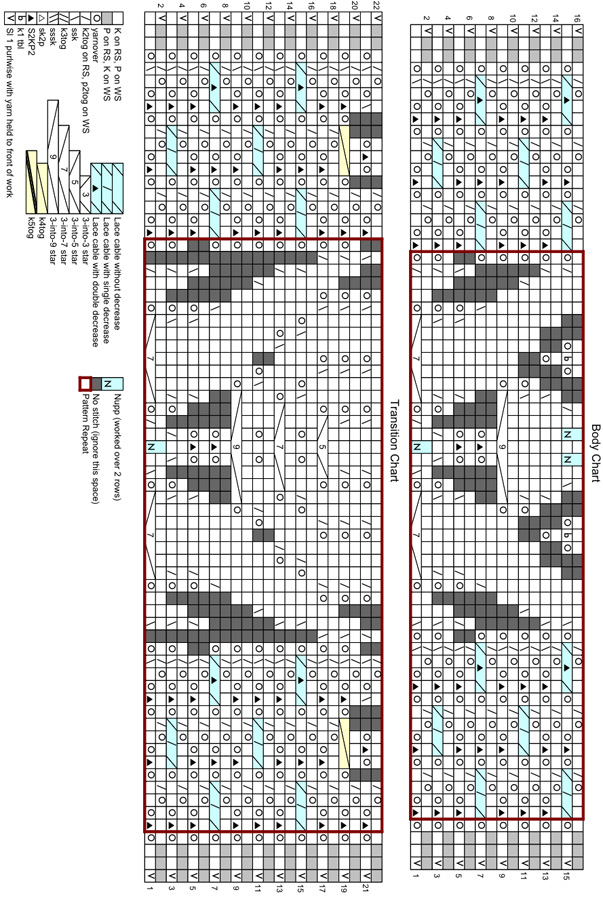
20 sts/21 rows = 4" in
pattern stitch, following swatch chart Gauge is measured over Swatch Chart. Correct gauge is not essential for this project unless you are working with a limited quantity of yarn. However, if you do wish to swatch and measure your gauge before beginning, use the Swatch Chart provided below. Block swatch, allow to dry, unpin and allow to relax before measuring gauge. A Second Side Set-up Chart is provided for the swatch, so that swatch can be used to practice the spiral loop cast on and setting up the second side. To do this, work spiral wrap cast on for 22 stitches (wrap approx. 30 times – see pattern notes). Work Rows 1-8 of Swatch Chart as many times as desired, then bind off loosely. Join yarn to sts on spare needle with WS facing. Work Rows 1-3 of set-up chart for swatch, then work Rows 1-8 of Swatch Chart as desired. |
|
|
PATTERN NOTES |
 Estonian Stitches: K3tog: Knit next 3 sts together. Sssk: Slip next 3 sts knitwise, one at a time, to right needle. Insert tip of left needle into fronts of these 3 sts from left to right, and knit them together. sk2p: Slip 1 knitwise, k2tog, pass slipped st over. 2 sts decreased. S2KP2: Slip next 2 sts together, knitwise, as if to work a k2tog. Knit next st through back loop, then pass both slipped sts over st just knit. This forms a centered double decrease. Nupp: On RS row, k next st without dropping st from left needle, yo, [k same st again without dropping from left needle, yo] twice, k same st again and drop st from left needle. 1 st increased to 7 sts. On following WS row, purl these 7 sts together. 7 sts decreased to 1 st. Star Stitches: 3-into-5 star: K3tog without dropping sts from left needle, yo, k same 3 sts together again without dropping from left needle, yo, k same 3 sts together again and drop from left needle. 3 sts increased to 5 sts. 3-into-7 star: K3tog without dropping sts from
left needle, yo, [k same 3 sts together again without dropping
from left needle, yo] twice, k same 3 sts together again and
drop from left needle. 3 sts increased to 7 sts. Lace Cable Stitches:
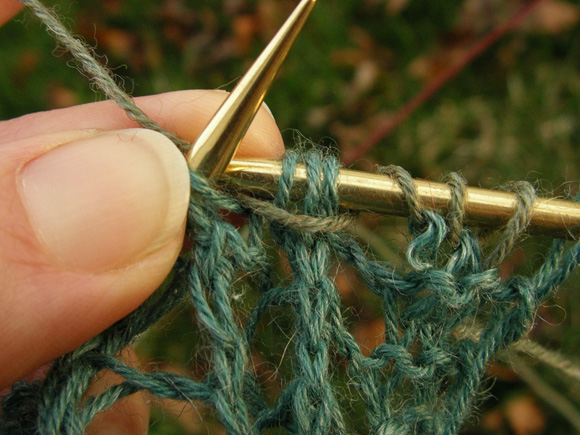
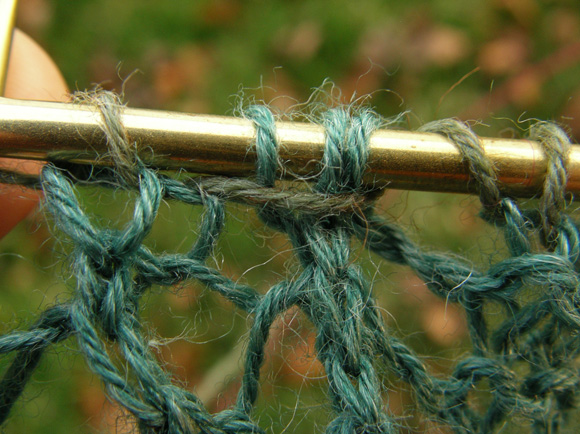
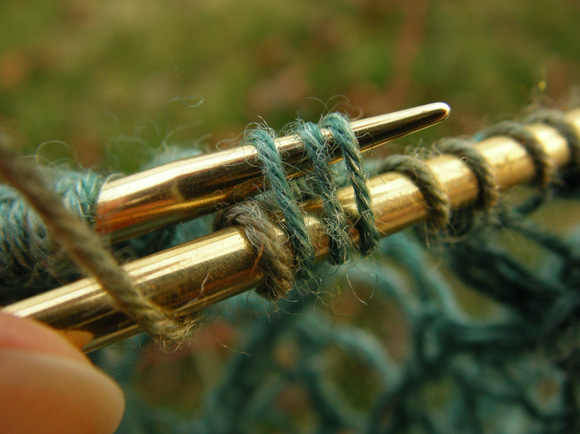
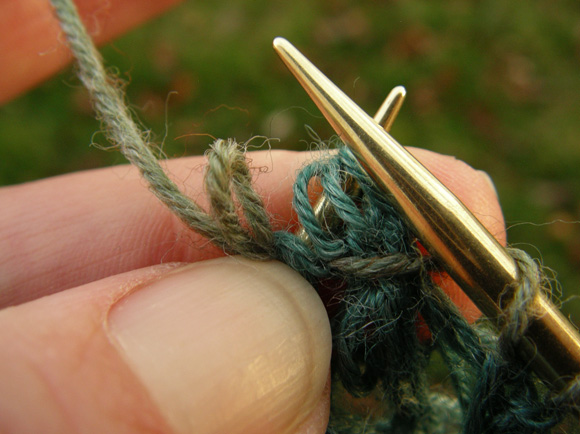
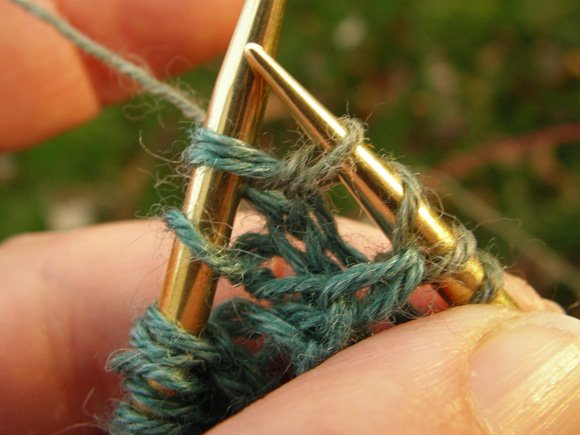
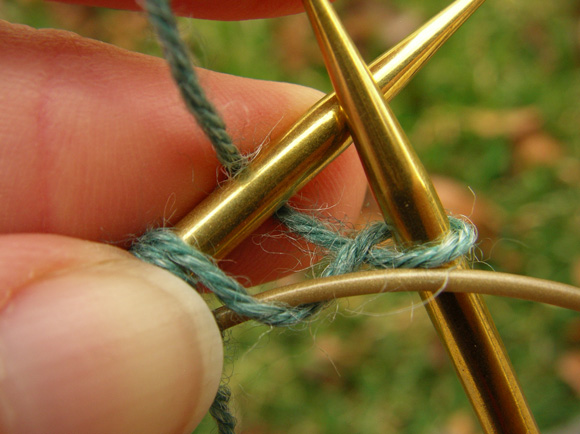
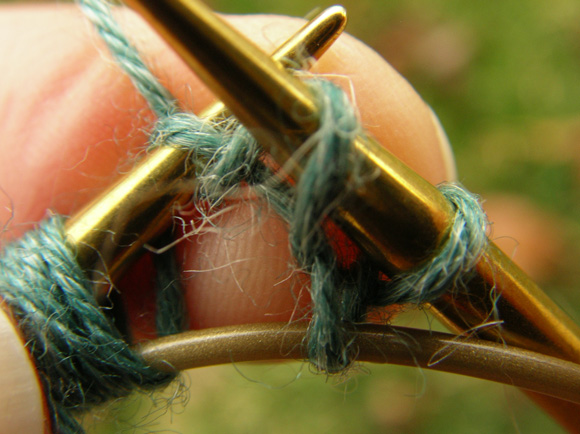
Sl 3 sts purlwise to right needle, then bring yarn between needles to back of work. Yarn will form a bar across fronts of slipped sts.
Work k2tog over next 2 sts on left needle. Bring yarn between needles to front of work.
Reach tip of left needle around back of work and insert into 3 slipped sts, skipping the k2tog just worked.
Use left thumb and index finger to pinch bases of last 4 sts on right needle, stabilizing them. Pull tip of right needle out of these 4 stitches. The 3 slipped sts will now be on left needle; the k2tog will be floating free in front of the left needle.
Quickly slip tip of right needle back into the k2tog.
Lace cable crossing is complete.
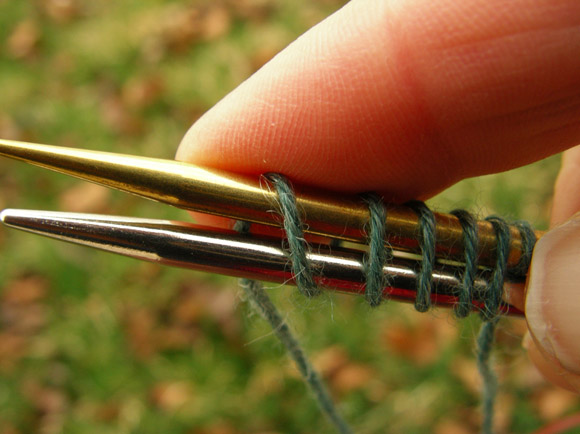
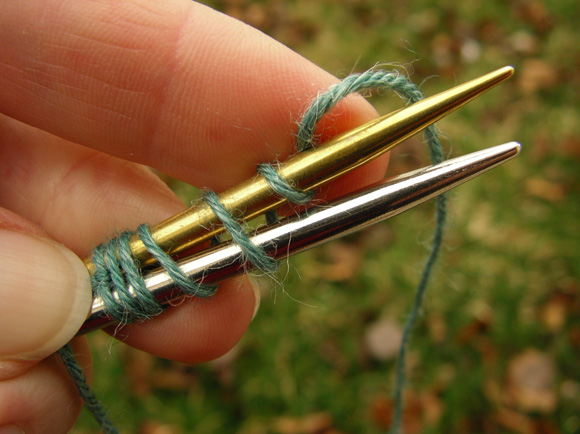
Lace cable with double decrease (6 sts decreased to 4 sts): Lace cable without decrease (worked over 4 sts): Turkish Cast On: Hold two circular needles parallel, with the working needle on the top, and the spare needle on the bottom. Make a slip knot approximately 8 inches from end of yarn, and place on working needle. With points of needles facing you, wrap yarn counter clockwise around both needles, wrapping several times more than the number of sts needed. Try to keep all wraps on the needles, rather than pushing them onto the cables (especially when working with a very lightweight yarn).
Turn working needle so that it is in position for the first
row to be worked. Wrap yarn once around working needle only – there
will now be one more st on working needle than on spare needle.
Pull tip of spare needle through sts so that both tips are hanging down, with all sts resting on cable. Wraps will now be loose on working needle; hold carefully in place so they do not slide off.
When working Row 1, slip first st purlwise with yarn held to back of work. (On all following rows, slip first st with yarn held to front of work). Work first row gently, to avoid distorting wraps.
Modifying the size: Information about blocking lace can be found here.
|
body and transition charts + chart key • edging, set-up charts, swatch charts 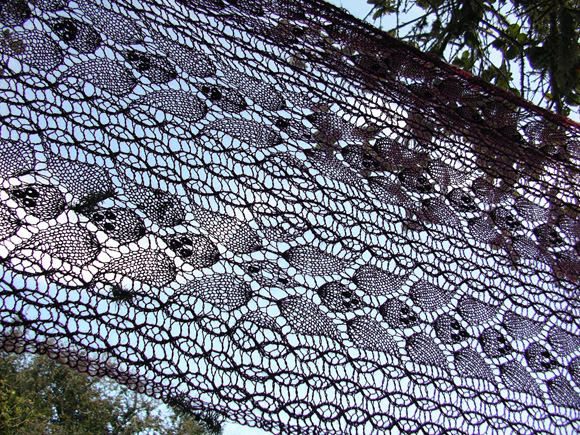
|
|
DIRECTIONS 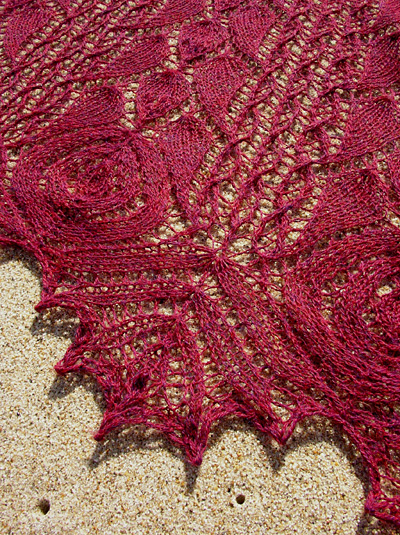
Using Turkish cast on, CO 133 sts (wrap yarn approx. 150 times). Work Row 1 of Body Chart, slipping first st with yarn held to back of work (for first row only) and working outlined pattern repeat three times. 157 sts on needle when Row 1 is complete. (After completing this row, remaining wraps and slip knot from CO can be dropped from needles.) Continue following Body Chart until you have worked Rows 1-16 a total of 13 times. 133 sts on needle when Row 16 is complete. Work Rows 1-22 of Transition Chart. 133 sts. SECOND SIDE Join yarn to sts on spare needle with WS facing. Work through charts and bind off as for first side. |
|
FINISHING |
| ABOUT THE DESIGNER |
|
|
|
Pattern & images © 2011 Elizabeth Freeman. Contact Elizabeth |

