Knitty: little purls of wisdom
Purl on the Lamb
Title
beauty shot

Tangy

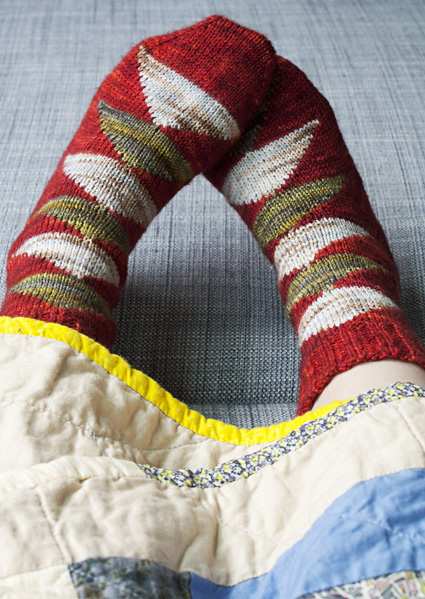
Confession: I've only ever made one quilt.

My sewing isn't quite as good as my knitting, but lately I've been losing time wandering the aisles of the fabric store, just soaking in all the color and pattern. I've spent hours reading online tutorials and bookmarking inspirational quilt tops, and have been particularly drawn to two specific but somewhat opposite types: modern and clean designs that emphasize geometry, and humble charm quilts that have a well-worn and homespun feel.

Making room to sew a quilt is a daunting task in our tiny ranch house, so naturally I turned to yarn instead of fabric. The resulting socks are a translation of a traditional flying geese design, knit one-triangle-at-a-time by using short rows. Depending on the yarn chosen, the final result can be either graphic or scrappy, making these a versatile option for both gift-giving and stash-busting.


spacer photos: Lacey Volk
   Pin It!


SIZE
Women's S[M, L]
Shown in size M on a size US 6.5 foot

FINISHED MEASUREMENTS
Foot Circumference: 7[8, 9] inches
Length of foot: Adjustable to fit
Length of leg: 7.5[8, 8.5] inches

spacer

MATERIALS
Yarn

spacer [MC] Sundara Sock [100% superwash merino wool; 370 yards per 100g skein; color: Red over Orange; 1[1, 2] skeins
spacer [CC1] Malabrigo Sock Yarn [100% merino wool; 440 yards per 100g skein]; color: Turner; 1 [1, 1] skein
spacer [CC2] MadelineTosh Sock [100% superwash merino wool; 395 yards per 100g skein]; color: Parchment; 1 [1, 1] skein
Note: This pattern is perfect for using up leftovers of precious sock yarns! I used far less than half a skein for each CC as pictured. For a scrappier quilt-inspired look, consider using more than two CCs to mix things up.

Recommended needle size
[always use a needle size that gives you the gauge listed below -- every knitter's gauge is unique]
spacer US #1.5/2.5mm needles for working in the round: DPNs, 1 long circular or 2 short circulars

Notions
spacer Yarn needle
spacer 2 stitch markers

spacer
GAUGE
30 sts/42 rounds = 4 inches in stockinette stitch
 

PATTERN NOTES
[Knitty's list of standard abbreviations and techniques can be found here.]

The colorwork design is worked entirely through the use of short rows. There are three distinct shapes in this pattern: Main Color Triangles, Contrast Color Triangles, and Main Color Quadrilaterals. See diagram at right.

When knitting Contrast Color Triangles, alternate between CC1 and CC2 as shown.

This pattern uses a stretchy cast on. You can use the Long Tail or Jeny's Stretchy methods:

Instructions for the Long-Tail Cast On can be found here

Instructions for the Jeny's Stretchy Cast On can be found here.

Pick up and Purl: To pick up and purl, insert the tip of the right needle from the back (RS of fabric) towards you (the WS of the fabric); wrap the yarn as is to purl and take the new stitch back through to the RS of the fabric.

Kitchener Stitch
Instructions for grafting can be found here.

Working Floats Together with Stitches:
When knitting the Main Color Triangles and Quadrilaterals, short lengths of yarn called "floats" are created on the wrong side of the work by slipping the first stitch in each row. To keep the color changes neat and tidy, floats are picked up and worked together with the stitch above them when working Contrast Color Triangles.

Knitting a stitch together with float: Pick up the float and place it on the left hand needle, insert the right needle into both the float and stitch, and knit them together.
Purling a stitch together with float: Sl1, pick up the float with your right hand needle, then purl the slipped stitch and float together.

Working Wraps Together with Wrapped Stitches:
When working the wraps at the turning points of the short rows together with the stitches they wrap, be sure not to twist your stitches by working as follows:

When working a RS row: Knit to wrapped stitch, insert right needle into both wrap and stitch from bottom to top, into the wrap first and then into the stitch, and knit them together.
When working a WS row: Purl to wrapped stitch, use tip of left needle to pick up "wrap" and place it on left needle, purl wrap and stitch together.

DIRECTIONS
Cuff
Using MC and a stretchy cast on method CO 52[60, 68] stitches. Distribute sts across needles as you prefer and join for working in the round, being careful not to twist.

Ribbing round: [K2, p2] around.
Work ribbing as set for 15 rounds total.
Next round: Knit.
Break yarn, leaving a tail to be woven in later.

Leg
The leg is worked in three sections. Each section is comprised of two Main Color Triangles (one on the left side of the sock, then one on the right) and two Contrast Color Triangles (one in the front and one in the back).

In the first and third sections CC1 is used for the front Contrast Color Triangle, and CC2 for the back Contrast Color Triangle. In the second section CC2 is used for the front, and CC1 for the back. This alternating pattern continues for the rest of the pattern.

First Main Color Triangle
Setup: With RS facing, slip first 27[31, 35] stitches of the round to a single needle.
Turn so that WS is facing.

Size L Only:
Row 1 [WS]: Sl1, p33, w&t, twisting your working yarn with the tail left from the previous step, as if for intarsia.
Row 2 [RS]: Sl1, k31, w&t.

Size M and L:
Row 3 [WS]: Sl1, p29, w&t. For size M only, twist your working yarn with the tail left from the previous step, as if for intarsia.
Row 4 [RS]: Sl1, k27, w&t.

All Sizes:
Row 5 [WS]: Sl1, p25, w&t. For size S only, twist your working yarn with the tail left from the previous step, as if for intarsia.
Row 6 [RS]: Sl1, k23, w&t.
Row 7 [WS]: Sl1, p21, w&t.
Row 8 [RS]: Sl1, k19, w&t.
Row 9 [WS]: Sl1, p17, w&t.
Row 10 [RS]: Sl1, k15, w&t.
Row 11 [WS]: Sl1, p13, w&t.
Row 12 [RS]: Sl1, k11, w&t.
Row 13 [WS]: Sl1, p9, w&t.
Row 14 [RS]: Sl1, k7, w&t.
Row 15 [WS]: Sl1, p5, w&t.
Row 16 [RS]: Sl1, k3, w&t.
Row 17 [WS]: Sl1, p1, w&t.

Break yarn, leaving a tail to be woven in later.

Set up for second Main Color Triangle: Reorient your needles so that the 25[29,33] unworked stitches are on your needle with RS facing. Add one stitch on each side from the previously worked stitches, so that you now have 27[31,35] stitches ready to be worked. Turn so that WS is facing.

Work as for first Triangle.

Set up for Contrast Color Triangles:
To set up for contrast triangles, your needles must be pointing in a V shape towards the center stitch of the gap you need to fill (see image at right).

With RS facing, reorient your needles so that 13[15, 17] stitches are on your right hand needle, 14[16,18] stitches are on your left hand needle, and the remaining 25[29,33] stitches are held -- on another needle or holder. The center stitch of the gap (the lowest point) should be the first stitch on your left hand needle.

Work the first Contrast Color Triangle with CC1 as follows:

All Sizes:
Row 1 [RS]: K1 together with wrap, turn.
Row 2 [WS]: Sl1, p1 together with wrap, turn.
Row 3 [RS]: Sl1, k1, k1 together with float, k1 together with wrap, turn.
Row 4 [WS]: Sl1, p3, p1 together with float, p1 together with wrap, turn.
Row 5 [RS]: Sl1, k5, k1 together with float, k1 together with wrap, turn.
Row 6 [WS]: Sl1, p7, p1 together with float, p1 together with wrap, turn.
Row 7 [RS]: Sl1, k9, k1 together with float, k1 together with wrap, turn.
Row 8 [WS]: Sl1, p11, p1 together with float, p1 together with wrap, turn.
Row 9 [RS]: Sl1, k13, k1 together with float, k1 together with wrap, turn.
Row 10 [WS]: Sl1, p15, p1 together with float, p1 together with wrap, turn.
Row 11 [RS]: Sl1, k17, k1 together with float, k1 together with wrap, turn.
Row 12 [WS]: Sl1, p19, p1 together with float, p1 together with wrap, turn.
Row 13 [RS]: Sl1, k21, k1 together with float, k1 together with wrap, turn.
Size S only:
Row 14 [WS]: Sl1, p23, p1 together with float, w&t

Size M only:
Row 14 [WS]: Sl1, p23, p1 together with float, p1 together with wrap, turn.
Row 15 [RS]: Sl1, k25, k1 together with float, k1 together with wrap, turn.
Row 16 [WS]: Sl1, p27, p1 together with float, w&t

Size L only:
Row 14 [WS]: Sl1, p23, p1 together with float, p1 together with wrap, turn.
Row 15 [RS]: Sl1, k25, k1 together with float, k1 together with wrap, turn.
Row 16 [WS]: Sl1, p27, p1 together with float, p1 together with wrap, turn.
Row 17 [RS]: Sl1, k29, k1 together with float, k1 together with wrap, turn.
Row 18 [WS]: Sl1, p31, p1 together with float, w&t

At this point, the RS is facing, and your stitches should be arranged as follows: 1 MC st, 25[29, 33] CC stitches, and 1 MC stitch; the final MC stitch is wrapped with the contrast color. Break yarn.

Turn so that you're facing the other side of the sock, reorient your stitches as indicated above, and work a second Contrast Color Triangle with CC2.

Once the two Contrast Color Triangles are complete, start another tier, Main Color Triangles first.

Setup for Main Color Triangles: Reorient your needles so that you have 13[15, 17] CC stitches, 1 MC stitch, and 13[15, 17] CC stitches on needle with RS facing.

Turn so that WS is facing, and follow instructions for Main Color Triangle above. Repeat another Main Color Triangle on the opposite side as before.

Once both MC triangles complete, work Contrast Color triangles as before, ensuring that you alternate so that CC2 is below CC1 on the front, and CC1 is below CC2 on the back.

Work a third tier as for the second, working CC1 again on the front, and CC2 again on the back.

Heel Flap
Reorient your needles as if to work another Main Color Triangle on the back of your sock. The heel flap will be worked across these 27[31, 35] stitches.
Join MC.

Using MC:
Row 1 [RS]: Sl1, k25[29, 33], k1 together with wrap, turn.
Row 2 [WS]: Sl1, k25[29, 33], p1 together with wrap, turn.
Row 3 [RS]: [Sl1, k1] 13[15, 17] times, k1.
Row 4 [WS]: Sl1, p25[29, 33].
Row 5 [RS]: Sl2, [K1, sl1] 12[14, 15] times, k1.
Row 6 [WS]: Sl1, p25[29, 33].

Repeat Rows 3-6 5[6, 7] more times, and work Rows 3 & 4 1[0, 0] more times. 28[30, 34] rows total. You will have 14[15, 17] slipped stitches on each side of your heel flap.

Turn Heel
Row 1 [RS]: K18[21, 24], SKP, turn.

Row 2 [WS]: Sl1, p9[11, 13] p2tog, turn.

Row 3 [RS]: Sl1, k9[11, 13], SKP, turn.
Row 4 [WS]: Sl1, p9[11, 13] p2tog, turn.

Repeat Rows 3-4 until all the stitches from the heel flap have been worked. RS is facing, and 11[13, 15] sts rem.

Break yarn.

GUSSET
We will continue to knit short rows throughout the gusset, so the pattern can continue uninterrupted on the instep of the sock.

Reorient your needles so that the center stitch of the contrast triangle on the instep is the first stitch on your left hand needle. Turn so that WS is facing.

Using MC:
Row 1 [WS]: P12[14, 16], pick up and p14[15,17] sts along heel flap, p11[13,15] across heel sts, pick up and purl 14[15, 17] sts along heel flap, p12[14, 16], w&t. Twist your working yarn with the tail left at the beginning of the row, as if working intarsia. 64[72, 82] sts.

Row 2 [RS]: Sl1, k11[13, 15], pm, k2tog, k35[39, 45], SSK, pm, k 11[13, 15], w&t.
Row 3 [WS]: Sl1, p to 2nd marker, p10[12, 14], w&t.
Row 4 [RS]: Sl1, k to marker, k2tog, k to 2 sts before marker, SSK, k9[11, 13], w&t.
Row 5 [WS]: Sl1, p to 2nd marker, p8[10, 12], w&t.
Row 6 [RS]: Sl1, k to marker, k2tog, k to 2 sts before marker, SSK, k7[9, 11], w&t.
Row 7 [WS]: Sl1, p to 2nd marker, p6[8, 10], w&t.
Row 8 [RS]: Sl1, k to marker, k2tog, k to 2 sts before marker, SSK, k5[7, 9], w&t.
Row 9 [WS]: Sl1, p to 2nd marker, p4[6, 8], w&t.
Row 10 [RS]: Sl1, k to marker, k2tog, k to 2 sts before marker, SSK, k3[5, 7], w&t.
Row 11 [WS]: Sl1, p to 2nd marker, p2[4, 6], w&t.
Row 12 [RS]: Sl1, k to marker, k2tog, k to 2 sts before marker, SSK, k1[3, 5], w&t.

Size S only:
Row 13 [WS]: Sl1, p to 2nd marker, w&t.

Size M only:
Row 13 [WS]: Sl1, p to 2nd marker, p2, w&t.
Row 14 [RS]: Sl1, k to 2nd marker, k1, w&t.
Row 15 [WS]: Sl1, p to 2nd marker, w&t.

Size L only:
Row 13 [WS]: Sl1, p to 2nd marker, p4, w&t.
Row 14 [RS]: Sl1, k to marker, k2tog, k to 2 sts before marker, SSK, k3, w&t.
Row 15 [WS]: Sl2, p to 2nd marker, p2, w&t.
Row 16 [RS]: Sl1, k to 2nd marker, k1, w&t.
Row 17 [WS]: Sl1, p to 2nd marker, w&t.

You should now have 52[60, 68] stitches remaining. Break yarn.

FOOT
From here, you'll work Contrast Color Triangles on the top of the foot, and Main Color Quadrilaterals on the sides/soles of the foot.

Main Color Quadrilateral
Reorient your needles and work Contrast Triangle in CC2 on the top of the foot.

Reorient needles with RS facing so that the center stitch of the last Contrast Triangle is the rightmost stitch on your left hand needle. Turn work to WS facing.

Using MC:
Row 1 [WS]: P51[59, 67], picking up the wraps on each end of your contrast triangle, w&t. Twist yarn with contrast color tail as if working intarsia.
Row 2 [RS]: Sl1, k49[57, 65], w&t.
Row 3 [WS]: Sl1, p47[55, 63], w&t.
Row 4 [RS]: Sl1, k45[53, 61], w&t.
Row 5 [WS]: Sl1, p43[51, 59], w&t.
Row 6 [RS]: Sl1, k41[49, 57], w&t.
Row 7 [WS]: Sl1, p39[47, 55], w&t.
Row 8 [RS]: Sl1, k37[45, 53], w&t.
Row 9 [WS]: Sl1, p35[43, 51], w&t.
Row 10 [RS]: Sl1, k33[41, 49], w&t.
Row 11 [WS]: Sl1, p31[39, 47], w&t.
Row 12 [RS]: Sl1, k29[37, 45], w&t.

Size S only:
Row 13 [WS]: Sl1, p27, w&t.

Size M only:
Row 13 [WS]: Sl1, p35, w&t.
Row 14 [RS]: Sl1, k33, w&t.
Row 15 [WS]: Sl1, p31, w&t.

Size L only:
Row 13 [WS]: Sl1, p43, w&t.
Row 14 [RS]: Sl1, k41, w&t.
Row 15 [WS]: Sl1, p39, w&t.
Row 16 [RS]: Sl1, k37, w&t.
Row 17 [WS]: Sl1, p35, w&t.

Break yarn.

Continue to work Main Color Quadrilaterals and Contrast Triangles until you are anywhere between 3[3, 3.5] and 1.5[1.5, 1.75] inches away from the end of the foot, ending with a Contrast Triangle. After the final row in the Contrast Triangle, with RS facing you should be in position to work across the instep.

Using MC, sl1, then knit even until foot measures 1.5[1.5, 1.75] inches less than desired full foot length.

Final round: K26[30,36], pm, k to end of round. The marker designates the center point of the round. Rearrange your sts if desired.

Shape toe:
Round 1: K1, SSK, knit to 3 sts before marker, k2tog, k1; k1, ssk, k to 3 sts before end of round, k2tog, k1. 4 sts decreased.
Round 2: K all stitches

Repeat Rounds 1 & 2 until 28 stitches remain.

spacer

FINISHING
Graft toe closed.
Block and weave in all ends. Use this opportunity to gently snug stitches to close any gaps at the triangle points, as needed.

spacer
ABOUT THE DESIGNER

Lacey Volk is an art-school graduate who somehow ended up working in technology. She writes and publishes patterns and other DIY projects on her blog, Volkstricken Industries, and can be found on Ravelry.

She lives Pittsburgh, Pennsylvania, with her husband and their imaginary French Bulldog.

spacer