Knitty: little purls of wisdom
Title
beauty shot

Tangy

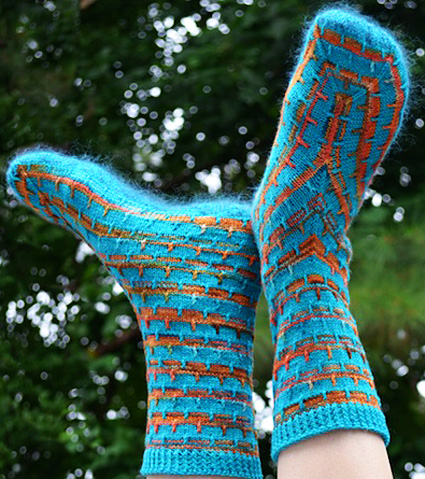
My friend's Grandma Bea always knitted socks with stripes. She said they went faster, because instead of saying to yourself "I'll just finish this round," you say "I'll just finish this stripe," and before you know it, you're done.

These are really just simple striped socks, but they're unlike any that Grandma Bea ever made. That's because the sole is knitted in full first, before all the rest of the sock. I developed this method so that I could easily reinforce my sock soles where they used to wear out: at the ball of the foot and sometimes the bottom of the heel. Right where the rubber meets the road, so to speak. For reinforcement yarn I carry along a strand of fine mohair/silk blend on the full sole -- it's both effective and hedonistically luxurious.

A most happy discovery, as I carried on knitting up all around the full sole, was that the toe-shaping decreases caused even simple horizontal stripes to reinvent themselves in interesting ways. They turned corners around the toe and met in chevrons at the instep. I could make the toe and instep decreases complement stitch patterns in various ways and have the complete sock top as an unbroken design canvas. Endlessly intriguing design possibilities!

This stitch pattern evolved as I experimented with making the stripes a little less stripy. I carried single stitches at intervals on up into the next color stripe by wrapping them three times, then slipping them knitwise on the next three rounds. That way they get twisted three times in the same direction, which makes them stronger and more textural.


spacer photos: Nick Salpekar
 

SIZE
S[M, L]

FINISHED MEASUREMENTS
Foot length: 8.75[9.5, 10.25] inches
Ball of foot circumference: 7[7.75, 8.5] inches
Ankle circumference: 7.5[8.25, 9] inches
Leg length (including heel): 7.75[8.75, 9.75] inches
Leg length (cuff to ankle): 4[4.75, 5.5] inches -- adjustable to fit.

spacer

MATERIALS
Yarn

spacer [MC] Mountain Colors Crazyfoot [90% Superwash Merino Wool / 10% nylon; 425 yd/388 m per 100g skein]; color: Aqua; 1[1, 1] skein
spacer [CC1] Claudia Hand Painted Yarns Fingering weight [100% Extra Fine Merino Wool; 175yds per 50gm skein]; color: Desert Dusk, 1 skein
spacer [CC2] Reinforcement yarn: Schulana Kid-Seta [70% kid-mohair / 30% silk; 230 yd/210 m per 25g ball]; color: 16; 1 ball (note: only about 8g needed)

Recommended needle size
[always use a needle size that gives you the gauge listed below -- every knitter's gauge is unique]
spacer 1 long or 2 short US #1.5/2.5mm circular needle
spacer 1 long or 2 short US #1 /2.25mm circular needle
spacer 1 US #1/2.25mm double-point needle
Note: This pattern is most easily worked using the Magic Loop or 2 Circulars methods. You can use DPNs if you prefer, but their rigidity will make the first couple rounds of the sole difficult. After that they'll be fine, but at the sole perimeter you may want to use seven DPNs because of the large number of stitches -- six to hold the stitches (three per side) and the seventh to knit with.

Notions
spacer stitch markers (2 removable safety-pin style, 4 any type in 3 colors: c1, c2, c3)
spacer yarn needle

spacer

GAUGE

32 sts/40 rnds = 4 inches in stockinette stitch (MC and reinforcement yarn together)
35 sts/48 rnds = 4 inches in pattern stitch on sock top
 

PATTERN NOTES
[Knitty's list of standard abbreviations and techniques can be found here.]

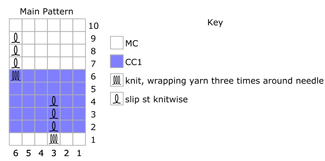
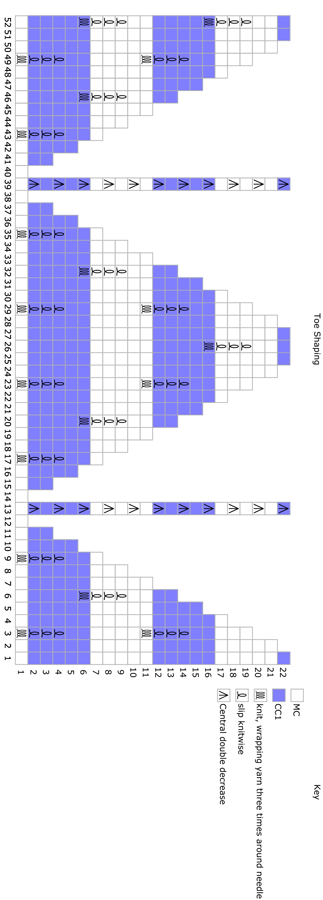
CDD: Central Double Decrease. Slip 2 tog (as if to k2tog), k1, then pass 2 slipped sts over stitch just knit.
M1: Make a backwards loop and place it on the right needle.

Judy's Magic Cast On, bottom-needle-first variation:
Note: this version puts the first CO stitch on the bottom needle (rather than its usual position on the top needle). When the needles are rotated and arranged in knitting position, the working yarn is coming from the needle opposite the first stitch to be knitted, rather than the same needle. This reduces the risk of a little hole forming at the start of the round.

1. Hold two needle points in right hand, one above the other, ends pointing left.
2. Let about 24 inches of the yarn tail hang down over bottom needle, with the end behind needle and ball (working yarn) in front. This is the first stitch on bottom needle.
3. In left hand, arrange tail over index finger, working yarn over thumb, with other three fingers holding both strands.
4. Pivot both needle points downward, move top needle point down behind and around strand coming from thumb, catching strand on needle. This is first stitch on top needle.
5. Pivot both needle points upward, move bottom needle point down behind and around strand coming from index finger, catching strand on needle.
6. Pivot both needle points downward, move top needle point down behind and around strand coming from thumb, catching strand on needle.
Repeat steps 5-6. After last stitch (which is on top needle), rotate needles so the ends point to right. Drop both strands of yarn. Tail will be to left of working yarn; bring it in front of working yarn, around to the right, and hold it against top needle to keep it out of the way. Slide stitches on bottom needle to cable and pick up working yarn.

Half-Twist Ribbing (Multiple of 2 sts, worked in the round):
Round 1: [K1 tbl, p1] around.
Round 2: [K1, p1] around.

Directions for Jeny's Surprisingly Stretchy
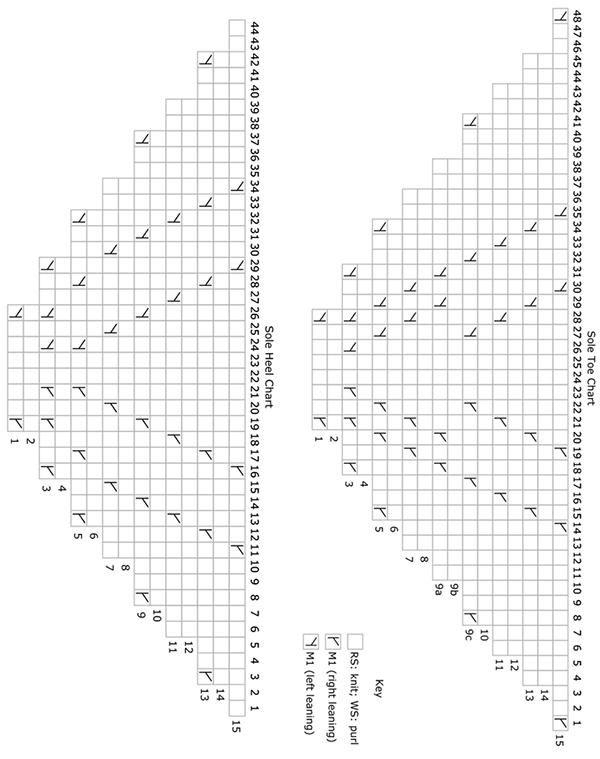
Bind Off
can be found here.

Charts
The charts for this pattern are very large.
Each fits on a letter-sized page.
Click below and print each resulting page.

Sole heel/toe | Toe shaping


DIRECTIONS
Sole
Holding MC and CC2 together and using the Bottom-Needle-first variation of Judy's Magic Cast On, CO 92[100, 108] -- 46[50, 54] pairs of sts -- onto the larger needles.

Setup round:
Needle 1: K1, m1, k1, pm c1 for end of heel, k41[45, 49], pm c2 for beginning of toe, k3.
Needle 2: K1, m1, k1, pm c2 for end of toe, k41[45, 49], pm c3 for beginning of heel and start of round. 3 sts rem unworked from CO at this point.

Note: It's easiest if you keep the sts arranged as they are, with the first three sts of the round on the same needle as the last sts of the round. There are 6 heel sts, 6 toe sts, and 41[45, 49] sts on each side. 94[102, 110] sts total.

Next round: Work Sole Heel Chart to marker c1; k to marker c2, work Sole Toe Chart to next marker c2; k to end of round.

Work as set until row 8 of the charts are complete.

Short rows:
Row 9a [RS]: Work Sole Heel Chart row 9 to marker c1; k to marker c2, work Sole Toe Chart to next marker c2; k8, w&t.

Row 9b [WS]: P8, work Sole Toe chart row 9b to marker, p8, w&t.

Row 9c [RS]: K8, work Sole Toe chart row 9c to marker, k to end of round.

As this point you will resume working in the round.

Work as set until row 11[13, 15] of the charts are complete, working wrapped sts together with their wraps on the first round. 154[172, 190] sts total.

Setup for next section:
K17[20, 22] to center of heel. This is the new start of round. At this point you can rearrange your sts as you prefer.

Final sole round: Removing markers as you go, adjust st count for sock top as follows:
Size S: (K22, M1F) 6 times, k22. 160 sts.
Size M: Knit around (no st count adjustment needed). 172 sts.
Size L: K9, k2tog, (k32, k2tog) 5 times, k9. 184 sts.

Foot
Cut CC2 and change to smaller needles.

Foot round 1: Work Main Patt chart 9[10, 11] times; pm for Toe Shaping, work Toe Shaping chart across next 52[52, 52] sts; pm for end of Toe Shaping; work Main Patt chart 9[10, 11] times.

Foot round 2: Work Main Patt chart 9[10, 11] times to marker; work Toe Shaping chart to next Toe Shaping marker; work Main Patt chart 9[10, 11] times.

Note: You might find it helpful to put removable stitch markers in the CDD sts, to help you keep track.

Work as set until Toe Shaping Chart is complete. 8 sts between Toe Shaping markers.
Work 0[1, 2] rounds even in pattern.

Final Toe Shaping round: Work Main Patt chart 9[10, 11] times to marker, remove marker (CDD, k1) twice to next Toe Shaping marker, remove marker; work Main Patt chart 9[10, 11] times. 112[124, 136] sts rem -- 4 between Toe Shaping markers.

Next round: Work 42[47, 52] sts in pattern as established.

Now join sides of lower foot:
Drop working yarn and slip next 13[14, 15] sts to right needle. [If using circular needle(s), don't pull sts on RN to the cable yet.] Slip next 14[15, 16] sts to DPN (you're going to use it as a temporary left needle). Cut a separate strand of CC1 yarn about 18 inches long. Leaving a 4-inch tail, k2tog (the first two sts from the DPN) with the separate strand, then pass 2nd st on right needle over st just made. Slip that st back to LN without turning it. Then continuing with the separate strand, make a "zip line" up the foot as follows:

[Slip the first st from right needle to left needle; work a CDD on the left needle; slip st just made to left needle] 12[13, 14] times. Slip the next st from right needle to left needle, drop the separate strand, pick up the CC1 working yarn, and work one final CDD.
And then finish round, working 43[48, 53] sts in pattern as established. Total 86[96, 106] sts remain.

Instep
Use a removable stitch marker to mark center front stitch coming from zip line and position it as first st on LN. It will be the center of instep-shaping CDDs.

Note: If any sts needed for the CDD are on RN, reposition them to LN (without twisting them), then do the CDD.

As you work through the following Decreases, when you hit Rounds 1 or 6 of the pattern stitch repeat, a triple wrap might fall on the marked stitch or the stitch on either side of it. If it does, just omit the triple wrap and just knit the stitch normally.

Decrease round: Work in pattern as set to 1 st before the marked center st; CDD; work in pattern as set to end of round.
Work the Decrease round 0[1, 2] more times.
Work a Decrease round followed by 1 even round 5[7, 8] times.
Work a Decrease round followed by 2 even rounds 4[3, 3] times.
66[72, 78] sts. Remove the center front marker.

Ankle & Leg
For a straight Leg as shown, work even in pattern as set, working Main Patt chart 11[12, 13] times around, until sock measures 7[8, 9] inches above sole, ending with Chart round 5 or 10. Proceed to Cuff.

For a Shaped Leg, work even in pattern as set, working Main Patt chart 11[12, 13] times around, until sock measures 5.5[6, 6.5] inches above sole.

Increase rnd: K1, M1B, work to 1 st before end of rnd, M1F, k1.
Work 4 rounds even.
Repeat the last 5 rounds once more, and work the Increase rnd a third time. 78[84, 90] stitches.

Continue working even in pattern as established for about 1 inch or length desired to cuff, ending with Chart round 5 or 10.

Cuff
Knit 1 round in MC.
Change to CC1.
Work 8 rounds of Half-Twist Ribbing.

Bind off using Jeny's Surprisingly Stretchy method.

spacer

FINISHING
Block as desired and weave in ends, snugging up last st of zip line with tail hanging there.

spacer
ABOUT THE DESIGNER

Betty has lived and knitted in many places, including a recent three-year stint in the Netherlands.

She and her newly retired husband now live in Atlanta, Georgia. He explored artisan bread-baking while she finished writing a book with eighteen more solefull sock designs, released in late January 2014. Each of their respective muses seems to be drawn by the aroma of fresh bread.

spacer