|
|
|
||||||
Yarn Selection for the Rigid-heddle Loom: The Secret Is In the Sett
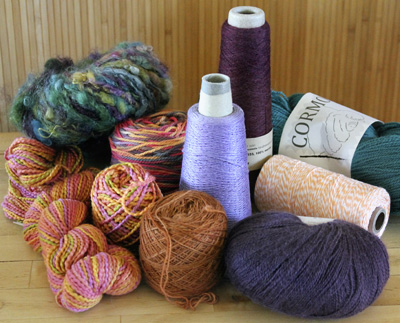
Many of the yarns you already have can be used on the rigid-heddle loom. You can weave with virtually anything -- yarn, twigs, ribbon, wire, raffia, tule -- whatever tickles your fancy. The yarns that you use to set up the loom, the warp, is subject to more stress and takes a little more consideration. TALKING TENSION Pinch and Pull Test
YARN CONTENT AND CONSTRUCTION Another consideration is how the yarn will act in the fringe. Yarns of more than two plies will often puff out in the wash; some fancy novelty yarns fray. Take the yarn you tested for warp and wash it vigorously in warm water with a little soap. Pay attention to how the ends behave and this will give you a good idea of what happen in the fringe. Superwash and Acrylic Coned Yarns Those funny numbers are an archaic system that expressed the size, number of plies, and yards per pound of any given yarn. It isn't necessary that you understand this system to use this yarn. (If you are really curious, here is a video from The Woolery that explains it.) Understanding how to determine the sett of a yarn is all you need to know. THE WEAVER'S GAUGE: SETT These numbers determine the weaver's gauge called sett. The larger the number, the finer the sett or the number of ends per inch in the warp. Just like with knitting and crochet if you use the wrong needle or hook and don't get gauge, your project will be off-kilter. A general rule of thumb for what yarn to use with each number is as follows: 5 = Bulky
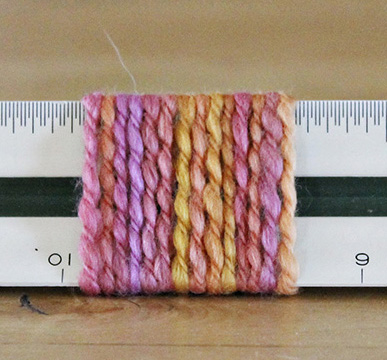
Determining Sett To determine a BPW sett, wrap the yarn around a ruler under very light tension. You want to mimic what the yarn will act like when relaxed and not under the tension of the loom. Count the number of wraps and then divide this number by two. If in doubt, wrap two inches and then take an average of the two. By taking half the yarns away, you allow room for the weft to interlace with the warp. For instance, if you have a yarn that wraps around the ruler 14 times in an inch, your BPW sett is 7 (see photo above). Choosing a size 8 rigid-heddle is probably a good place to start.
When determining sett, you want to take into consideration this bloom factor, as mentioned in the Superwash section, and leave enough room for the yarn to do its thing. But this measurement tells you nothing about the character of the yarn. Two yarns can have the same sett and be radically different. One may be a tightly spun worsted yarn and the other an airy woolen yarn, but they will technically have the same BPW sett. You have to use your judgment about the nature of the yarn and how you will use. Knitters often confuse Wraps Per Inch (WPI) with sett. You use WPI to calculate sett, but they are not one and the same. For those that want to get super geeky I wrote a blog post about how these two things relate to yards per pound. |
||||||
 by Liz Gipson | ||||||
|
SIZE |
|
FINISHED MEASUREMENTS (laid flat) |
|
MATERIALS Project specifications
|
|
PATTERN NOTES |
|
If you are unhappy with the drape of your fabric, it is probably because you are packing the weft yarns too tight and not leaving enough space between your yarns. They need room to bloom! A table runner/scarf is a good first project because you aren't looking for drape so if you overbeat it, it won't affect the final result. It is a perfect, quick gift project that will burn through your stash. |
|
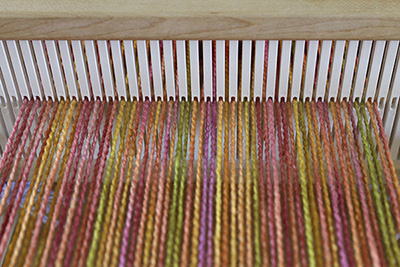
DIRECTIONS Center the warp in the rigid heddle for 7 inches. Using the direct warping method, thread 7 inches worth of slots. Wind the warp on the back beam adding packing paper between the layers. Move one thread in each slot to a hole to its left. Tie the warp on the front apron rod and adjust for even tension. 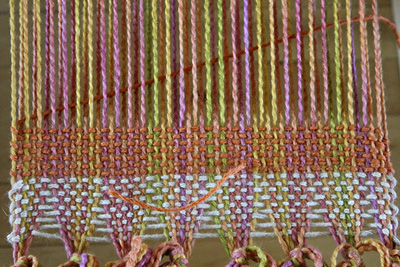 Wind 2 shuttles, one with a smooth scrap yarn, and the other with your weft yarn. To give yourself a good foundation and to spread the warp, start by weaving a piece about 1.5 inches long with scrap yarn. It doesn't matter if you start in an up or down shed. Using your project weft, open the next shed and insert your first pick leaving a tail of about 6 inches. Change sheds, tuck the tail in the new shed and then bring it out between two warp ends. Lay in the next pick at about a 60 degree angle and beat (see top photo at right). Continuing weaving, as you do maintain your weft angle. This will allow the weft enough room to travel over and under the warp ends and keep your fabric from pulling in at the edges. If you have loops at the edges, called selvedges, your weft angle is too steep, Beat the yarn gently as you weave to maintain a consistent number of wefts per inch. (See middle photo.) Your goal is to get the same number of warp and weft ends in an inch of weaving. Don't over think this, though. The goal is to get a few projects under your belt, not perfection! Remove Cloth from Loom FINISHING 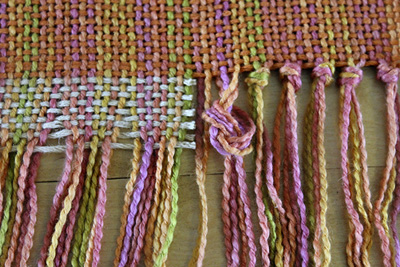 Using small embroidery scissors and working carefully, cut the scrap yarn in half. Remove half of the scrap and tie the warp in bundles of four warp ends using an overhand knot. Note: the first and last bundle will have five yarns in it. Leave the knots fairly loose at first so that you can go back and adjust if necessary. Work from whichever direction is comfortable for you. In this scenario I'm working from left to right. Like many things yarn, this is easier to do than comprehend. Split the first three bundles in half.
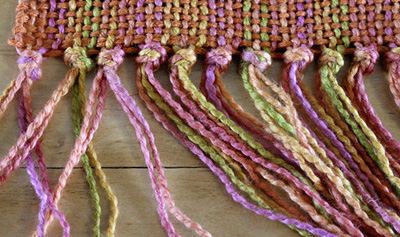 When doing so make sure that third bundle's right half goes over the right half of the second bundle. Tie a knot at place where the first bundle's left half meets the left half of the second bundle. Tie the next knot where the left half of the first bundle meets the right half of the third bundle.
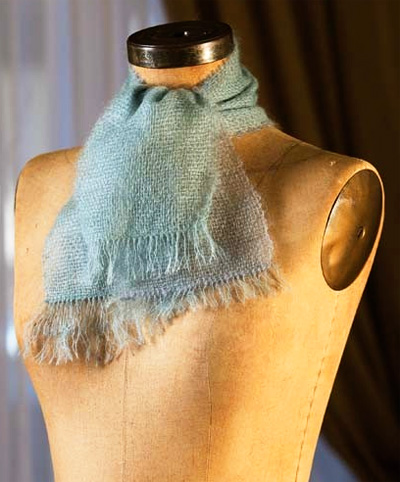
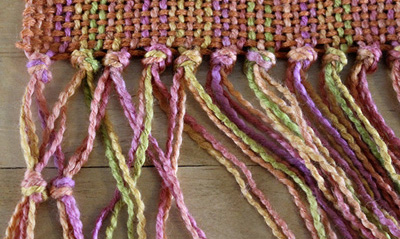 Continue working in this manner across the fringe. Tighten and adjust knots to align with one another as necessary. Washing This basic form can be used to create an endless variety of projects -- lengthen the warp and you have a scarf, widen and lengthen the warp and you have a shawl. In this column, we have the first steps in cloth design -- yarn selection and sett. In the next installment, we will talk about color and working with unalanced weaves. In the meantime, join me on any of the Yarnworker social media sites (see links below) and show off your cloth! |
| ABOUT THE DESIGNER |
She recently lanched Yarnworker, a source for indepentantly published patterns and know-how for the rigid-heddle loom. |
Text & images © 2015 Liz Gipson. Contact Liz |