Knitty: little purls of wisdom
Title


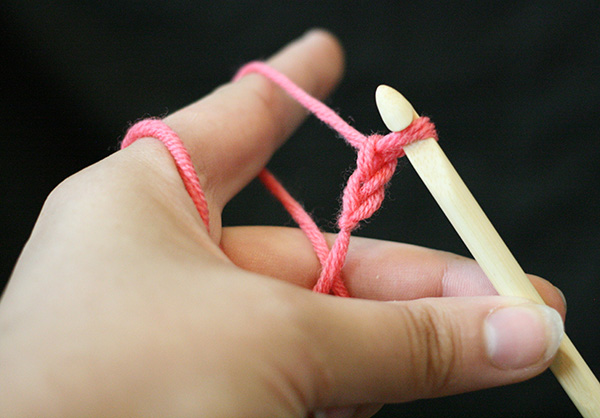
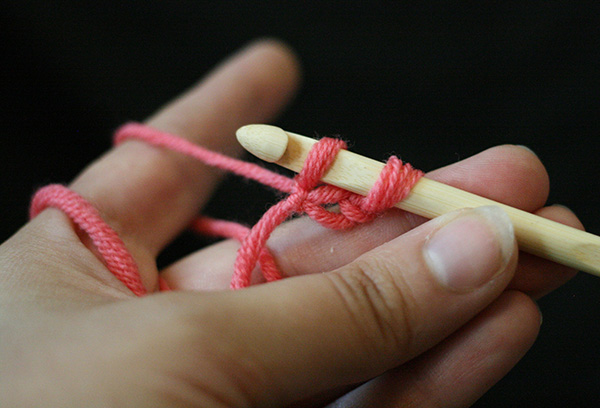
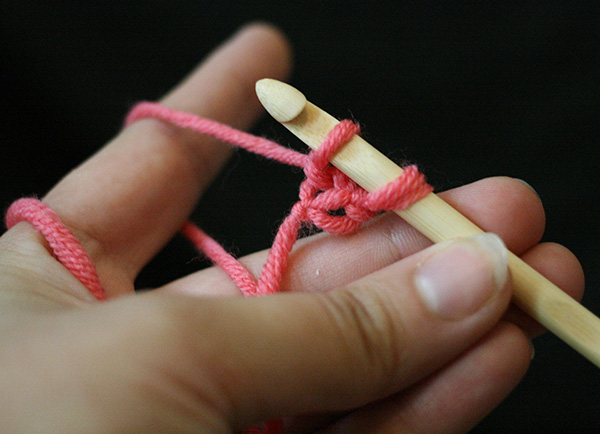
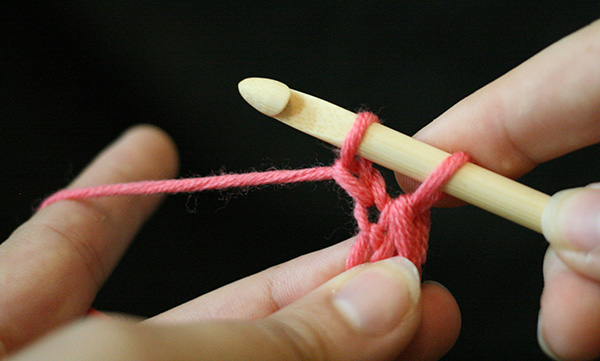
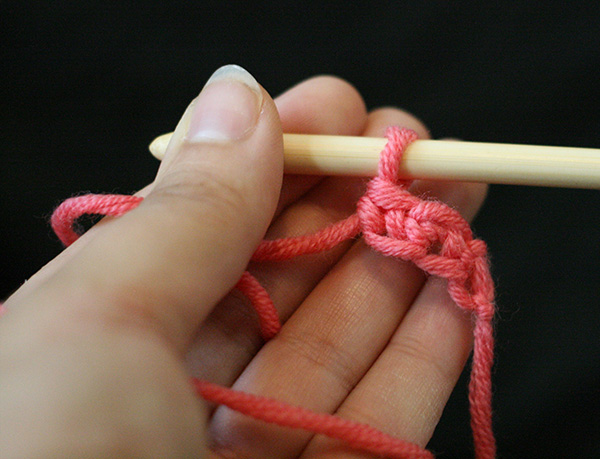
All You Need Is Gauge

A lot of bi-craftual makers -- people who both knit and crochet -- find that they have very different tensions between the two crafts. These differences can be especially pronounced if you knit with the yarn in your right hand (aka English or Throwing Method) and Crochet with the yarn in your left. Trying to find a stitch gauge that pairs your knitting and crochet takes experimenting and a willingness to play a little before jumping into a pattern.

Swink! is a little different because you begin with a crochet gauge swatch that you measure yourself --you don't need to match a pattern gauge; you just keep track of a gauge you are comfortable with. Swatch, measure; then wash, block, and measure again. Fill in the worksheet (which provides a custom fit!). When you start to knit, you'll pick up knitting stitches along the edge. If your knitted edge doesn't ruffle or pull too tight, you're good to go. If not, then you can change your knitting needle size accordingly.

Getting Started
You may recall the Foundation Double Crochet we used for Crane Hill. Swink! begins in the same way, but with a single crochet instead of a double crochet. Let's walk through it.

To create a foundation single crochet:

image
Chain 2,
image
insert the hook into the 1st st, pull up a loop,
image
ch 1,
image
yo, pull through both loops.

image
1 fsc made.
*[Insert hook into the ch 1 you just made,

image
pull up a loop, ch 1,

image
yo, pull through both loops. 1 more Fsc made.
Repeat from * until you've made required number of foundation stitches.


You'll notice the soft horizontal lines in Swink! These are made by crocheting through the back loop only. Across the top of a crocheted row is a neat little chain. If you anchor the next row by pushing your hook through BOTH halves of each chain, the finished fabric is firm and continuous. But with Swink! we want a softer, fabric with more drape. A fabric more suited to this little wisp of a sweater. So, when you anchor the next row, stick your hook through the back loop only.

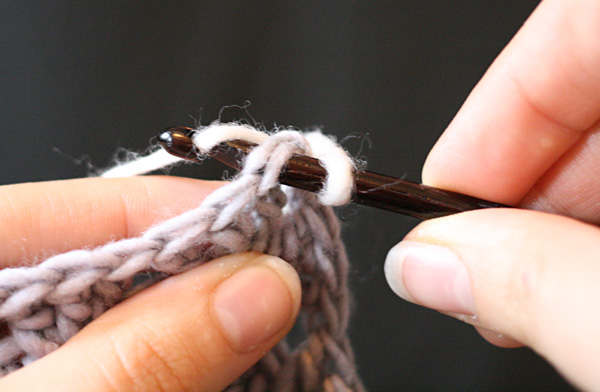
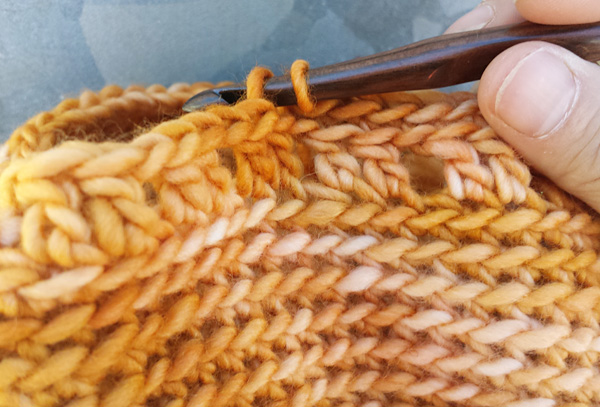
These images will help you visualize the difference:
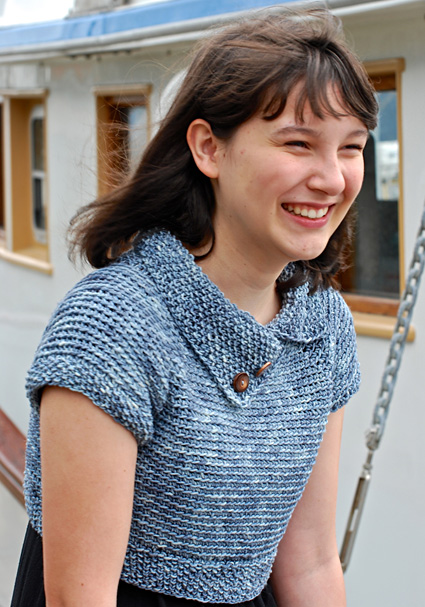
image
Crocheting through both loops
image
Crocheting through the back loop only


pink needle


title
beauty shotblank

by Amy O'Neill Houck

Tangy

Swink! was inspired by the Japanese fashion of layering loose pieces of varying lengths. I wanted to make a slightly unstructured sweater that was maybe even more of an accessory than a garment. You can throw it on over lots of things for a little warmth and it will spice up or change the look of an outfit. The name came about when I showed the sweater to my sweetie, and he said something like, “It's just a wink of a sweater... it's a Swink!" Swink! is crocheted from the neck down using the neckline measurement as a starting point. The sleeve caps and length are crocheted to fit. Try it on as you go, or size it to match a sweater or top that looks great on you.

This pattern is in worksheet format—that means there's no guessing about what size to make or how your Swink! will fit. Making Swink! just requires the same things you need for any garment—a swatch, and your measurements. After that, we walk you step-by-step through a few easy calculations that make this pattern zoom along and fit great. There are a few things you don't have to worry about with Swink!: you'll never count rows, and you don't have to keep track of which size or measurements to follow because this pattern was written JUST FOR YOU.

spacer model: Skye Van Valin
spacer photos: Amy O'Neill Houck
 

SIZE
Swink! is crocheted to fit. (Shown in size S/36 inches).
Follow the worksheet to crochet and knit to the desired measurements.

TAKING MEASUREMENTS
Since Swink! is crocheted to fit, begin by getting measurements of the body you're crocheting for. If you're making this for yourself, it helps to have a friend measure you.
Note: we give some calculations a letter name if we're going to refer to them again later in the pattern.

Cross Back (Shoulder to Shoulder): ____________ [CB]

High Bust (circumference just under the arms – this is typically above the fullest part of the bust): ___________ [HB]

Length (Measure from your collar bone to the bottom of your rib cage): _______

Calculate your Neckline using your Cross Back measurement:
([(CB) _____________ X .72] x 2 ) = _______________________

spacer

MATERIALS
Yarn

spacer A Tree Hugger's Wife Yarns Best of the Worsted [100% Superwash Merino; skein 175 yd/160m per 100g skein]; color: Stormy; 3 (3, 4, 4, 4, 5, 5) to fit bust sizes 28[30, 32, 36, 40, 44, 48, 50] inches.
Note: yarn requirements are estimates; actual usage will depend on your gauge and size of finished piece. It's a good idea to have an extra skein on hand.

Recommended needle size
[always use a needle size that gives you the gauge listed below -- every knitter's gauge is unique]
spacer 1 US L-8mm crochet hook
spacer 1 32 inch inch US 10.75/7 mm circular needle
spacer US 10/6mm needles for small circumference in the round: DPNs, magic loop or 2 circulars

Notions
spacer measuring tape
spacer 4 split ring markers (2 in "color A" and 2 in "color B")
spacer 2 coil-less safety pins or removable stitch markers
spacer 2 1-inch buttons
spacer calculator
spacer pencil

spacer

GAUGE

Make your crocheted swatch in the round:
ch 30, and join to work in the round. Sc-blo around until your piece measures at least 6 inches.

Measure your swatch before blocking: __________ [UBG](sts per 4 inches)

Block swatch, lay flat to dry, then take gauge:

____________ [BG](sts per 4 inches)

____________ [SPI] (divide by 4 for sts per inch)

Knitted stitch gauge for the collar and bottom edge should match the crochet stitch gauge. Pick up stitches along the last edge of the crocheted swatch with needles the same size as your hook and work back and forth (in rows) in seed stitch. If your work lays flat without pulling or ruffling, you've found a good match. If your knitting is tighter than your crochet, go up a needle size. If it's much looser, try a smaller needle.

Calculate Increase Width (I):
These calculations account for the change your garment will undergo when blocked, and work in the right amount of ease to give you Swink! its cute boxy shape.

Divide Blocked Gauge by Unblocked Gauge:
_________ [BG] / _________ [UBG] = _________________ [D]
(This is the percentage of change your swatch, and garment undergo with blocking. It should be a decimal, mine was .92, for instance. If it's over 1.0 you've probably multiplied backwards.)

Multiply High Bust by [D]:
_____________ [HB] x ____________ [D] = _________________ [M]

Add in Ease:
______________ [M] x 1.05 = _______________ [I]

Gauge of Swink! shown:
12.5 sts/13 rows = 4 inches in sc-blo
12.5 sts/25 rows = 4 inches in seed stitch with larger needles (collar and edging)
14 sts/28 rows = 4 inches in seed stitch with smaller needles (sleeve cuffs)

A note about gauge: This pattern plays with gauge by pairing a large hook/generous gauge with a springy-twisty heavy worsted yarn. The result is a fabric that has both drape and a lot of stretch. If you choose a different kind of yarn, you don't have to match the pattern gauge, but you do need to accurately measure your gauge to make the calculations work.


PATTERN NOTES
[Knitty's list of standard abbreviations and techniques can be found here.]


sc-blo: single crochet in the back loop

fsc (foundation single crochet): chain 2, insert the hook into the 1st st, pull up a loop, ch 1, yo, pull through both loops. *[Insert hook into the ch 1 just made, pull up a loop, ch 1, yo, pull through both loops. Fsc made.] Repeat from * until you've made required number of foundation stitches.

The collar and edging are knitted in seed stitch with a slipstitch edge.

Seed Stitch (Worked back and forth over an even number of sts):
Row 1 [RS]: Sl 1, [k1, p1] to last st, k1. 
Row 2 [WS]: Sl 1, [p1, k1] last st, k1.

Seed Stitch (Worked back and forth over an odd number of stitches):
All rows: Sl 1, [k1, p1] to last st, k1.

The cuffs are knitted in seed stitch in the round.

Seed Stitch in the Round (Over an even number of stitches):
Round 1: K1, p1 around.
Round 2: P1, k1 around.

Seed Stitch in the Round (Over an odd number of stitches):
Round 1: *K1, p1, repeat from *, k1.
Round 2: *P1, k1, repeat from *, p1.

DIRECTIONS

spacer
SETUP (CROCHET)
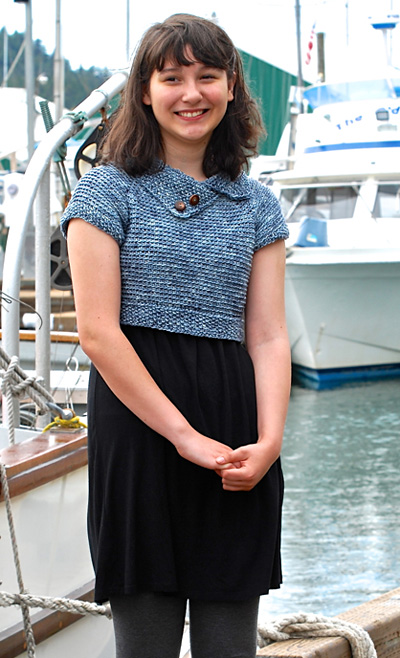
Calculate your Foundation (fsc):
Step 1: Neckline Measurement
x [SPI]
: ___________________

Step 2: Adjust result from Step 1 to
nearest multiple of 6: __________ (R)
(HINT: Here's a handy list of multiples of 6: 54, 60, 66, 72, 78, 84, 90, 96, 102, 108, 114)

Then add 4 stitches: _______ (fsc)

For example: If my cross-back measurement were 14, I would have a neckline measurement of 20.16 inches. Multiplied by my crochet gauge = 63 sts. 60 is the closest number divisible by six, so my foundation chain would 60 +4 = 64 sts.

Calculate your marker placement:

Divide (R) / 6: __________ (S)

Multiply (S) x 2: __________ (FB)

Neckline
Using the (fsc) calculations you just completed above, Fsc __________ sts. Join the foundation row to work in the round. Mark the join with coil-less safety pin on the bottom-side of the foundation. This will be the center front of your sweater.

Place Markers
From safety pin, count [(S) -1] _____ sts, place Color A marker in next st, count (S)______ sts, place color B marker in next st, count (FB) ______ sts, place color B marker in next st, count (S)_______ sts, place color A marker in next st. The smaller sections will become your sleeves.
The larger sections will become your front and back.

Sleeve Shaping
Increase Round: [Sc-blo to 1 before marker, 2sc in next st, sc, move marker up, 2 sc in next st] 4 times, sc-blo to end of round.

Repeat increase round until front section measures to your calculation (I) from the worksheet above, and the sleeve section wraps comfortably around your arm when you try on the sweater.

spacer

Form Sleeve Caps
Next round, form sleeve caps: *[Sc-blo to 1 before marker. Remove marker, insert hook into both loops of marked st, pull up a loop, ch 1, yo, pull through both loops. Make 2 fsc. Insert hook into ch from last fsc, pull up a loop, insert hook into next marked st (remove marker), yo, pull through all loops on hook.] Work even in sc-blo to next marker, repeat from * to form second armhole. Sc-blo to end of round.
Mark the 2 center sts under each arm with split ring marker.

Lower Body
Sc-blo even around until sweater reaches the Swink! length you measured above, or falls to a length you like (remember you'll be adding a 2-inch edging).

Cowl Neck (KNITTING)
With WS facing, starting at the position of at coil-less safety pin, join yarn on the flip side of the foundation round (you'll see what looks like a round of stitches), and using circular knitting needle, pick up the back loop only around the neckline; when you've picked up all the way around, continue picking up the front loop of the next 3 inches.

Do not join. Work back and forth in seed stitch until the cowl portion measures 5 inches. Bind off in pattern.

Bottom Edging
The bottom edging is worked in rows in two parts, front and back.

Count your body stitches: _____________ sts
Divide by 2, and mark division at each underarm with coil-less safety pin.

With wrong side of front facing, join yarn in front of right-hand coil-less safety pin. Using circular needle, pick up the back loop only across to next safety pin.

Work back and forth in seed stitch until edging measures 2 inches. Bind off in pattern.
Repeat on other side.

Cuffs
With RS facing, starting at the underarm rejoin yarn, and using needles for small circumference, and pick up the back loop only of sts around the sleeve in work in seed stitch in the round until cuff measures 1 inch. Bind off in pattern. Repeat for second cuff.

FINISHING
Weave in ends. Wash and lay flat to dry. Sew buttons on to outer corner of cowl, half an inch or so from bottom and side edge (see photo).

spacer
ABOUT THE DESIGNER
.Blank Amy O'Neill Houck blogs at thehookandi.com and tweets @plainsight. Miriam can be found on on the web at miriamfelton.com, and on Twitter @mimknits.

Amy and Miriam both have patterns on ravelry.com.

spacer