|
|
|
|
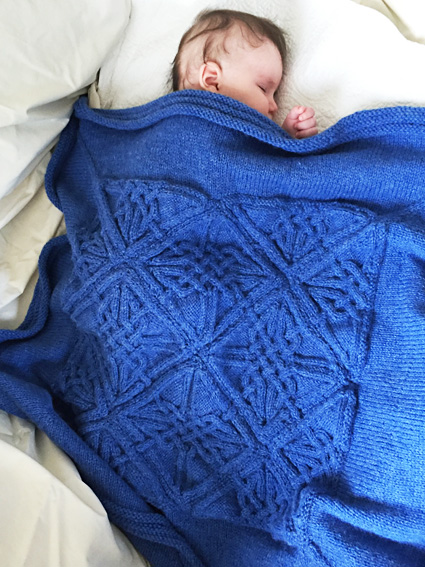
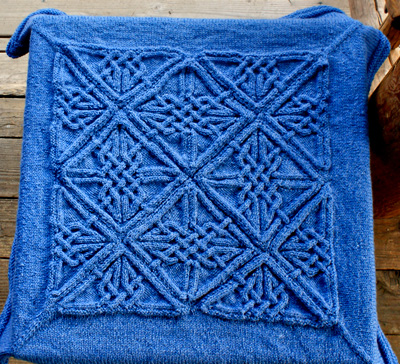
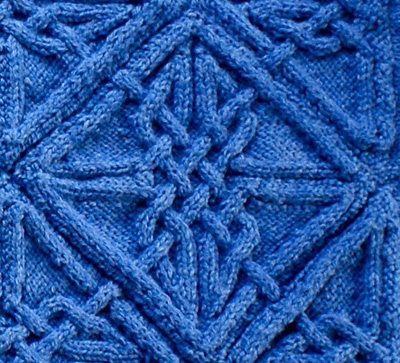
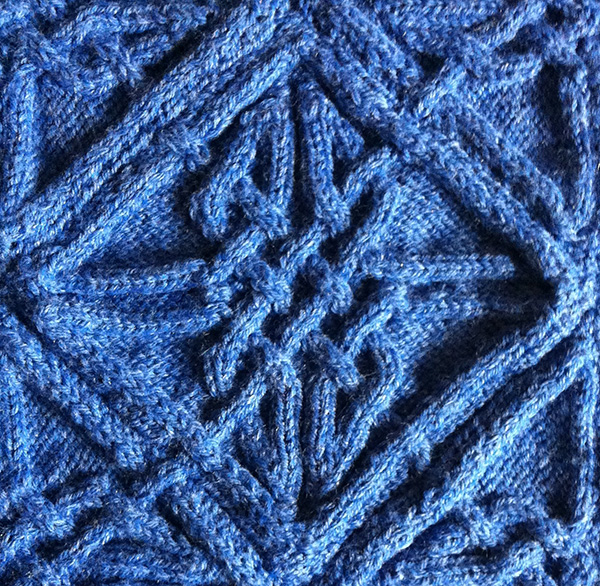
This pattern features cables that turn horizontally and meet, forming patterns that were nearly impossible before. Sideways cables open up all kinds of design possibilities. All of the interlacings fit together without interruption. Although I think lacy baby blankets are wonderful, I wanted to make an heirloom baby blanket that little fingers or toes couldn't get trapped in, and was machine-washable. As someone who loves Celtic designs, I was inspired by stonework found in Dunfallandy, Perthshire, Scotland, documented in J. Romilly Allen's masterful work, Celtic Art in Pagan and Christian Times.
|
||
|
SIZE |
|
|
FINISHED MEASUREMENTS |
|
MATERIALS Notions |
|
GAUGE |
| 18 sts/26 rounds = 4 inches in stockinette stitch with US#8/5mm needles. |
|
PATTERN NOTES |
|
A horizontal cable will have loose stitches in the following row, but these can be tightened up by knitting through the back loop. After a few rows, it is barely noticeable, especially when supported by other cables. If the looseness bothers you, they can be tightened up later by turning the blanket to the wrong side, and finishing them as is described below. For those who count very carefully, you may notice that once the pattern is established, after finishing a wrong side and looking at the right, the borders are 5 stitches each; at the end of working the right side, borders are 4 stitches each. This will reverse after the half-way point of the square. There will also be three right side rows following one after another halfway through. All will be explained. The first 17 rows can be fiddly, and some stitches will look wonky, but will improve in succeeding rows. In addition, the cables will cross the same direction together on a particular row -- one row they all cross to the right, the next time they cross, all to the left. This can look a little confusing on the edge cables as the come in or out of the square. See picture. 3-way dec: Sl first st on Left needle to Right needle, pass second st on Left needle over st closest to ndl tip, pass the st on Left needle to Right needle, pass the second st over the ndl tip, slip st back to Left needle, pass second st on Left needle over st at ndl tip. 3-way inc: Kbf (not kfb), then insert left hand needle front to back into right side of the vertical strand just below the stitches worked, and knit it. Kbf: Knit into back of st, then into the front of it. M1PL: Insert left needle, from front to back, under strand of yarn which runs between next stitch on left needle and last stitch on right needle; purl this stitch through back loop. 1 stitch increased pfb: P into the front and the back of the st.
|
|
Row 1 [RS]: Purl. Row 7 [RS]: K1, M1PR, p2, T4R, pm for center of row, T4L, p2, M1PL, k1. 16 sts. Row 8 [WS]: K1, M1R, k3, p2, k2, pm, k2, p2, k3, M1L, k1. 18 sts. Row 9 [RS]: K1, M1PR, p2, T4R, p2, sm, p2, T4L, p2, M1PL, k1. 20 sts. Row 10 [WS]: K1, M1R, k3, p2, k4, sm, k4, p2, k3, M1L, K1. 22 sts. Row 11 [RS]: K1, M1PR, p2, T4R, p2, k1, p1, sm, p1, k1, p2, T4L, p2, M1PL, k1. 24 sts. This row prepares for edge cables coming into the borders, and continues building the central cables. Row 12 [WS]: K1, M1R, k3, p2, k2tog, k2, M1PL, p1, k1, sm, k1, p1, M1PR, k2, ssk, p2, k3, M1L, k1. 26 sts. Row 13 [RS]: K1, M1R, p2, T4p2togR, p3, M1R, k2, p1, sm, p1, k2, M1L, p3, T4p2togL, p2, M1L, k1. 28 sts. Row 14 [WS]: K1, M1PR, p1, k2, p2, k4, p3, k1, sm, k1, p3, k4, p2, k2, p1, M1PL, k1. 30 sts. Row 15 [RS]: K1, M1PR, k2, T4p2togR, p3, T3incL, k2, p1, sm, p1, k2, T2L, M1L, p3, T4p2togL, k2, M1PL, k1. 32 sts. Row 16 [WS]: K1, M1R, k1, p4, k4, (p2, k1) twice, sm, (k1, p2) twice, k4, p4, k1, M1L, k1. 34 sts. Crossing the border cables. The new right edge cable will cross over the border cable, while the new left edge cable will cross under the border cable. Row 17 [RS]: K1, M1PR, p2, C4L, p3, T3R, p1, k2, p1, sm, p1, k2, p1, T3L, p3, C4L, p2, M1PL, k1. 36 sts. Row 18 [WS]: K1, M1R, k3, p4, k3, p2, k2, p2, k1, sm, k1, p2, k2, p2, k3, p4, k3, M1L, K1. 38 sts. Row 19 [RS]: K1, M1PR, p2, T4R, T4L, T3R, p2, k2, p1, sm, p1, k2, p2, T3L, T4R, T4L, p2, M1PL, k1. 40 sts. Row 20 [WS]: K1, M1R, k3, p2, k4, p4, k3, p2, k1, sm, k1, p2, k3, p4, k4, p2, k3, M1L, K1. 42 sts. Row 21 [RS]: K1, M1PR, p2, T4R, p4, C4R, p3, k2, p1, sm, p1, k2, p3, C4R, p4, T4L, p2, M1PL, k1. 44 sts. Row 22 [WS]: K1, M1R, k3, p2, k6, p4, k3, p2, k1, sm, k1, p2, k3, p4, k6, p2, k3, - M1L, k1. 46 sts. Row 23 [RS]: K1, M1PR, p2, T4p2togR, p4, T4R, T4L, T3R, p1, sm, p1, T3L, T4R, T4L, p4, T4p2togL, p2, M1LP, k1. 46 sts. Row 24 [WS]: K1, M1R, k3, p2, k5, p2, k4, p4, k2, sm, k2, p4, k4, p2, k5, p2, k3, M1L, k1. 48 sts. Row 25 [RS]: K1, M1PR, p2, T4p2togR, p5, k2, p4, C4L, p2, sm, p2, C4L, p4, k2, p5 T4p2togL, p2, M1LP, k1. 48 sts. Row 26 [WS]: K1, M1R, k3, p2, k6, p2, k4, p4, k2, sm, k2, p4, k4, p2, k6, p2, k3, M1L, k1. 50 sts. Row 27 [RS]: K1, M1PR, p2, T4p2togR, p6, T4L, T4R, T4L, sm, T4R, T4L, T4R, p6, T4p2togL, p2, M1LP, k1. 50 sts. Row 28 [WS]: K1, M1R, k3, p2, k9, p4, k4, p2, sm, p2, k4, p4, k9, p2, k3, M1L, k1. 52 sts. Row 29 [RS]: K1, M1PR, p2, T4R, p9, C4R, p4, C4R (over the 2 sts before the marker, and the 2 sts after the marker, replacing the marker in the center), p4, C4R, p9, T4L, p2, M1PL, k1. 54 sts. Row 30 [WS]: K1, M1R, k3, p2, k11, p4, k4, p2, sm, p2, k4, p4, k11, p2, k3, M1L, k1. 56 sts.
Row 31 [RS]: K1, M1PR, p2, sl next 2 sts to cable ndl and hold in back of work, k2, sl sts on cable ndl onto Left ndl, sl the last 2 sts worked from Right ndl to Left ndl, YO, k1, ssk. *Slip last 3 sts from Right ndl to Left ndl, kbf, k1, ssk; rep from * 9 times more, until you are 2 p sts away from the next cable on the Left ndl. T4R. T4L, T4R, sm, T4L, T4R, T4L, sl the last 2 sts worked onto the Left ndl. YO, k1, ssk. *Slip last 3 sts on Right ndl to Left ndl, kbf, k1, ssk; rep from * 7 more times, until you are adjacent to the next cable on the Left ndl. Place 2 sts on cable needle and hold in front of work, rep from * 2 more times, k2 from the cable ndl, p2, M1PL, k1. 58 sts. Row 32 [WS]: K1, M1R, k3, 3-way dec, k12 tbl, k4, p4, k2, sm, k2, p4, k4, 3-way dec, k12 tbl, k3, M1L, k1. 54 sts. Row 33 [RS]: K1, p20, C4L, p2, sm, p2, C4L, p20, k1. 54 sts. Note: The next row is also a right-sided row. This allows you to start another horizontal cable on the RS, rather than the WS. Cut the yarn, leaving sufficient tail for weaving in later, slide the sts back to the other end of your circular ndl, and begin work on the RS again. Row 34 [RS]: P5, k2. Using your crochet hook, create two new stitches as follows: insert the hook into the first of the two sts just worked, grab the working yarn and pulling it through; repeat with the second stitch. Put these two stitches on your cable needle. Rotate the cable needle, and knit those two stitches off it (the first stitch worked will be the second one you created). Slip these two sts back to the left needle, yo, k1, ssk. *slip last 3 worked sts back to Left needle, kbf, k1, ssk; rep from * until you are 4 stitches from the next cable, p4, k4, p2, sm, p2, k4, p4. Using your crochet hook, create two new stitches as before, and work them off the twisted cable needle. Slip these two sts back to the left needle, yo, k1, ssk. *slip last 3 worked sts back to Left needle, kbf, k1, ssk; rep from * to last 5 sts, p5. 58 sts. The following row is again a right-sided row. Cut yarn and slide stitches to the left as for row 34.
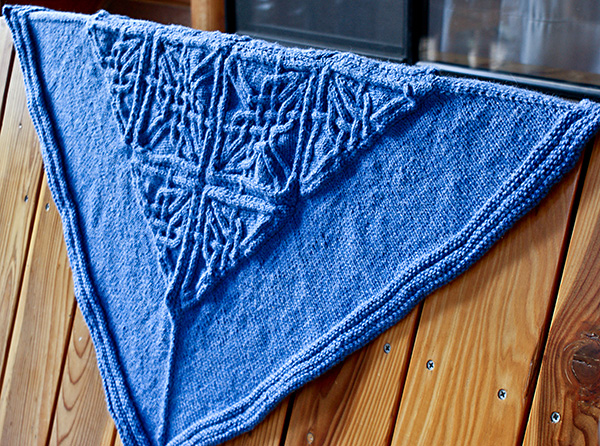
Row 35 [RS]: K1, p2tog 2 times, T4L, p clockwise 7 sts, pfb, T4L, T4R, T4L, sm, T4R, T4L, T4R, pfb, p clockwise 7 sts, T4R, p2tog 2 times, k1. 56 sts. Row 36 [WS]: K1, ssk, kk2 p2, k7 tbl, k4, p4, k4, p2, sm, p2, k4, p4, k4, k7 tbl, p2, k2, k2tog, k1. 54 sts. Row 38 [WS]: K1, ssk, k2, p2, k9, p4, k4, p2, sm, p2, k4, p4, k9, p2, k2, k2tog, k1. 50 sts. Row 39 [RS]: K1, p2tog, p1, T4L, p5, T4R, T4L, T4R, sm, T4L, T4R, T4L, p5, T4R, p1, p2tog, k1. 48 sts. Row 40 [WS]: K1, ssk, k2, p2, k5, p2, k4, p4, k2, sm, k2, p4, k4, p2, k5, p2, k2, k2tog, k1. 46 sts. Row 41 [RS]: K1, p2tog, p1, T4L, pfb, p2, k2, p4, C4L, p2, sm, p2, C4L, p4, k2, p2, pfb, T4R, p1, p2tog, k1. 46 sts. Row 42 [WS]: K1, ssk, k2, (p2, k4) twice, p4, k2, sm, k2, p4, (k4, p2) twice, k2, k2tog, k1. 44 sts. Row 43 [RS]: K1, p2tog, p1, T4L, pfb, p1, T4L, T4R, T3L, p1, sm, p1, T3R, T4L, T4R, p1, pfb, T4R, p1, p2tog, k1. 44 sts. Row 44 [WS]: K1, ssk, k2, p2, k5, p4, k3, p2, k1, sm, k1, p2, k3, p4, k5, p2, k2, k2tog, k1. 42 sts. Row 45 [RS]: K1, p2tog, p1, T4L, pfb, p2, C4R, p3, k2, p1, sm, p1, k2, p3, C4R, p2, pfb, T4R, p1, p2tog, k1. 42 sts. Row 46 [WS]: K1, ssk, k2, p2, k4, p4, k3, p2, k1, sm, k1, p2, k3, p4, k4, p2, k2, k2tog, k1. 40 sts. Row 47 [RS]: K1, p2tog, p1, T4L, T4R, T3L, p2, k2, p1, sm, p1, k2, p2, T3R, T4L, T4R, p1, p2tog, k1. 38 sts. Row 48 [WS]: K1, ssk, k2, p4, k3, p2, k2, p2, k1, sm, k1, p2, k2, p2, k3, p4, k2, k2tog, k1. 36 sts. Row 49 [RS]: P1, p2tog, p1, C4L, p3, T3L, p1, k2, p1, sm, p1, k2, p1, T3R, p3, C4L, p1, p2tog, p1. 34 sts. Row 50 [WS]: K1, ssk, p4, k4, p2, k1, p2, k1, sm, k1, p2, k1, p2, k4, p4, k2tog, k1. 32 sts. Edge cable finished on edges, and two cables dec'd. Row 51 [RS]: T4k2togR, T4L, pfb, p1, T3sskL, k2, p1, sm, p1, k2, T3k2togR, p1, pfb, T4R, T4sskL. 30 sts. Row 52 [WS]: K1, ssk, k2, p2, k4, p3, k1, sm, k1, p3, k4, p2, k2, k2tog, k1. 28 sts. Row 53 [RS]: K1, p2tog, p1, T4L, pfb, p1, ssk, k1, p1, sm, p1, k1, k2tog, p1, pfb, T4R, p1, p2tog, k1. 26 sts. Row 54 [WS]: K1, ssk, k2, p2, k3, p2, k1, sm, k1, p2, k3, p2, k2, k2tog, k1. 24 sts. Row 55 [RS]: K1, p2tog, p1, T4L, pfb, ssk, p1, sm, p1, k2tog, pfb, T4R, p1, p2tog, k1. 22 sts. Row 56 [WS]: K1, ssk, k2, p2, k4, sm, k4, p2, k2, k2tog, k1. 20 sts. Row 57 [RS]: K1, p2tog, p1, T4L, p2, sm, p2, T4R, p1, p2tog, k1. 18 sts. Row 58 [WS]: K1, ssk, k2, p2, k2, sm, k2, p2, k2, k2tog, k1. 16 sts. Row 59 [RS]: K1, p2tog, p1, T4L, sm, T4R, p1, p2tog, k1. 14 sts. Row 60 [WS]: K1, ssk, k2, p2, sm, p2, k2, k2tog, k1. 12 sts. Row 61 [RS]: K1, p3, 3-way dec, p4, k1. 9 sts. Row 62 [WS]: K1, ssk, k3, k2tog, k1. 7 sts. Row 63 [RS]: K1, p2tog, p1, p2tog, k1. 5 sts. Row 64 [WS]: Ssk, k1, k2tog. 3 sts. Bind off purlwise. TRIANGLES (Make 8) Row 33 [RS]: K1, M1PR, p3, pfb, p15, 3-way dec, p1 clockwise, p4, 3-way dec, p1 clockwise, p15, pfb, p3, M1PL, k1. 52 sts. |
|
FINISHING 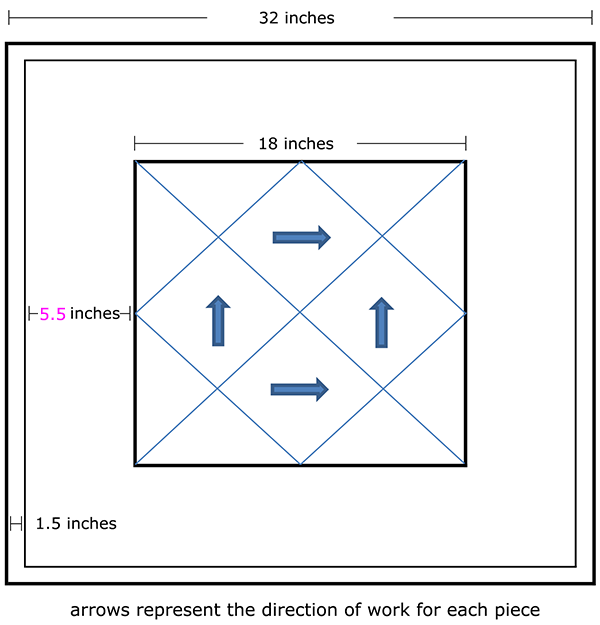
Using a circular ndl, starting at one corner, pick up and knit 174 sts along the side. Repeat along all four sides. Place a removable st marker in the fabric to indicate the start of round. 696 sts. The instructions below will refer to "sides" -- this means a set of stitches on one ndl. Rnd 1: [K1, M1R, k across to last st of side, M1L, k1] 4 times. 8 sts increased. Rnd 41: [P1 clockwise, M1RP, p clockwise across to last st of side, M1LP, p1 clockwise] 4 times. 8 sts increased. Generally, if there are other cables stabilizing the fabric, no additional finishing is needed. If the stitches above the horizontal cable still appear loose, they can be snugged up on the wrong side. Thread some of the same yarn used in the project onto a tapestry ndl. Anchor it by weaving it through a few stitches on the WS near the cable. Block and weave in ends. |
| ABOUT THE DESIGNER |
|
Find her here on Ravelry. |
|
Pattern & images © 2015 Terry de Roulet. Contact Terry |