Body
CO
145 [165, 181, 189] stitches using #5 / 3.75mm
needles.
Do not join, but work back and forth.
Work 3 rows 1x1 Rib. (1x1 Rib: *K1, P1, repeat from
* across).
(WS): Switch to #8 / 5mm needles and P across.
You will now work in Stockinette Stitch for the
remainder of the body.
Next
Row (RS): Work 36 [41, 45, 47] stitches, place
marker, work 73 [83, 91, 95] sts, place marker,
finish row.
Work 11 more rows, ending with a WS row.
INC Row (RS): K within 1 st of marker, M1,
K1, slip marker, K1, M1, K 71 [81, 89, 93], M1,
K1, slip marker, K1, M1, finish row.
Repeat INC Row every 12th row 4 [4, 4, 4] more times.
Continue working in Stockinette St until piece measures
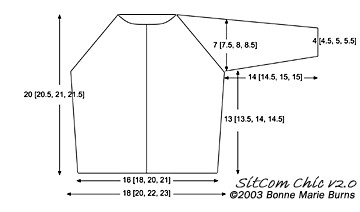
13 [13.5, 14, 14.5] inches ending with a WS row.
(STITCH COUNT: The Right & Left Fronts are each
41 [46, 50, 52] sts; the Back is 83 [93, 101, 105]
sts.)
Next
Row (RS): *Knit within 6 [6, 7, 7] sts
before marker, cast-off next 12 [12, 14, 14]
sts. Repeat from * one more time.
(STITCH COUNT: The Right & Left
Fronts are each 35 [40, 44, 46] sts; the Back is
71 [81, 87, 91] sts.)
Put aside and make 2 sleeves.
Sleeves
Cast-on
38 [42, 46, 50] sts using #5 / 3.75mm double-point
needles. Place marker and join, being careful not
to twist stitches.
Work 3 rounds in 1x1 Rib.
Change to #8 / 5mm double-point needles.
Knit 4 [4, 5, 2] rounds.
INC Round: K 4 sts, M1, K1, place marker,
K1, M1, finish round, removing the marker that is
at the end of the round.
Repeat INC Round every 5th row 5 [2, 0, 0] more
times, slipping marker when you come to it.
THEN
INC every 6th round 7 [10, 12, 12] times.
Continue working for 5 [5, 6, 6] rounds.
(STITCH COUNT: There are now 64
[68, 72, 76] sleeve stitches.)
Next Round: Knit within 6 [6, 7, 7] sts
before marker, cast-off next 12 [12, 14, 14] sts.
(You will go past the normal beginning of the round
but it will still be balanced.)
Place 52 [56,
58, 62]
sleeve stitches on holder.
Make second sleeve.
Join
pieces
With WS facing you, Purl the 35 [40, 44,
46] sts of the Left Front, Place Marker (PM),
purl the 52 [56,
58, 62]
first sleeve stitches from holder, PM, purl
71 [81, 87, 91] Back sts, PM, purl the 52
[56,
58, 62]
second sleeve stitches from holder, PM, purl
the 35 [40, 44, 46] sts of the Right Front.
Next row (RS): *Knit to within 3 stitches
of the Marker, K2TOG, K2, SSK, repeat from
* 3 more times.
Repeat DEC row every RS row 8 [9, 10, 11]
times.
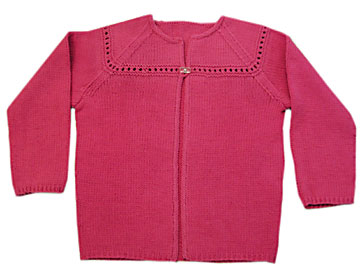
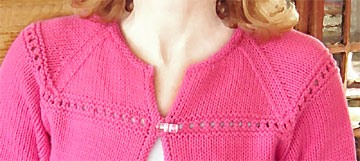 Begin
yoke detailing
Begin
yoke detailing
Knit next 3 rows, starting
with the next row (WS). Work DECs in the established
way on the middle RS row.
Next row (RS): K2, *YO, K2TOG, repeat from * across.
Do not work DECs on this row.
Knit next 3 rows, starting with the next row (WS).
Work DEC in the set manner on the middle RS row.
Continue working in Stockinette St, working the
established DECs on every RS rows.
After 7 [8, 9, 10] DECs have been worked from the
garter/eyelet/garter rows, begin Neck Shaping.
Neck
shaping
During the Neck Edge Shaping, you will continue
working the raglan shaping until the sweater is
finished. Bind-off 4 [5, 6, 7] stitches at the beginning
of the next two rows.
Bind-off 2 [2, 3, 3] stitches at the beginning of
the next two rows.
((((NOTE: I like to form *slanted
decreases* at the front edges as follows:
RS: beginning DEC=SSK; last DEC=K2TOG
WS: beginning DEC=P2TOG; last DEC=SSP
When you end up with just 2 stitches left, work
DECs at the front edges slanting TOWARDS the marker.))))
Dec one stitch at the beginning and end of each
row until 1 stitch remains before the markers on
the left and right fronts.
Bind-off all stitches.


 Left
& Right front edges
Left
& Right front edges