  by
Julia Trice by
Julia Trice

I recently got married, and at our
small, informal wedding ceremony my husband wore his
"wedding sweater" -- a white aran sweater
that I designed for him six years ago at the beginning
of our relationship. [True to the curse we did break
up during the making of the sweater, but I completed
it nonetheless and tearfully presented it to him,
even if only as a friend -- SUCKER!.]
Anyway, at the wedding I also wore
a sweater, though not one of my own making. Everything
went beautifully but I was bothered by the fact that
I didn't have on something a little sexier that I
had made myself.
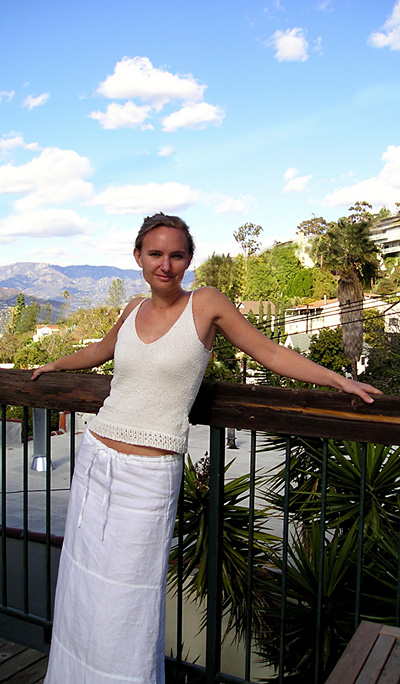
Hence, the honeymoon cami. It goes
beautifully with the white skirt that I wore at the
wedding and it definitely adds a little bit of sex
appeal. Worked in the round in stockinette stitch,
it completely avoids the bother and angst associated
with seams. The shaping in the bodice makes it cling
nicely, and the eyelet rib at the bottom adds interest
to the simple shaping and clean lines. It's a quick
knit and the perfect little fun/sophisticated top
to toss into a honeymoon bag packed for Italy.
TIPS
1] This yarn can be, as my
friend Heather would say, a little tricksy. Take your
time to avoid splitting stitches -- it's worth it.
Usually, I don't subscribe to the theory that you
have to change a ball of yarn at the side of your
knitting, but for this camisole, with this yarn, it's
necessary. You can start a new ball at either side,
but be sure that you get to where the side seams would
be (if there were seams!). The decreases and increases
will help mask the woven in ends -- if you start a
new ball anywhere else the ends will show and it will
look crappy!
2] Use the decrease and increase
methods that I've included. They're paired to mirror
each other in the work and will look more polished
than unpaired decreases will. It's worth the effort
and you'll learn something new -- I did!
|
|
 photographer & model:
Julia Trice
photographer & model:
Julia Trice
|
|
| To fit bust size 32[34, 36, 38, 40,
42, 44] inches |
| |
|
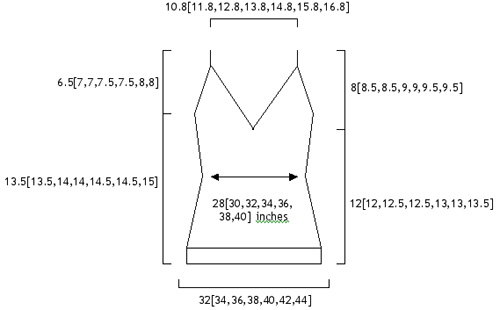
Chest: 32[34, 36, 38, 40, 42, 44] inches
Length: 20[20.5, 21, 21.5, 22, 22.5, 23] inches
|
| |
|
|
|
GGH Mystik [54% cotton, 46% viscose; 120 yd/110m
per 50g skein];
color: Ivory (02); 4[5, 5, 5, 6, 6, 6] skeins
1 set 28 inch US #6/4mm circular needles
1 set US #6/4mm straight needles
Optional:
1 set US #6/4mm double pointed needles
Notions:
4 stitch markers, 2 in one color and 2 in a second
color
2-4 stitch holders
1-2 safety pins
|
|
|
|
20 sts/28 rows = 4" in stockinette
stitch
|
| |
|
Ktbl: Knit through the back
loop to form a twisted knit stitch
Rdec: make
a right-slanting decrease using the ssk method --
slip 2 sts from the left to
right needle knitwise and then knit the two slipped
sts together.
Ldec: make
a left-slanting decrease by knitting 1 stitch, returning
it to the left needle, passing
the second stitch on the left needle over the returned
stitch, and finally returning
the first stitch to the right needle (w/o twisting
it or knitting it again).
RRI: make
a right raised increase. Reach the tip of the right
needle around on the farside
and insert it up under the purl nub below the first
stitch on the left needle.
Lift this stitch onto the left needle tip without
twisting. Now knit the new stitch
you created by lifting the purl nub.
LRI: make
a left raised increase by knitting the stitch above
the one that you will use to
increase. Insert the tip of the left needle under
the second purl nub below the
stitch that you just knitted and pull up onto the
left needle. Knit this new stitch
created by the purl nub from the farside (if you knit
it from the nearside it will
twist and look wrong).
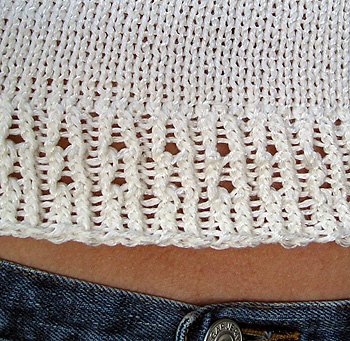
Twisted Rib Eyelet Border
(multiple of 3):
Rounds
1-4: *k2 tbl, p1* repeat this pattern for the entire
round, all four rounds.
Round 5: *ktbl, yo, ktbl, p1*
repeat to end.
Round 6: *k2tog, k, p1* repeat
to end. (This is regular knit, not ktbl!)
Rounds 7 and 8: *k2 tbl, p1*
repeat to end.
Round 9: *ktbl, yo, ktbl, p1*
repeat to end.
Round 10: *k2tog, k, p1* repeat
to end.
Rounds 11 and 12: *k2 tbl,
p1* repeat to end.
|
BODY
 With
circular needles, CO 162[171, 183, 192, 201, 213,
222] sts. Join and pm. Work 1[1, 1, 1, 1, 2, 2,
2] repeats of Twisted Rib Eyelet Border. With
circular needles, CO 162[171, 183, 192, 201, 213,
222] sts. Join and pm. Work 1[1, 1, 1, 1, 2, 2,
2] repeats of Twisted Rib Eyelet Border.
Next round: K all
sts and dec 2[1, 3, 2, 1, 3, 2] sts evenly around.
(160[170, 180, 190, 200, 210, 220] sts).
Next round: K 80[85,
90, 95, 100, 105, 110] sts, pm (this should be the
same color as the left armhole marker already on
the needles), k to end of round.
Next round: Knit.
Shape Waist
Next
round: K1, Rdec, k to last 3 sts before second
marker, Ldec, k2 (one st on either side of the right
armhole marker), Rdec, knit to last 3 sts in the
round, Ldec, k1.
*K 3 rounds even.
Next round: K1, Rdec,
k to last 3 sts before second marker, Ldec, k2 (one
st on either side of the right armhole marker),
Rdec, knit to last 3 sts in the round, Ldec, k1.*
Rep from * to * 3 times more.
(140[150, 160, 170, 180, 190, 200] sts).
Work even for 2[2.25, 2.25,
2.5, 2.5, 2.75, 2.75] inches.
Shape Bust
Next
round: K1, RRI, k to the last st before second
armhole marker, LRI, k2 (one st on either side of
second marker) RRI, k to last st, LRI.
**K 5 rounds even.
Next round: K1, RRI,
k to the last st before second armhole marker, LRI,
k2 (one st on either side of second marker) RRI,
k to last st, LRI.**
Rep from ** to ** 3 times
more. (160[170, 180, 190, 200, 210, 220] sts).
Work even until body measures
12[12, 12.5, 12.5, 13, 13, 13.5] inches.
Shape V-Neck and Back
K40[43,45,47,50,53,55], place
marker to mark center front V, k 80[85,90,95,100,105,110],
place marker to mark center back V, k 40[43,45,47,50,53,55].
Next row: k to 3 sts before V-neck marker,
Rdec, k1 (you are now at the marker).
Divide the work and start a new ball of yarn on
straight needles: k1, Ldec, k past side marker to
3 sts before V-Back marker, Rdec, k1. Stop at the
V-back marker. Work only the half of the work that
is now on the straight needles. (This is the front
right side and the back right side, with the armhole
in the center of the work.) You can leave the other
half on circular needles for now, or move the live
stitches to a stitch holder if you prefer.
Right side
Cont in St st with V-neck and back shaping by decreasing
1 st at each end of the work as previously done
on every other row for the rest of the pattern(dec
every RS row). Cont as established, at the same
time, beg the armhole shaping:
After 1.5 inches of V-neck
and V-back shaping, beg shoulder shaping by knitting
across the work, BO the 6 center stitches and then
cont to knit across to the V-back (don't forget
to continue the V-shaping at the end of the row!).
The work will once again
be divided in half, this time into front right and
back right segments. Work the back right segment.
You can leave the right front segment on the needles
if you prefer or alternately move it to a stitch
holder.
On the next RS row, BO
4 sts, k to end(don't forget V-shaping!).
On the following RS row, k1, Ldec, k to end (again,
don't forget V-shaping!).
Cont decreasing 1 st EOR until 4[3, 4, 3, 4, 3,
4]sts rem.
P 1 row. (K1, K2tog, K1) 1[0, 1, 0, 1, 0, 1] times.
Place the 3 rem live sts on a stitch holder.
Return to right front and
work as right back, reversing shaping as necessary.
When 3 sts rem, knit I-cord straps by knitting continuously
without turning your work, but instead pulling the
yarn tightly across the back of your sts.
After you have completed about 3-5 inches, put a
safety pin through the live sts and then through
the live sts on the right back piece.
Try the camisole on to check the length of the straps.
(Yes, you will be flashing some skin!)
When the strap ends are grafted together, the entire
length of the camisole should approximately equal
the length suggested for your size, but you should
adjust the fit to your taste.
Strap placement makes a huge difference in this
camisole, and it can look sloppy if you allow the
straps to be too long. When you have determined
the appropriate strap length, graft the front and
back of the strap together. (As a reference, I found
that 3 inch straps worked well for size 32 bust).
Left side
Work as for right side, reversing shaping as necessary.
|
|
Weave in loose ends.
Blocking is unnecessary, as the armholes are designed
to roll in so that further finishing is not required.
Wear, look ravishing, etc!
|
|
Julia
is a sometimes attorney temporarily living in the
hills of Los Angeles, and moonlighting at the fabulous
Knit Café. Her life is enriched daily by the
company of her hottie husband (and he's smart, too!),
two fabulous felines, and a pair of pups. Visit her
new weblog at mindofwinter.prettyposies.com
|
| Pattern & images
© 2004 Julia Trice. Contact Julia. |
|