|
...For
Lazy Color Addicts
Some knitters
are into texture. Not me -- I love color. The
plainest yarn in the world becomes exciting
when it's dyed chartreuse, or a deep, rich plum,
or both! Even better are colors with a story.
I name the yarn and roving I dye after what
inspired the color combination. The roving pictured
here, called Ohio Autumn Roadside, contained
brilliant oranges and yellows as its primary
background colors, with notes of green, plum
purple and red -- colors you'd see driving down
a back road in October.
And while no one
would call me lazy, it is true I like
to find shortcuts that provide maximum
pleasure for minimal effort. For example,
I'm a slow purler -- knitting almost
exclusively on circular needles makes
me faster. Using this method of dyeing
fiber, you can design your own multicolor
yarn on the cheap without a huge investment
in materials or time. As a matter
of fact, you'll probably spend less
on materials than on two or three
skeins of fancy yarn, and it takes
less than an hour for the setup (plus
a dishwasher cycle). Did I mention
it's really fun, too? You'll need
the supplies in the box below.
Assemble
your materials:
- Natural fiber roving (or yarn).
I used superwash merino.
- Lanaset/Sabraset acid dyes
- Plastic wrap
- Old newspapers, or other table
protection
- Clear plastic hair dye bottles
(available at beauty supply shops)
- Clear plastic cups
- Spray bottle filled with white
vinegar
- Rubber or latex gloves, if you're
picky about your manicure (also
available at beauty supply shops)
- Stockpot with lid
- Metal colander that will fit
inside the stockpot |
Before you set
up anything else, place your roving
in a large pot or bowl filled with water.
Gently force it under the water, without
swishing it around, and soak until it
absorbs as much water as possible. Some
rovings take longer than others. Your
ultimate goal is thoroughly wet fiber.
If your fiber is pure white, it will
look almost clear when it absorbs as
much as it can!
Now you're ready
to prepare your workspace. Spread
newspapers everywhere -- the more,
the better. Depending on how Jackson
Pollock you get with the dye bottles,
you'll be surprised where extra dye
spots might show up! Form a layer
of plastic wrap over the newspaper,
overlapping the edges as you go. More
overlap = less leaking in the dyepot,
so be generous!
If your beauty-supply bottles
aren't open at the pointy applicator tip, don't
cut them quite yet! Mix the dye inside first.
I'm not very scientific. I tend to mix the dye
with a small amount of water until it looks
strong enough to me. Err on the side of
caution. You can always add more dye, and the
powders are very concentrated. This isn't dyeing
with drink mix. You won't need to use multiple
packets of dye to get a strong color! You can
also add water to the dye base to make lighter
shades. It helps to have clear plastic cups
to play Mad Dye-ientist.
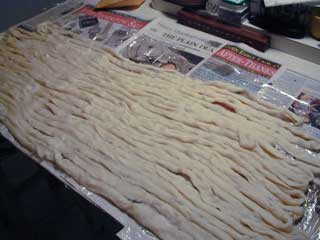
Fiber soaked and ready to dye
Drain the excess water from
your roving, being careful not to agitate it
(the colander will come in handy here), then
arrange the roving on top of the plastic. Expose
as much surface area as you can. I used a zigzag
pattern here, but you can also do circles, squares
or any other shape as long as there's enough
roving exposed.
Now, it is time to be an Artiste.
Feel free to put on a beret for this section.
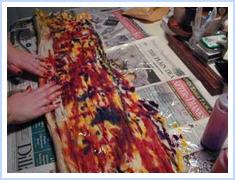
The art part
Hot
tip:
Use clear plastic cups to make small amounts
of lighter colors of dye (dilute with water)
or new colors by mixing dyes. Pour dye straight
from the cup, no need to put it in a bottle. |
Squirt dye on the damp roving.
Start with the lightest color first, and progress
to the darkest. Less is more. More than 4 or
5 colors can be too much, unless they're in
the same color family, or you want a very rainbow-like
roving. Remember that each spot of color will
be much larger when stretched out in the final
yarn, so don't worry if some spots look too
small. Don't be afraid to leave white space,
either. It can add an interesting effect, and
mute really obnoxious colors that might be too
much combined together. The dye will bleed and
overlap a little, too.
When you like the
way the dye looks, spray vinegar onto
the entire roving with your squirt
bottle. The acid in the vinegar makes
the dye "strike", or grab
onto the fiber. Don't worry about
getting too much vinegar on the wool.
In this case, better more than less.
Cover the roving
with another layer of plastic wrap,
and press it gently with your fingers
to work dye through to the other side.
(You may want to flip your roving
over and put some dye on the back
if it hasn't soaked through). Roll
it up like a sausage, and try to keep
separate sections from touching each
other as much as you can. Wrap the
entire thing tightly with another
layer of plastic wrap. If you're making
more than one roving, and they're
very different colors, you can be
extra-cautious and seal the packets
inside individual Ziploc bags.
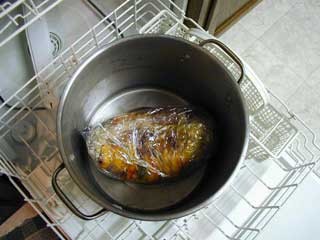
Into the dishwasher
Place the colander
in the bottom of your metal pot, and
put the fiber packets in it. Cover
with the lid, then put the pot and
contents into your dishwasher for
longest, hottest cycle possible. You
may need to place the pot on a cookie
sheet to keep it upright, or send
it through two cycles, depending on
how hot your dishwasher gets. Leave
the pot inside until it cools down.
Acid + heat sets the dye, so err on
the side of caution.
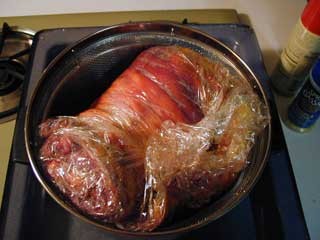
Finished dye packet
When you open
the lid, the packets will be steamy
(surprise!), and the colors will appear
slightly darker, as if they've melted
together. You thought dye-squirting
was the messy part? No -- this next
section is -- so it's best done outdoors,
or in a laundry sink. Unwrap the packets,
and pour off the extra dye. Almost inevitably,
some will run off and gather in the
pot, no matter how tightly you've sealed
the packets. Place the fiber in the
corner of your sink and "push"
water on to it with your hands. Remember,
running water directly onto the fiber
increases the likelihood of felting,
and you don't want that! Some dye will
come off during the rinse.

Dyed roving ready to hang dry
Hot
tip:
Lynne Vogel, of Twisted Sisters
Sock Workbook fame, uses a salad
spinner at this point to extract
as much water as possible from
the roving. If you're doing several
rovings at once, or you don't
have optimal drying conditions,
buying yourself a second salad
spinner will save you lots of
time. (I wouldn't recommend using
the same one for salad greens
and green dye!) |
When the water
runs clear, hang your roving to dry,
either outside or above something where
it can drip. Wet roving is heavy, and
it will stretch if you don't hang it
properly. If I'm drying inside, I take
a heavy plastic clothes hanger and loop
the roving over the bar multiple times,
zigzag style. Outside, I use a laundry
line or a metal rack and sawhorses.

Beautiful dyed roving [I told
you it would dry lighter]
Don't worry if
the colors look too dark -- they will
lighten up quite a bit as they dry.
Of course, if the colors are too light
for your taste, you can always repeat
the dyeing process. Now knit yourself
something special, you artist, you!
|