|


![Read exactly what FREE PATTERNS really means...respect our designers and authors rights [and thank you]](../images/OFFnavLEGAL.gif)

 
|
|
 <click
for more! <click
for more!
 
|

 By
Jacquelyn Landry By
Jacquelyn Landry

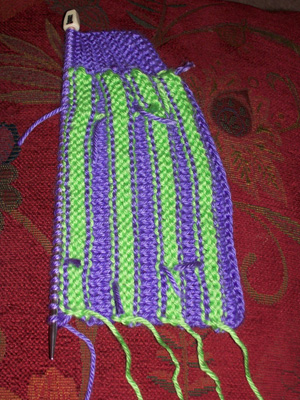
Mickey is a simple pleated
skirt whose birth was a complete accident. As
I toiled to finish last year's Christmas gifts
I completely goofed on a ribbing section I was
doing for a cardigan, but quite liked the look
of my mistake. With a few modifications it made
a fun skirt for my daughter. It was my first
taste of short rows though I didn't realize
it until months later when I sat down to write
the pattern.
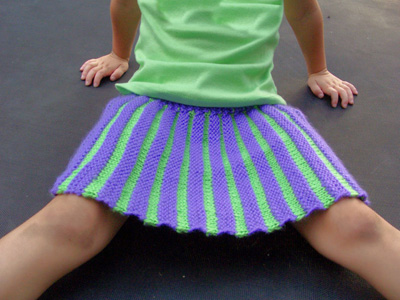
It is written in two versions;
a two-tone version that creates a very
Oh Mickey, you're so fine, you're so fine
you blow my mind, Hey Mickey! cheerleader
style skirt, or a solid more understated version
that looks fabulous with printed tights. There
are also finishing options. The skirt can be
finished with an elastic waistband, drawstring,
or belt loops, and it knits up quickly. From
casting on to finishing I was done in three
evenings.
Even with my limited math
skills this pattern is as easy to customize
as it was to create. Once the desired length
is determined (I recommend above the knee,)
waist sizing is mindless because the skirt is
worked side to side over a six row repeat until
it fits.
I made the pattern with my
four year old daughter in mind, but it isn't
just limited to little girls. The beauty of
the pattern is that it is customizable to any
size so it can be made to fit anyone from infant
to adult (for those of us who actually remember
and loved the original Hey Mickey complete with
the cheesy cheerleaders.)
The options for this pattern
are limitless. In a cotton blend for summertime
it would be great over a swimsuit as a flirty
little cover-up or with a tank and a pair of
flip-flops.
It would also be very easy
to do in scrappy vertical stripes by changing
yarn every row which is also a great way to
use up odds and ends from your stash.
The two-tone cheerleader
version can be made using one MC and as many
CCs as you'd like. Just keep track of how often
you repeat which colors. |
 model: Sloan
photos: Jacque Landry
model: Sloan
photos: Jacque Landry
|
|
|
|
| This is a formula pattern;
all dimensions are calculated to fit. |
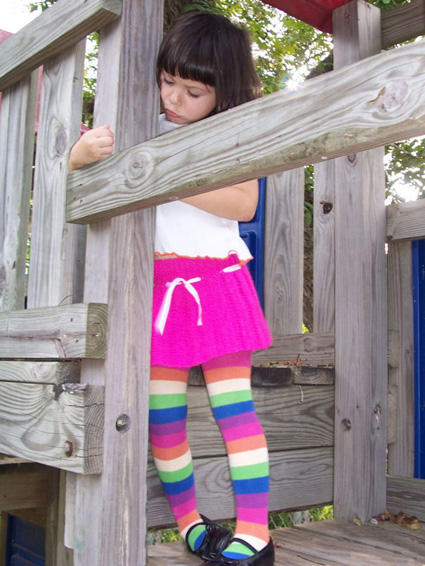
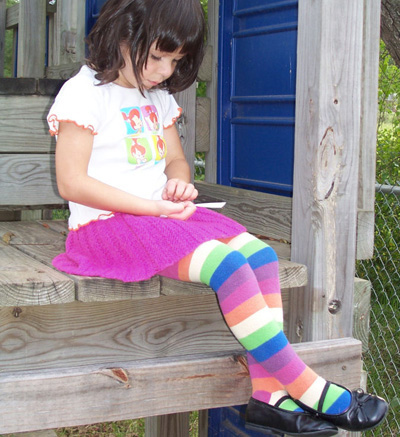
| The two-tone model fits
my four-year-old daughter. It is 9.5 inches
long, and the waist circumference is 20 inches.
The fuchsia model was knit to fit my daughter
at age 3. It is 8 inches long, and the waist
circumference measures 18 inches. |
| Two-Tone
Skirt [see below]
Caron Simply Soft Brites [100% acrylic; 315
yd/288m per 170g skein]; less than 1 skein of
each color
[MC] Grape
[CC] Limelight
Solid-Color Skirt
Lion Brand Wool-Ease [80% acrylic, 20% wool;
197 yd/180m per 85g skein]; color: Fuchsia;
1 skein
Notes: It is advisable to use needles which
are 1 or 2 sizes smaller than the size recommended
on the ball band. This will yield a firmer
fabric, which will be more durable and less
inclined to droop.
For a short child's skirt, a pair of straight
needles will suffice, but if you are knitting
a longer skirt (such as an adult skirt), you
may prefer to use a longer circular needle.
To work I-Cord belt loops, two double-point
needles are required.
Stitch marker
Tapestry needle
Waistband elastic (optional)
Sewing needle and thread (if using waistband
elastic)
Ribbon for lacing (optional; see Pattern Notes) |
| Your gauge will depend on the
yarn and needles you choose. It is absolutely
essential to work a gauge swatch and take an accurate
gauge measurement, as your stitch gauge per inch
is an important variable in the pattern formula. |
[Knitty's list
of standard abbreviations and techniques can
be found here] |
 This
is a formula pattern, which means that you are
asked to provide several numbers and perform a
few basic calculations, which will give you the
numbers required for the pattern. Print the pattern
out, fill in the spaces with the necessary numbers,
and your pattern will be ready to use. This
is a formula pattern, which means that you are
asked to provide several numbers and perform a
few basic calculations, which will give you the
numbers required for the pattern. Print the pattern
out, fill in the spaces with the necessary numbers,
and your pattern will be ready to use.
One option for this skirt is to omit the "wrap"
part of the "wrap and turn" when
turning the short rows at the top of the pleats.
If the short rows are turned without wrapping,
small holes will be created, through which
ribbon or a drawstring may be laced. The fuchsia
skirt shown was knit in this way, and 0.25-inch
grosgrain ribbon was laced through the holes.
I-Cord
Next
Row: Instead of turning work around to work
back on the WS, slide all sts to other end of
needle, switch needle back to your left hand,
bring yarn around back of work, and start knitting
the sts again. I-Cord is worked with the RS facing
at all times.
Repeat this row to form I-cord. After a few rows,
work will begin to form a tube. |
 Three
numbers are required to complete the formula for
this pattern: Three
numbers are required to complete the formula for
this pattern:
[A] The width, in inches, of the garter stitch
waistband
[B] The length, in inches, of the skirt below
the waistband
[C] Your stitch gauge per inch
The waistbands of the skirts shown are 2 inches
wide; this number works well for a small child's
skirt. If you are making a skirt for an older
child or an adult, you may wish to make a wider
waistband. If you wish to use a drawstring to
keep the skirt up (see Pattern Notes), work a
narrower waistband.
When determining the skirt length, keep in mind
that the knitted fabric will stretch with wear.
Allow for approx. 0.5 inch of lengthwise growth
for a skirt similar to the ones show, or several
inches for a longer skirt knit in a heavier yarn.
(Unfortunately, we can't tell you how much allowance
to make for growth; many factors, including the
yarn you choose and the tension of your knitted
fabric, will determine this.)
When working your calculations, round all numbers
to the nearest whole number.
_____[A] x _____[C] = _____[W]
[W] is the number of waistband stitches.
_____[B] x _____[C] = _____[S]
[S] is the number of skirt stitches.
_____[W] + _____[S] = _____[CO]
[CO] is the number of stitches to cast on.
The directions for the two-tone and solid-color
skirts are the same. If you are working a solid-colored
skirt, disregard the instructions to break and
join MC and CC.
Using MC, cast on _____[CO].
Row 1 [WS]: Knit all stitches.
Row 2 [RS]: Purl _____[S], w&t. Knit to end.
Row 3 [RS]: Purl _____[S], knit _____[W].
Row 4 [WS]: Knit _____[W], break MC, join CC,
purl _____[S].
Row 5 [RS]: Knit _____[S], w&t. Purl to end.
Break CC.
Row 6 [RS]: Join MC, knit all stitches.
Repeat these 6 rows until the waistband is the
desired length, ending on Row 5. When wrapped
around the waist of the wearer, the edges should
meet easily without being stretched. Before binding
off, place all stitches on waste yarn and pin
the edges together, to be sure the skirt can easily
be pulled on and off.
When the skirt is the desired length, bind off
all stitches using MC. |
 Weave
in all ends. Weave
in all ends.
Block the skirt as desired, taking care not
to flatten out the pleats.
Sew the short edges of the skirt together.
The skirt may be held up in one of three ways:
1. Waistband elastic
2. A belt, held by I-Cord belt loops
3. A drawstring (as described in Pattern Notes)
Waistband Elastic
To determine the necessary length of waistband
elastic, wrap the elastic around the waist of
the wearer so that it is slightly stretched,
but not snug. Add 1 inch to this length and
cut the elastic.
Overlap the ends of the elastic by 1 inch and
sew the ends securely together, ensuring that
the elastic is not twisted.
Use pins to divide both the waist of the skirt
and the elastic loop into quarters. Matching
up these quarter points, pin the elastic to
the inside of the waistband.
Sew in place, stretching the elastic slightly
as you sew.
Belt Loops
Using a double-pointed needle, cast on 4 sts.
P 1 row (this provides a flat end to the piece).
K 1 row.
Work I-Cord until the piece measures 0.5 inch
longer than the width of the belt to be worn.
With WS of work facing, p 1 row.
Bind off all sts.
Make desired number of belt loops and sew in
place on outside of waistband. |
 Jacque
is a stay at home mom to two precious little
girls who she hopes will one day pick up the
needles. She is a self-taught knitter who drives
her darling husband nuts with her yarn hoarding
and subsequent organizing. Jacque
is a stay at home mom to two precious little
girls who she hopes will one day pick up the
needles. She is a self-taught knitter who drives
her darling husband nuts with her yarn hoarding
and subsequent organizing.
Whenever she's not enhancing or cataloging
her stash, she can be found knitting, reading,
writing, hanging with her family or going on
about her adventures at thiskittenknits.blogspot.com. |
| Pattern & images
© 2007 Jacquelyn
Landry. Contact Jacquelyn |
|
|
|
|
|
