| Spring
Cleaning
As the days start to get longer and we creep
out of winter, it’s time to contemplate
Spring cleaning. Any fit of organization
sooner or later leads a knitter to a conversation
with her yarn stash. If you’re
anything like me, in bags and boxes and drawers
there are lots of yarns that seem to have lost
their purpose. Even after the organizing is
done, with all the potential projects sorted
away and codifed, there is, inevitably, a pile
of skeins in colors and textures you are no
longer committed to, the odd impulse purchase,
and a bunch of little balls that are, as the
saying goes in my family, “too
short to use and too long to throw away.”
So in this issue, Frankenknits turns its attentions
to a couple of great odd ball projects that
will help you clean out your closets and put
all those bits and pieces to use. If you don’t
have a stash of yarn that outpaces even optimistic
calculations of longevity and productivity
(or even if you do), these projects make a
great excuse to call together the knitters
you know for a yarn swap. With beverages and
de-stashed yarn on the table, it will give
everyone plenty of yarns to choose from and
may be the perfect opportunity to find a good
home for your last ball of fun fur.
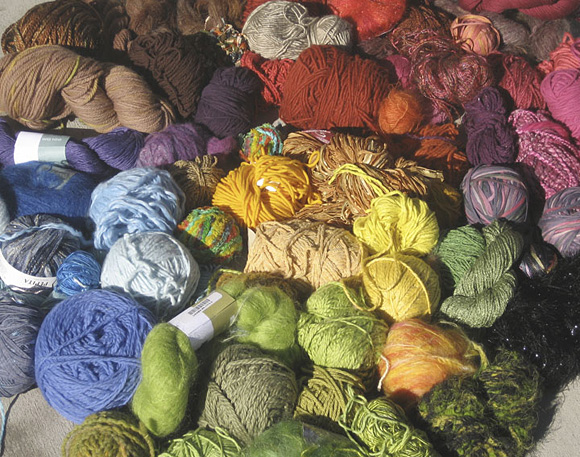
Once you’ve assembled all the yarns,
you’ll likely want to do a bit of sorting.
Grouping the yarns by color or texture or weight
can give you a better perspective of what you
have. For the Secret Message Mitts you’ll
want to use yarns that are, on average, worsted
weight. A few bits of finer or bulkier
yarn will be just fine, though, so don’t
worry about swatching or detailed analysis. It’s
unlikely that any of these stray bits have
ball bands attached, so just grab what looks
right. In total you’ll need about 200
yards of yarn, but any bit that’s over
two yards long is fair game.
You have even greater latitude in choosing
yarns for the Biased Oddball Stole.
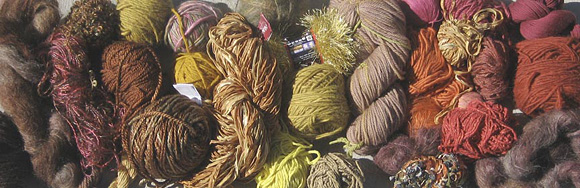
Choose a color or range of colors that you
like, remembering that you want a range of
textures too. Mohair, ribbons and novelty yarns
will be happy additions. Clearly, you can draw
inspiration from Prism Yarns’ jaw-dropping
beauties like Wild Stuff made up of a hand-dyed menagerie of all manner
of novelty yarns. Don’t be afraid to choose some yarns that
you don’t actually like on their own. Remember you’re
only using very small portions of each, so even a cloying or overpowering
yarn may be just right in this context. You needn’t worry
too much about gauge, though very bulky yarns may be best separated from
the rest and used for their own project. Skinny yarns can be held
double or triple to make them more similar to the others yarns you’re
using.
The more yarns you use the better. There are about 20 yarns
used in my sample. This isn’t a project for minimalists. More is
more here. Once you’ve made your selections, begin cutting
lengths of yarn between one and five yards long. Tie the ends together
leaving tails a couple of inches long and begin winding it into a ball. You’ll
create coherence by clustering similar colors together and do give a
bit of thought to the placement of very light or very dark colors or
any stand-out yarns you are using. By placing any screamers at
somewhat regular intervals, you give a rhythm to the finished piece. For
this stole using predominantly worsted and aran weight yarns, I used
about 300 yards. This will be a very large ball of yarn! Don’t
worry too much about how much you’ve got – this
is a flexible project and you can always add
a few more scraps at the end if you come up
short.
Honestly, making these giant oddballs can
be a lot of fun in itself. You might
find yourself making several. And that’s
just fine – knit up or in the raw, they
make great gifts. Each one is a reminder of
projects and ideas you’ve had over the
years.

BIASED ODDBALL STOLE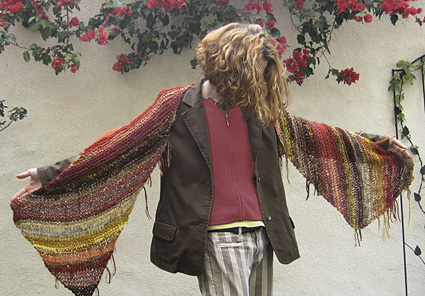 
With less yarn or less time, you can easily
make a scarf instead; just move on to the
bias center section when your scarf is
6 inches wide and follow the rest of the
pattern as written.
Finished measurements
16 inches wide by 60 inches long
Materials
 1 giant oddball (approximately 300 yards) 1 giant oddball (approximately 300 yards)
US 13/9 mm needles (or size needed to match
gauge or create a fabric that you like. For
thicker yarns, use a larger needle.)
Gauge
8 stitches/16 rows = 4 inches over garter stitch
(matching gauge is not critical for this project)
 PATTERN PATTERN
Increase Section:
CO 2 sts.
Row 1: K1fb, k to end of row.
Repeat this row 44 times, or until the short
sides of the stole measure 16 inches or the
desired finished width.
Biased Center Section:
Row 1: K1fb, k to last 3 sts, k2tog, k1.
Row 2: Knit.
Repeat these 2 rows until the longest side
of the stole measures 60 inches or desired
finished length.
Decrease Section:
Row 1: K to last 3 sts, k2tog, k1.
Repeat this row until 3 sts remain.
Next row: K1, k2tog.
Next row: K2tog, cut yarn and bring yarn through
last loop to secure.
Finishing
Weave in ends if desired. Or consider simply
pulling all the tails through to one side
and treat them as a decorative element.
To gild the lily, add fringe. Cut approximately
100 20-inch lengths of yarn from your remaining
odd balls. Divide them into 18 groups. Fold
a fringe group in half and use a crochet hook
to pull the doubled end about 2 inches through
the edge of the stole. Reach through this loop
and grab the loose ends of the fringe. Pull
gently to secure. Repeat at 2-inch intervals
along each short side of the stole.
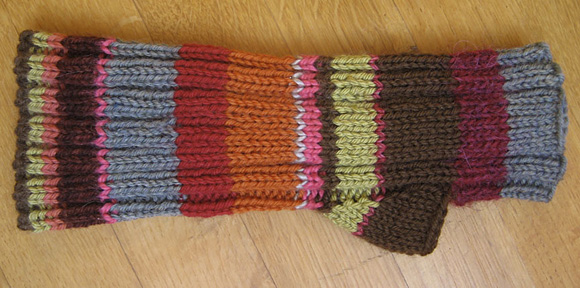
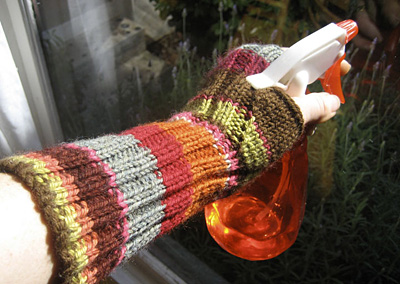
SECRET MESSAGE MITTS
The inspiration for these fingerless gloves
came from a discussion of creating random
stripes combined with a lingering question
about Madame DuFarge, literature’s
most famous knitter. How did she manage to
encode the names of those condemned to die
for the new republic into her knitting? Some
sort of pictogram? A coded set of knits and
purls?
I have no idea how she did it, but
I do know that you can put secret messages
into your knitting with stripes. A
number like your birth date, anniversary,
or social security number is a fine choice.
Use these numbers to create your stripe sequence.
Repeating the initials of the wearer where
a one-row stripe stands for A, a two-row
stripe for B, a three-row stripe for C and
so on… is also a great way to create
a repeating stripe pattern. By extension.
you could use this system to write “My
hovercraft is full of eels.” along
the length of a scarf or even “I don’t
really like you that much.” What you
encode (and whether you reveal the secret)
is up to you.
Size
One size fits most adults
Finished measurements
9 inches long
Wrist circumference 6 inches unstretched (up
to 8 inches stretched)
Materials
Scraps of worsted/DK/aran weight yarn totaling
200 yards
US 6/4 mm needles
Gauge
24 stitches/28 rows over 2x2 rib (unstretched)
 PATTERN PATTERN
These fingerless gloves are knit flat and then
seamed. Because they are long, the mitts
are slightly tapered to make them fit comfortably
on the lower arm. You could make them come
all the way up to the elbow -- just work
more rows before you begin your shaping.
CO 50 sts with the first color.
Change colors as needed throughout to create
your code.
Work in k2, p2 rib for 2.5 inches, ending
with a WS row.
Next row (Decrease Row) [RS]: K1,
ssk, p1, (k2, p2) 4x, k2, p1, k2tog, k2, ssk,
p1, (k2, p2) 4x, k2, p1, k2tog, k1 (46 sts).
Next row [WS]: P2, k1, (p2,
k2) 4x, p2, k1, p4, k1, (p2, k2) 4x, p2, k1,
p2.
Work sts as they appear for 1.5 inches more,
ending with a WS row.
Next row (Decrease Row) [RS]: K1,
ssk, (k2, p2) 4x, k2, k2tog, ssk, (k2, p2)
4x, k2, k2tog, k1 (42 sts).
Next row [WS]: P2, (p2, k2) 4x, p6, k2, (p2,
k2) 3x, p4.
Work sts as they appear for 1.5 inches more,
ending with a WS row. Piece measures
approximately 5.5 inches.
Shape Thumb Gusset (Left Hand)
Row 1 [RS]: K4, p2, k2, p2, place marker, m1,
k2, m1, place marker, p2, continue in pattern
as set across row.
Row 2 and following
WS rows: Work stitches
as they appear. The newly made stitches should
be purled on WS rows and knit on RS rows.
Row 3 and following RS
rows: Work to marker,
slip marker, m1, work to next marker, m1, slip
marker.
Repeat Rows 2 and 3 until there are 14 thumb
gusset stitches between markers.
Next row [RS]: Work to marker, remove
marker, bind off 14 thumb gusset stitches,
remove second marker, continue in pattern to
end of row.
Next row [WS]: Work in pattern to bound off
stitches, CO 2 stitches, continue in pattern
to end of row.
Work in rib pattern for 2 inches more. Bind
off.
To shape the thumb gusset for the right
hand, place markers on the opposite side
of the mitt, 10 and 12 stitches in
from the left edge of the piece.
Finishing
Weave in ends. Use mattress stitch to create
a seam on the underside of the glove.
|