Grandma Knitty Home
Knitty®: little purls of wisdom
what's the editor up to lately?feature articlesKnitty's generous selection of patternsKnittyspinşarchive of previous issuesMeet other Knitty readers and chat in our coffeeshop!sign up for the free Knitty newsletterLooking for an ad fromone of our advertisers? Click here!Our tiny, perfect online shopping mallGet yourself a little Knitty treat!read the behind-the-scenes news at Knitty


Find exactly what you're looking for

The answer to your question about Knitty is probably here!

Take home something Knitty today

Advertise with Knitty

Get your cool stuff reviewed in Knitty

Full information about how  to get published in Knitty

Read exactly what FREE PATTERNS really means...respect our designers and authors rights [and thank you]

Knitty is produced in a pro-rabbit environment

© Knitty 2002-2008. All rights reserved. Unauthorized reproduction prohibited. This means you.


<click for more!
 
Dream Weaver Yarns

The Charm Shrug was inspired by a kilt/charm pin I saw in my local craft store.  These large safety pins – in gold or silver - have two or three hooks for attaching decorative beads or charms. Customize the charm pin to suit the girl who'll be lucky enough to wear this sweet sweater.

This short-sleeved shrug is worked in a Garter Rib stitch, with ribbed collar and front bands accented in a crocheted picot stitch.

I love neutral colors and blended natural-fiber yarns for this child’s garment, which can enhance many types of spring outfits. 

model: Grace photos: M. Tifford

SIZE
Child's 4[6, 8] (shown in size 6)
 
FINISHED MEASUREMENTS

Chest circumference: 28[31, 34] inches
Length: 13.5[14, 14.5] inches

 
MATERIALS

Debbie Bliss Cashmerino Aran [55% Merino Wool / 33% Microfibre / 12% Cashmere; 98yd/90m pr 50g ball]; color: #101 Off White; 5[5, 6] balls
Recommended needle size:
1 set US #7/4.5mm straight needles
1 US #5/3.75mm circular needle, 29 inches or longer
[always use a needle size that gives you the gauge listed below -- every knitter's gauge is unique]

1 50g ball size 3 Perle Cotton, used for picot edging
Size 1/2.75mm or 0/3.25mm crochet hook
Stitch holders
Safety pins or split ring markers
Stitch markers
Tapestry needle
1 large safety pin with loops for hanging charms or beads (available at craft stores)
Beads and charms as desired

GAUGE

18 sts/24 rows = 4 inches in Garter Rib on larger needles

 
PATTERN NOTES

[Knitty's list of standard abbreviations and techniques can be found here]

Working Wraps Together with Wrapped Stitches:
When working rows which follow short rows, work the "wraps" at the turning points of the short rows, together with the stitches they wrap, as follows:

When working a RS row: Knit to wrapped stitch. Slip next stitch from left needle to right needle, use tip of left needle to pick up "wrap" and place it on right needle, insert left needle into both wrap and stitch, and knit them together.

When working a WS row: Purl to wrapped stitch. Slip next stitch from left needle to right needle, use tip of left needle to pick up "wrap" and place it on right needle, slip both wrap and stitch back to left needle, purl together through back loops.

Garter Rib (Worked over a multiple of 3 sts + 2):
Row 1 [RS]: [K2, p1] to last 2 sts, k2.
Row 2 [WS]: P all sts.
Repeat these 2 rows for Garter Rib.

2x1 Rib (Worked over a multiple of 3 sts + 2):
Row 1 [RS]: [K2, p1] to last 2 sts, k2.
Row 2 [WS]: [P2, k1] to last 2 sts, p2
Repeat these 2 rows for 2x1 Rib.

Three-Needle Bind Off
Hold both pieces of knitting with right sides together.
Insert needle into first st on front needle and first st on back needle, and knit them together. *Repeat this for the next st on the front and back needles. Draw the first st worked over the second st.*
Repeat from * to * until all sts have been bound off. Break yarn and draw through remaining st.

Directions for the crochet stitches used can be found here.

DIRECTIONS

BACK
Using 
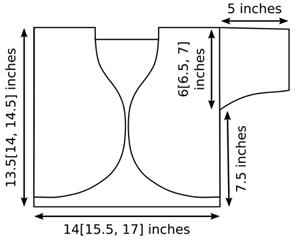
larger needles, CO 65[71, 77] sts.

Work in Garter Rib until work measures 12.5[13, 13.5] inches, ending with a WS row.

Shape back neckline:
Next Row [RS]: Work 21[23, 25] sts in pattern; attach a second ball of yarn and BO 23[25, 27] sts, continue in pattern to end.

Working each set of 21[23, 25] sts separately with attached ball of yarn, work 6 rows in pattern.

Break yarn and place sts on st holder.

RIGHT FRONT
Using larger needles, CO 13[15, 17] sts.

Row 1 [WS]: P all sts.
Row 2 [RS]: CO 2 sts; k3[2, 1], [p1, k2] to end. 15[17, 19] sts. This row establishes Garter Rib for right front.
Row 3 [WS]: P all sts.
Row 4 [RS]: CO 2 sts, work in pattern to end.
Repeat Rows 3 and 4 eight times more. 33[35, 37] sts.

Work in pattern until work measures 7[7, 7.5] inches, ending with a WS row.

Next Row [RS]: K1, ssk, work in pattern to end.
P 1 row.
Repeat these 2 rows 11 times more. 21[23, 25] sts.

Continue in pattern until work measures 12.5[13, 13.5] inches. Join sts to held sts of back right shoulder using Three-Needle Bind Off.
Note: The front will be 1 inch shorter than the back at this point. The front edging will make up for this difference in length.

LEFT FRONT
Using larger needles, CO 13[15, 17] sts.

Row 1 [WS]: P all sts.
Row 2 [RS]: [K2, p1] to last 1[3, 2] sts, k1[3, 2].
This row establishes Garter Rib for right front.
Row 3 [WS]: CO 2 sts, p to end.
Row 4 [RS]: Work in pattern as set.
Repeat Rows 3 and 4 eight times more. 33[35, 37] sts.

Work in pattern until work measures 7[7, 7.5] inches, ending with a WS row.

Next Row [RS]: Work in pattern to last 3 sts, k2tog, k1.
P 1 row.
Repeat these 2 rows 11 times more. 21[23, 25] sts.

Continue in pattern until work measures 12.5[13, 13.5] inches. Join sts to held sts of back left shoulder using Three-Needle Bind Off.

SLEEVES
Measure 6[6.5, 7] inches down side front edge of sweater from shoulder seam, and place a safety pin or split ring marker.

Mark 6[6.5, 7] inches down side back edge in the same way.

With RS facing and using larger needles, pick up and k 56[62, 65] sts between markers.

Work 3 rows in 2x1 Rib, ending with a WS row.
Decrease Row [RS]: K1, ssk, work in pattern to last 3 sts, k2tog, k1.
Repeat these 4 rows once more. 52[58, 61] sts.

Work 5 rows in pattern. Work Decrease Row.
Repeat these 6 rows 2[2, 3] times more. 46[52, 53] sts.

Continue in pattern until sleeve measures 5 inches or desired length.
BO all sts in pattern.

Work second sleeve in the same way.

FINISHING

Weave in ends. Sew sleeve seams and side seams.

Front Edging:
When picking up sts as described below, pick up and k 1 st in each CO or BO st and 3 sts for every 4 rows along vertical edges.

Using circular needle and beginning at lower side edge of right front (at base of side seam), with RS facing, pick up and k sts as described above along right front edge to beginning of neckline decreases, place marker, pick up and k sts along vertical right front and back neck edge, along back neck edge and vertical left neck edge to bottom of neckline decreases on left front, place marker, pick up and k sts along left front edge until side edge is reached. Be sure you have the same number of sts for left front edge as for right front edge.

Work front edging in 2x1 Rib as follows:
Row 1 [WS]: Work all sts in pattern.
Row 2 [RS]: Work in pattern to second marker, W&T.
Row 3 [WS]: Work in pattern across neckline to marker, W&T.
Row 4 [RS]: Work in pattern to end.
Repeat Rows 1-4 twice more.
BO all sts loosely in pattern.

Picot Edging:
Note: See linked article in Pattern Notes for crochet stitch directions.
You may find that you need to work the sts in the first round more closely together to achieve the correct tension.

Using crochet hook, attach perle cotton to bottom of right side seam with a sl st.
Round 1: Ch 1, sc in ea BO st of front edging and in each CO st of back, sl st in first sc to join.
Round 2: Ch 1, [sc in first 2 sc, work picot in next sc] to end, sl st in first sc to join.
Fasten off.

Weave in remaining ends.
Attach beads or charms to safety pin and use it to fasten shrug when worn.

ABOUT THE DESIGNER

Marjorie enjoys the challenge of creating original knitting patterns.  Inspiration comes from making gifts for her grandchildren, needing an addition to her own wardrobe, or learning a new knitting technique with her guild.