|
  BACK BACK
CO 110[128, 137, 155, 164, 182, 191] sts.
K 1 row.
P 1 row.
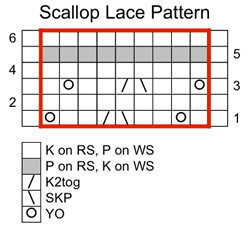
Work 4 rows in Scallop Lace Pattern.
Note: Decrease Row is worked on Row 5 of
Scallop Lace Pattern.
Decrease Row [RS]: K1, p2tog, p to last 3
sts, p2tog, k1.
Work 5 rows in pattern.
Repeat these 6 rows 10[12, 10, 12, 12, 13,
12] times more, then work Decrease
Row once
more. 86[100, 113, 127, 136, 152, 163] sts.
Continue in pattern until work measures approx.
9[9.5, 9.5, 9.5, 10, 10, 10] inches, ending
with Row 6 of pattern.
Work 6 rows in stockinette st, ending with
a WS row.
P 1 row.
This forms a purl ridge on RS of
work, which indicates top of waistband.
Work 3[3, 3, 5, 5, 5, 5] rows in stockinette
st, ending with a WS row.
Increase Row [RS]: K1, m1, k to last st,
m1, k1.
Repeat these 4[4, 4, 6, 6, 6, 6] rows 5[4,
4, 4, 6, 5, 6] times more. 98[110, 123, 137,
150, 164, 177] sts.
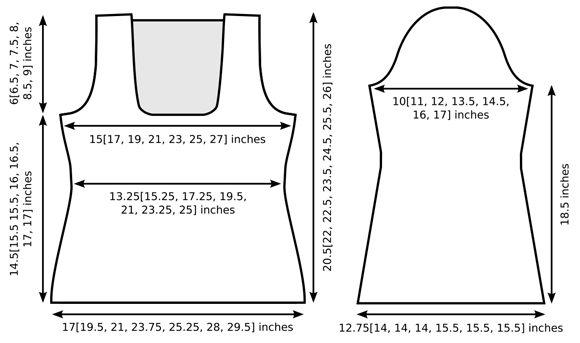
Continue in stockinette st until work measures
14.5[15.5 15.5, 16, 16.5, 17, 17] inches,
ending with a WS row.
Shape Armholes
Size XS Only:
BO 3 sts at begining of next 2 rows. 92 sts.
Size S Only:
BO 4 sts at beginning of next 2 rows.
BO 2 sts at beginning of next 2 rows. 98
sts.
Sizes M, L, 1X Only:
BO -[-, 4, 5, 5, -, -] sts at beginning of
next 2 rows.
BO 3 sts at beginning of next -[-, 2, 2,
4, -, -] rows.
BO 2 sts at beginning of next -[-, 4, 2,
2, -, -] rows. -[-, 101, 117, 124, -, -]
sts.
Sizes 2X, 3X Only:
BO 6 sts at beginning of next 2 rows.
BO 4 sts at beginning of next -[-, -, -,
- 2, 4] rows.
BO 3 sts at beginning of next 2 rows.
BO 2 sts at beginning of next 2 rows. -[-,
-, -, -, 134, 139] sts.
All Sizes:
Decrease Row [RS]: K1, k2tog, k to last 3
sts, ssk, k1.
P 1 row.
Repeat these 2 rows 2[2, 1, 5, 5, 6, 5] times
more. 86[92, 97, 105, 112, 120, 127] sts.
Continue in stockinette st until work measures
19.75[21.25, 21.75, 22.75, 23.75, 24.75,
25.25] inches (armhole measures 5.25, 5.75,
6.25, 6.75, 7.25, 7.75, 8.25] inches), ending
with a WS row.
Next Row [RS]: K32[35, 37, 40, 43, 47, 51];
attach second ball of yarn and BO next 22[22,
23, 25, 26, 26, 25] sts, k end.
In the directions that follow, “first
half” will refer to the set of sts
worked before the gap created by the BO
sts at center back. Directions for first
half and second half will be separated
by a semi-colon.
Working both sides at the same time using
attached balls of yarn, continue as follows.
Row 1 [WS]: P to end of first half; BO 6
[6, 7, 7, 8, 8, 8] sts, p to end.
Row 2 [RS]: K to end of first half; BO 6
[6, 7, 7, 8, 8, 8] sts, k to end.
Repeat these 2 rows once more. 20[23, 23,
26, 27, 31, 35] sts in each half.
P 1 row.
Work measures 20.5[22, 22.5, 23.5,
24.5, 25.5, 26] inches (armhole measures
6[6.5, 7, 7.5, 8, 8.5, 9] inches).
Place sts on st holders.
 FRONT FRONT
Work as for Back until work is 1 row
shorter than Back at beginning of armhole
shaping (ending with a RS row).
Next Row [WS]: P76[73, 81, 89, 94, 101, 107],
place marker, p31[37, 42, 48, 56, 63, 70].
Note: Read ahead! Armhole and neckline shaping
are worked at the same time.
Work armhole shaping as for Back. AT
THE SAME TIME: Shape neckline
as follows, beginning on first
row of
armhole shaping:
Next Row [RS]: K to marker, remove marker;
attach second ball of yarn and BO next 36[36,
39, 41, 38, 38, 37] sts, k to end.
In the directions that follow, "first
half" will refer to the set of sts
worked before the gap created by the BO
sts at center front. Directions for first
half and second half will be separated
by a semi-colon.
Working both sides at the same time using
attached balls of yarn, continue as follows.
Sizes 1X, 2X, 3X Only:
Next Row: Work to end of first half; BO 4
sts, work to end.
Repeat this row once more.
All Sizes:
Next Row: Work to end of first half; BO 3
sts, work to end.
Repeat this row once more.
Next Row: Work to end of first half; BO 2
sts, work to end.
Repeat this row once more.
Sizes M, L, 1X, 2X, 3X Only:
Next Row: Work to end of first half; BO 1
st, work to end.
Repeat this row once more.
All Sizes:
When all neckline and armhole shaping has
been completed, 20[23, 23, 26, 27, 31,
35] sts remain in each half.
Continue in pattern until work measures same
as Back to shoulder. Join sts of each shoulder
to sts of corresponding Back shoulder using
Three-Needle Bind Off.
 SLEEVES (Make 2) SLEEVES (Make 2)
CO 83[92, 92, 92, 101, 101,
101] sts.
K 1 row. P 1 row.
Work 6[6, 6, 8, 8, 12, 20] rows in Scallop
Lace Pattern.
Decrease Row [RS]: K1, k2tog, work in patt
to last 3 sts, ssk, k1.
Work 5[5, 5, 7, 7, 11, 19] rows in pattern.
Repeat these 6[6, 6, 8, 8, 12, 20] rows 14[15,
12, 9, 10, 6, 3] times more, then work Decrease
Row once more. 51[58, 64, 70, 77, 85, 91]
sts.
Continue in pattern until work measures
12 inches or 6.5 inches less than desired
length to underarm, ending with Row 6 of
pattern.
Work 6 rows in stockinette st, ending with
a WS row.
P 1 row.
This forms a purl ridge on RS of
work, which indicates top of sleeve band.
Work 5[5, 5, 3, 3, 3, 3] rows in stockinette
st, ending with a WS row.
Increase Row [RS]: K1, m1, k to
last st, m1, k1.
Repeat these 6[6, 6, 4, 4, 4, 4] rows 6[6,
6, 8, 8, 9, 9] times more. 65[72, 78, 88,
95, 105, 111] sts.
Continue in stockinette st until work measures
18.5 inches or desired length to underarm,
ending with a WS row.
Shape Sleeve Cap:
BO 3[5, 7, 6, 7, 9, 10] sts at beginning
of next 2 rows. 59[62, 64, 76, 81, 87,
91] sts.
Sizes L, 1X, 2X, 3X Only:
BO -[-, -, 5, 6, 7, 7] sts at beginning of
next 2 rows. -[-, -, 66, 69, 73, 77] sts.
All Sizes:
Decrease Row [RS]: K1, k2tog, k to last 3
sts, ssk, k1.
P 1 row.
Repeat these 2 rows 8[8, 8, 7, 7, 7, 8] times
more. 41[44, 46, 50, 53, 57, 59] sts.
Work Decrease Row. Work 3 rows in stockinette
st.
Repeat these 4 rows 2[3, 4, 5, 6, 7, 7] times
more. 35[36, 36, 38, 39, 41, 43] sts.
Work Decrease Row. P 1 row.
Repeat these 2 rows 8[8, 7, 7, 6, 7, 8] times
more.
BO remaining 17[18, 20, 22, 25, 25, 25] sts. |