![Read exactly what FREE PATTERNS really means...respect our designers and authors rights [and thank you]](../images/OFFnavLEGAL.gif)
![Read exactly what FREE PATTERNS really means...respect our designers and authors rights [and thank you]](../images/OFFnavLYS.gif)

 
|
 |
 <click for more! <click for more!
|
 
 |
|
 |
|
This issue of Knitty is printer friendly. To print, simply click the option you wish from the buttons on the right: print all text, images, charts and schematics OR print all text, charts and schematics and just the first pattern image, to save paper and ink. |
|
 |
|
 |
|
|
 |
|
|
|
 |
| by Franklin Habit |
For almost as long as I’ve been a knitter, I’ve been fascinated by the history of knitting. I’ve especially enjoyed the mind-twisting process of working with the often obtuse and obfuscatory language of antique patterns. There’s a thrill, I find, in watching a project emerge row by row and knowing that other knitters, long gone, followed the same path.
The process of decoding, testing and correcting isn’t for everyone, though; and so in this column I hope to share the excitement of the journey by removing as many of the roadblocks as possible. You don’t need to be a historian to come along–just a knitter with a curious mind.
|
Babez in Da Hood
Every time I work through a pattern from
an antique source I learn somethng new. This time, I learned
that screaming at a dead woman does nobody any good.
I suppose I already knew this to
be so, but it didn’t
stop me from bellowing forte fortissimo at the ghost
of Cornelia Mee, prolific author of such nineteenth-century
needlework best-sellers as Exercises in Knitting and Mee’s
Companion to the Work-Table.
It was in the latter that I encountered “For a Baby’s
Hood, in German Wool.” Intriguing title, that. I’m
familiar with hats and bonnets for babies–but hoods?
Sounds exotic, even slightly sinister–two qualities
I appreciate in a baby.
I’ve been around the block with Mrs. Mee a few times
and knew to expect speed bumps. But to my great surprise,
the knitting proceeded with little ado. Wordy instructions
for a “dice pattern” quickly revealed themselves
to be what I was taught
to call double moss stitch. Likewise, the slight shaping
at the back of the headpiece sounded complex but turned out
to be quite straightforward.
Before long, I had three completed all three pieces of knitting.
And I had no bloody idea how to fit them together.
This is when the aforementioned screaming ensued.
The pattern itself gives only the
barest of clues: “The
horseshoe is sewed to the headpiece.” It is, is it?
Where, exactly? With which end of the horseshoe up? The frill “is
sewed on” (to what?) “where the holes are made.” Which
holes? There are two
rows of holes on the frill, and two more on the headpiece.
Answer came there none, not even when I attempted contact
via Ouija board.
I sewed, ripped and re-sewed the damned thing four times
before finally arriving at what looks to me (with reference
to a few contemporary illustrations and surviving objects)
like a baby hood. I think, at last, that I got it right.
And if I didn’t, Cornelia honey, you’re
more than welcome to speak up.
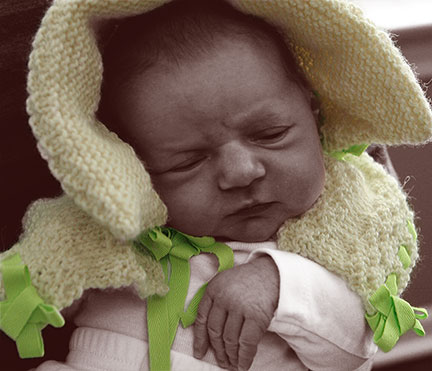
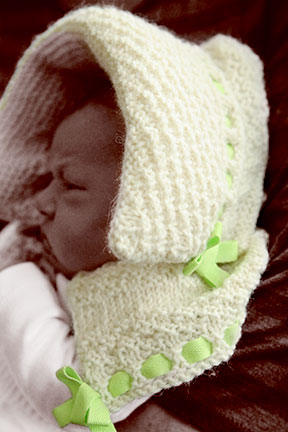
About the Hood
One of my favorite things about working
from antique patterns is running across once-common construction
techniques that have faded into obscurity. This hood has
a padded ruche at the front opening–an eminently sensible feature I don’t
think I’ve ever seen on a modern bonnet. It not only
adds warmth, but protects
the head from accidental knocks against the barn door, the
butter churn, or other hazards of Victorian childhood.
The hood produced by the pattern
is on the small side–definitely
best suited to a newborn.
For an older or larger infant, work the pattern as written
in worsted weight with appropriate needles.
As always, change the fiber to suit
your particular needs. The alpaca/wool blend is warm and
soft, but not correct for the period. If you’re making
this for a re-enactment, pure wool is the way to go. For
warm-weather, switch to cotton, with cotton batting for
the ruche.
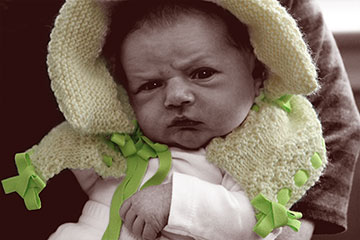
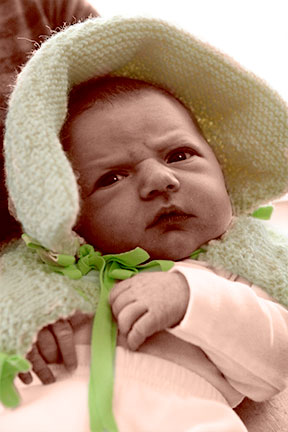
And as to finishing touches, Cornelia’s
own suggestion is "a
netted rosette, edged
with silk floss."
(She doesn’t
tell you where to put
it, of course.) As my
netting skills are not what they ought to be, I substituted
couple of very simple, hand-sewn bows. Use your imagination.
The lack of specificity in antique sources can be frustrating
at times–but
it also makes them a
springboard for creativity.
|
|
 |
|
by Franklin Habit,
translated from Mee's
companion to the work-table (1844) by Cornelia
Mee

Newborn
Headpiece:
6 inches deep
by 6 inches high.
Entire
piece:
9 inches high including
frill.
 Berroco
Ultra Alpaca Lite (50% Super Fine Alpaca/50% Peruvian
Highland Wool 144yd/133m
per 50gm skein) Winter White/4201,
2 skeins Berroco
Ultra Alpaca Lite (50% Super Fine Alpaca/50% Peruvian
Highland Wool 144yd/133m
per 50gm skein) Winter White/4201,
2 skeins
1
pair US #4/3.5 mm needles
[always use a needle size that gives you the gauge
listed below -- every knitter's gauge is unique]
small
amount of polyfill, clean roving or cotton batting
about 10 feet 3/8th inch wide
fabric ribbon
stitch holders, or two lengths
of scrap yarn in a contrasting color
scissors
yarn needle |
| 24 sts/32 rows = 4 inches in stockinette
st |
| |
[Knitty's list of standard abbreviations and techniques can be found here] |
Yo at beginning of row. Before working
the first stitch of the row, bring the working yarn over
right needle from front to back.
Dice pattern (worked flat on an even number
of stitches)
Rows 1 and 2: [K2, p2] across.
Rows 3 and 4:
[P2, k2] across. |
|
| |
HEADPIECE
CO 70 sts. Work in garter st for two rows.
Row 3 [RS]: [YO, p2tog] to end.
Rows 4–6: Knit.
Rows 7–32: Work
in Dice Pattern .
Rows 33-50: Knit.
Rows 51-62: Work
in Dice Pattern.
Rows 63-65: Knit.
Row 66 [RS]: [YO,
p2tog] to end.
Rows 67-69:
Knit.
Rows 70-81: Work
in Dice Pattern.
Note: Rows 82-88 will shape the
back of the headpiece.
Row 82 [RS]: K20, slip
those 20 sts onto a holder or scrap yarn; [P2, k2]
7 times, k to end.
Row 83 [WS]:
K20, slip those 20 sts
onto a holder or scrap
yarn; [K2, p2]
7 times, k2.
Note: Rows 84-86 are
worked only on the center
30 sts.
Rows 84–85:
Work two more rows
dice pattern.
Rows 86 [RS] : Knit.
Turn work.
Row 87 [WS]: Knit
the center 30 sts. Do
not turn work. Slip
adjacent 20 sts from
the holder or scrap yarn
on your left to free
needle and knit them.
You will have 50 sts
on your needle. Turn
work.
Row 88 [RS]: Knit
across to rem sts on
scrap yarn. Slip these
20 sts from the adjacent
scrap yarn or holder
to free needle and knit
them.
Row 89 [WS]: Knit
all sts.
Cast off. Weave in ends.
 HORSESHOE
Cast on 14 sts.
Rows 1–16: Work in Dice Pattern.
Row 17 [RS]: K1,
m1, k1, work in Dice
Pattern as established.
Row 18 [WS]:
P1, m1, k1, continue
Dice Pattern to last
stitch, k1.
Row 19 [RS]: K1,
m1, continue Dice Pattern
to last stitch, p1.
Row 20 [WS]: K1,
m1, continue Dice Pattern.
Row 21 [RS]: K1,
m1, p1, continue Dice
Pattern.
Row 22 [WS]: K1,
m1, p1, continue Dice
Pattern to last stitch,
p1.
Rows 23–26: Knit.
Row 27 [RS]: K2tog,
k1, work in Dice Pattern
(beginning with p2) to
last stitch, k1.
Row 28 [WS]: k2tog,
k1, continue Dice Pattern
to end.
Row 29 [RS]: P2tog,
continue Dice Pattern
to end.
Row 30 [WS]: P2tog,
continue Dice Pattern
to last stitch, k1.
Row 31 [RS]:
P2tog, p1, continue Dice
Pattern to last stitch,
p1.
Row 32 [WS]:
P2 tog, p1, continue
Dice Pattern to end.
Row 33 [RS]: K2tog,
continue Dice Pattern
to end.
Row 34 [WS]: K2tog,
continue Dice Pattern
to last stitch, p1.
Row 35 [RS]: K2tog,
k1, continue Dice Pattern
to last stitch, k1.
Row 36 [WS]: K2tog,
k1, continue Dice Pattern
to end.
Cast off. Weave in ends.

FRILL
Cast on 100 stitches.
Rows 1–4: Knit.
Row 5 [RS]:
[Yo, p2tog] to end.
Rows 6–15:
Work in Dice Pattern.
Row 16 [WS]:
Knit.
Row 17 [RS]:
Purl.
Repeat Rows 16 and
17 twice more.
Rows 22–29: Work in Dice Pattern.
Rows 30-31:
Knit.
Row 32: [Yo,
p2tog] to end.
Rows 33–34:
Knit.
Cast off. Weave in ends. |
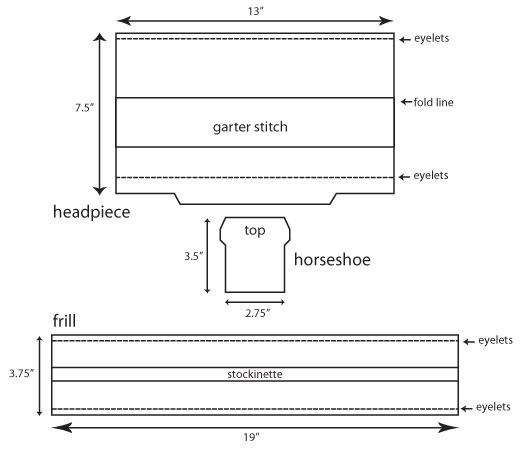
Wash and gently block all
pieces before sewing up.
1. Fold cast-on (unshaped) edge of headpiece back along
first row of garter stitch so that first and second eyelet
rows align. Pin long edge in place. Using mattress stitch,
seam the two short selvedges of folded portion to
form a shallow pocket. Unpin long (eyelet) edge and stuff
gently with fiber. Using a running stitch, sew long edge
closed, taking care to keep both rows of eyelets aligned.
2. Lay headpiece and horseshoe on a work surface with right
sides facing up and top center of horseshoe aligned to center
of cast-off (shaped) edge of headpiece. Pin the pieces together
at this point. Using mattress stitch, seam horseshoe to
headpiece, working first from center to the left and then
from center to the right.
3. With right sides facing up, pin top center portion of
frill (with ten rows of dice pattern) to lower edge of horseshoe.
Using mattress stitch, seam pieces together.
4. Run lengths of ribbon through all eyelet rows, leaving
8–10 inches at either end of fabric to serve as ties.
(Tip: attach a small safety pin to the end of the ribbon
to help pull the ribbon through the eyelets.)
5. If you wish, trim hood
with bows, rosettes, or other ornaments of your own devising.
(Cornelia Mee recommends “a netted rosette, edged
with silk floss.”) My version includes extremely simple
bows sewn from extra ribbon at the bottom corners of the
headpiece and the frill. |
 Franklin Habit is a knitter, writer, illustrator and photographer
who lives in Chicago. His
first book, It
Itches: A Stash of Knitting Cartoons
Franklin Habit is a knitter, writer, illustrator and photographer
who lives in Chicago. His
first book, It
Itches: A Stash of Knitting Cartoons ,
was recently published by Interweave Press. ,
was recently published by Interweave Press.
Visit his blog at the-panopticon.blogspot.com.
|
| Pattern & images © 2009.
Franklin Habit. Contact Franklin
|
|
|
|
|
|