|
|
|||

|
|
|||
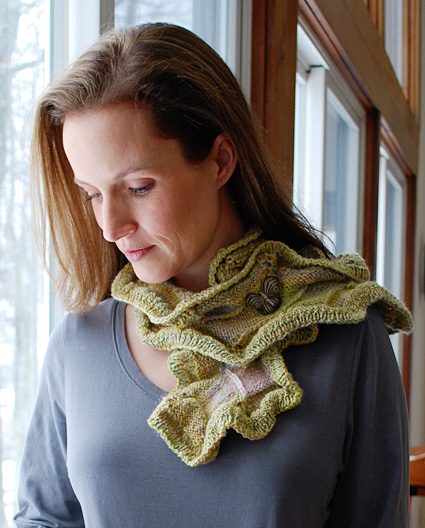
Ripple is one of those patterns that's hard to describe. It's kind of faux entrelac with a ruffle surround, sort of. Fun to knit and fun to wear...it drapes like crazy. Start by working a chain of alternating
stockinette and reverse
stockinette rectangles
then pick up all in the
round to knit reversible
ripple edging. |
|||
| SIZE | |||
One |
|||
| FINISHED MEASUREMENTS | |||
Handspun version Commercial yarn version |
|||
| MATERIALS | |||
Handspun version [shown
above] Commercial yarn version [shown
in technique photos and
last modeled picture below]
|
|||
| GAUGE | |||
Handspun version |
|||
|
PATTERN NOTES [Knitty's list of standard abbreviations and techniques can be found here.] |
|||
Spinning notes: Once I spun my yarn, a two ply sportweight Blue Faced Leicester in Winter Fields and Winter Daybreak colorways (one ply of each) from Three Waters Farm, I decided to adapt the pattern to my yarn as follows. I cast on the same number of stitches and knit the rectangles exactly like the original Ripple, but I used a US 5 needle to get a finer gauge. I knew the scarf would be shorter, even if I knit the same number of rectangles, but I decided to shorten it further to a neckwarmer length by knitting only 20 rectangles. The edging is the same as the original. [I embellished it with a scarf pin.] The edging for this project
is worked in the round
using 2 circular needles.
If you are unfamiliar with
this technique, instructions
may be found here and
a video can be found here. Instructions for the Long-Tail Cast On can be found here. When picking up sts in slipped sts along an edge, always insert needle under both strands of the chain formed by the slipped sts. |
|||
|
Left to right: 2: Stockinette st face of second rectangle and all left-slanting rectangles is on WS of work (note the clip on marker peeking through on the wrong side of first rectangle). 3: Third rectangle and all right-slanting rectangles have stockinette st face on RS of work. |
|||
| DIRECTIONS | |||
|
CHAIN OF RECTANGLES First Rectangle: Second Rectangle: Third Rectangle: Note: Second and third rectangles are the same, except
for the following things: Repeat second and third rectangles until you have worked 24 rectangles, ending with second rectangle. If you wish to lengthen or shorten the scarf, be sure to work an even number of rectangles. Do not turn your work at end of last row; edging begins with WS facing. RIPPLE EDGING: FIRST TIER Drop second needle (needle you have just been working
with) and pick up first needle, bringing points of first
needle together as if to begin working in the round. [K 10 sts of rectangle immediately next to picked-up sts, place marker, pick up and PURL 10 sts along adjacent edge of same rectangle] 12 times or until all rectangles on this needle have been worked; you will have reached the lower corner of the first rectangle. 12 stitch markers are in place; one at the outer corner of each triangle. Drop first needle and pick up second needle. [Pick up and k 10 sts along edge of adjacent rectangle, place marker, p 10 sts of same rectangle] 12 times or until all rectangles on this needle have been worked. Join to work in the round. See Pattern Notes re. working in the round using two circular needles; the edging is worked using this technique. Two Important Notes: Using first needle, p10; you are now at beginning-of-round marker. Each half of the round (between beginning-of-round marker and midpoint marker) contains three 10-st sections ('short sections') and eleven (depending on the number of rectangles worked) 20-st sections ('long sections'). Round 1: K all sts to midpoint marker; p all sts to
end-of-round marker. RIPPLE EDGING: SECOND TIER Round 1: For first half of round, in each short section, work [p1, yo, p2, yo, p3, yo, (p2, yo) three times, p3, yo, p2, yo, p1]; in each long section, work [p1, yo, p2, yo, p8, yo, (p2, yo) three times, p8, yo, p2, yo, p1]. For second half of round, in each short section, work [k1, yo, k2, yo, k3, yo, (k2, yo) three times, k3, yo, k2, yo, k1]; in each long section, work [k1, yo, k2, yo, k8, yo, (k2, yo) three times, k8, yo, k2, yo, k1]. Each short section now has 26 sts, each long section now has 36 sts. When working next round, remove all plain markers, but leave beginning-of-round marker and midpoint marker in place. Rounds 2-5: P to midpoint marker, k to end of round. |
|||
| FINISHING | |||
Weave in ends. If desired, block scarf by steaming each ripple separately. (Handspun version shown has not been blocked.) Be sure to set the temperature of your steam iron correctly for the fiber you used; do not steam synthetic fibers. |
|||
| ABOUT THE DESIGNER | |||
If you don't find Lynne dyeing, spinning, knitting, or crocheting, or writing about said activities, you might try looking for her on the many woodland trails around Sewanee, TN, with husband, James, and dogs Monk and Pearl. If she isn't there, she could easily be traveling to teach workshops nationwide. Twisted Sisters Knit Sweaters, is her second book. You can find her patterns at her Etsy store and her yarns and fiber at Three Waters Farm. Find out where she's teaching this year on her blog. |
|||
| Pattern & images © 2009 Lynne Vogel. Contact Lynne |