Blank
Knitty�: little purls of wisdom
ul
ml
Madeline Tosh
ur
b
Title
asdf
spacer model: Andy spacer photos: Jillian Moreno

Tangy

This sweater is a design collaboration between my husband and me. It took a while.

Part of it went like this: "I like that stitch. That's nice"

Part of it went like this: "A knitted chef's coat. Are you kidding???"

It's knit from Balance, an organic wool/cotton blend that, even in an all-over twist stitch, is really light. It's perfect for spring wear or chilly summer nights.

In the end, we compromised on all things, though I did win on the more Steve McQueen-style than chef's-coat style thing.

He won on the color, and I'm glad because the brown yarn makes his eyes electric blue.

SIZE

S[M, L, XL, 2X, 3X] (shown in size Large)

 
FINISHED MEASUREMENTS

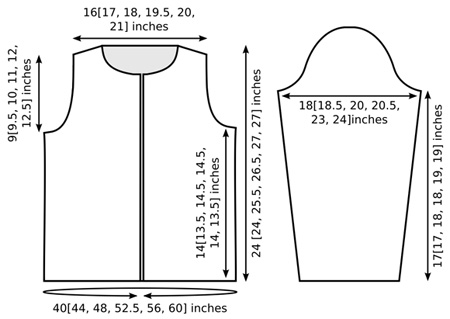
Chest: 40[44, 48, 52.5, 56, 60] inches
Length: 24 [24, 25.5, 26.5, 27, 27] inches

 
MATERIALS
O-Wool Balance [50% certified organic wool, 50% certified organic cotton; 130yd/119m per 50g skein]
spacer [MC] #8014 Agate; 7[8, 9, 10, 11, 12] skeins
spacer [CC] #3222 Malachite; 2 skeins

Recommended needle size:
spacer 1 US #7/4.5mm circular needle, 32 inches or longer
spacer 1 US #6/4mm circular needle, 32 inches or longer (or one size smaller than needed to obtain gauge)
spacer 1 spare circular needle, 24 inches or longer, #7/4.5mm or smaller
[always use a needle size that gives you the gauge listed below -- every knitter's gauge is unique]

spacer Waste yarn
spacer Stitch markers
spacer Yarn needle
spacer Separating zipper (buy zipper after sweater is complete to determine correct length)

 
GAUGE

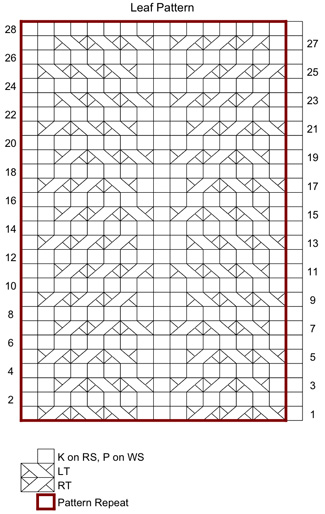
20 stitches/24 rows = 4 inches in Leaf Pattern using larger needles
20 stitches/ 28 rows = 4 inches in 1x1 Twisted Rib using larger needles

 
PATTERN NOTES
[Knitty's list of standard abbreviations and techniques can be found here.]

This pattern uses a provisional cast on. Any provisional cast on method may be used. Directions for one method can be found here.

LT (Left Twist): Bring right needle behind left needle and knit into back of second stitch on left needle without dropping st from needle; knit into front of first stitch on left needle, drop both stitches from left needle.

RT (Right Twist): K2tog but do not drop sts from left needle, knit again into first st on left needle, drop both stitches from left needle.

ssp: Slip next 2 sts knitwise, one at a time, to right needle. Slip them both, purlwise, back to left needle. Purl them together through their back loops.

1x1 Twisted Rib (Worked over an even number of sts):
All Rows: [K1 tbl, p1] to end.

chartLeaf Pattern
(Worked over a multiple of 16 sts + 1):
Row 1 [RS]: K1, [LT, (RT) twice, k3, (LT) twice, RT, k1] to end.

Even-Numbered Rows 2-28 [WS]: P all sts.

Row 3 [RS]: K1, [k1, LT, (RT) twice, k1, (LT) twice, RT, k2] to end.

Row 5 [RS]: K1, [(LT) twice, RT, k3, LT, (RT) twice, k1] to end.

Row 7 [RS]: K1, [k1, (LT) twice, RT, k1, LT, (RT) twice, k2] to end.

Row 9 [RS]: K1, [(LT) three times, k3, (RT) three times, k1] to end.

Row 11 [RS]: K1, [k1, (LT) three times, k1, (RT) three times, k2] to end.

Row 13 [RS]: Work as for Row 9.

Row 15 [RS]: Work as for Row 7.

Row 17 [RS]: Work as for Row 5.

Row 19 [RS]: Work as for Row 3.

Row 21 [RS]: Work as for Row 1.

Row 23 [RS]: K1, [k1, (RT) three times, k1, (LT) three times, k2] to end.

Row 25 [RS]: K1, [(RT) three times, k3, (LT) three times, k1] to end.

Row 27 [RS]: Work as for Row 23.
Repeat Rows 1-28 for Leaf Pattern.

Intarsia: When working colorwork in Intarsia, different sections of each row are worked in different colors. For this pattern, it is necessary to use a different ball of yarn for each area of color. When switching from one color to the next, drop the color you have been knitting with, and bring the yarn for the next color up from under the yarn of the previous color before you continue knitting. This will twist the 2 yarns around each other. It is very important to do this; if you do not wrap the yarns in this way, the areas of color will not be joined, and you will have holes in your work.

DIRECTIONS

LOWER BODY

Hem Facing:
Using smaller needle and MC, CO 199[219, 239, 263, 279, 299] sts using provisional CO method. Work in stockinette st until work measures 1.5 inches, ending with a WS row.
P 1 RS row, forming turning ridge for hem.

Set Pattern for Lower Body:
Using larger needle, p 1 WS row. From this point, body is worked using larger needle.

Important: In the directions below, 'Leaf Pattern motif' will refer to the 16-st pattern repeat outlined in red in the chart, or delineated in square brackets in the written directions. Different sections of the piece are worked in different colors, using the intarsia method of colorwork; see Pattern Notes if you are not familiar with this technique. When working the lower body, you will have 5 balls of yarn attached.

Stitch markers are used to separate ribbed side panels from leaf motif panels. If you wish to use additional markers placed between each motif, use a different type of marker for these additional markers.

Set-up Row [RS]: K1 tbl, k1, work Leaf Pattern motif, attach CC and work Leaf Pattern motif, attach second ball of MC and work Leaf Pattern motif 1[1, 1, 2, 2, 2] times, place marker, [p1, k1 tbl] 1[6, 11, 1, 5, 10] times, place marker, work 6[6, 6, 8, 8, 8] Leaf Pattern motifs, place marker, [p1, k1 tbl] 1[6, 11, 1, 5, 10] times, place marker, work Leaf Pattern motif 1[1, 1, 2, 2, 2] times, attach second ball of CC and work Leaf Pattern motif, attach third ball of MC and work Leaf Pattern motif, k1 tbl.

This row sets pattern for lower body. Continue in pattern, working side panels in 1x1 Twisted Rib and all other sts in Leaf Pattern, changing colors as set, until work measures 1.5 inches, ending with a WS row.

Turn Hem:
Carefully remove waste yarn from CO edge, placing resulting live sts on smaller needle. Fold work along turning ridge, so that WS of hem facing meets WS of hem, and sts of CO edge sit directly behind sts on working needle.

Joining Row [RS]: Working in pattern as set, [work next st on left needle together with next st of CO edge] until all sts have been worked.

Continue in pattern until work measures 14[13.5, 14.5, 14.5, 14, 13.5] inches or desired length to underarm, ending with a WS row.
Note: Armholes of this jacket are deep, making it suitable for an outer layer; after working armholes and shoulder shaping, jacket will be 10[10.5, 11, 12, 13, 13.5] inches longer than length to underam. Take this into account if adjusting length to underarm.

Shape Armholes:
Note: In the next row, sts are placed on hold on circualr needles. Use waste yarn or long stitch holders if you prefer.

Next Row [RS]: Work 46[50, 53, 58, 61, 64] sts in pattern and place these sts on spare circular needle for right front; BO 8[10, 14, 16, 18, 22] sts, work 90[98, 104, 114, 120, 126] sts in pattern (91[99, 105, 115, 121, 127] sts on needle after last set of bound-off sts) and place these sts on smaller circular needle for back; BO 8[10, 14, 16, 18, 22] sts, work in pattern to end. 46[50, 53, 58, 61, 64] sts.

LEFT FRONT
Work 1 row in pattern.
Next Row [RS]: K1, k2tog, work in pattern to end.
Repeat these 2 rows 5[6, 7, 8, 9, 10] times more. 40[43, 45, 49, 51, 53] sts.

Continue in pattern until work measures 19.5[19.5, 21, 22, 22.5, 22.5] inches (5.5[6, 6.5, 7.5, 8.5, 9] inches from underarm), ending with a RS row.

Shape Neckline:
Next Row [WS]: BO 10[10, 10, 12, 14, 14] sts, work in pattern to end. 30[33, 35, 37, 37, 39] sts.

Next Row [RS]: Work in pattern to last 3 sts, ssk, k1.

Work 1 row in pattern.

Repeat these 2 rows 7[8, 9, 9, 9, 9] times more. 22[24, 25, 27, 27, 29] sts.

Work 4[2, 0, 0, 0, 0] rows in pattern.

Shape Shoulder:
Row 1 [RS]: BO 7[8, 8, 9, 9, 9] sts, work in pattern to end. 15[16, 17, 18, 18, 20] sts.

Rows 2 and 4 [WS]: Work all sts in pattern.

Row 3 [RS]: BO 7[8, 8, 9, 9, 10] sts, work in pattern to end. 8[8, 9, 9, 9, 10] sts.

Row 5 [RS]: BO remaining 8[8, 9, 9, 9, 10] sts.

RIGHT FRONT
Work held sts of right front from spare needle onto working needle (larger circular needle) when working first row. Join MC at armhole edge and work as follows, beginning with a WS row.

Work 1 row in pattern.
Next Row [RS]: Work in pattern to last 2 sts, ssk, k1.
Repeat these 2 rows 5[6, 7, 8, 9, 10] times more. 40[43, 45, 49, 51, 53] sts.

Continue in pattern until work measures 19.5[19.5, 21, 22, 22.5, 22.5] inches (5.5[6, 6.5, 7.5, 8.5, 9] inches from underarm), ending with a WS row.

Shape Neckline:
Next Row [RS]: BO 10[10, 10, 12, 14, 14] sts, work in pattern to end. 30[33, 35, 37, 37, 39] sts.

Work 1 row in pattern.
Next Row [RS]: K1, k2tog, work in pattern to end.
Repeat these 2 rows 7[8, 9, 9, 9, 9] times more. 22[24, 25, 27, 27, 29] sts.

Work 4[2, 0, 0, 0, 0] rows in pattern.

Shape Shoulder:
Row 1 [WS]: BO 7[8, 8, 9, 9, 9] sts, work in pattern to end. 15[16, 17, 18, 18, 20] sts.
Rows 2 and 4 [RS]: Work all sts in pattern.
Row 3 [WS]: BO 7[8, 8, 9, 9, 10] sts, work in pattern to end. 8[8, 9, 9, 9, 10] sts.
Row 5 [WS]: BO remaining 8[8, 9, 9, 9, 10] sts.

BACK
Work held sts of back from smaller circular needle onto working needle (larger circular needle) when working first row.

Join MC at left armhole edge and work as follows, beginning with a WS row.

Work 1 row in pattern.

Next Row [RS]: K1, k2tog, work in pattern to last 2 sts, ssk, k1.

Repeat these 2 rows 5[6, 7, 8, 9, 10] times more. 79[85, 89, 97, 101, 105] sts.

Continue in pattern until work measures 23[23, 24.5, 25.5, 26, 26] inches (9[9.5, 10, 11, 12, 12.5] inches from underarm), ending with a WS row.

Shape Shoulders:
Rows 1 and 2: BO 7[8, 8, 9, 9, 9] sts, work in pattern to end. 65[69, 73, 81, 83, 87] sts.

Rows 3 and 4: BO 7[8, 8, 9, 9, 10] sts, work in pattern to end. 51[53, 57, 63, 65, 67] sts
.
Rows 5 and 6: BO 8[8, 9, 9, 9, 10] sts, work in pattern to end.
BO remaining 35[37, 39, 43, 47, 47] sts.

SLEEVES (Make 2):

Hem Facing:
Using smaller needle and MC, CO 51[51, 55, 59, 63, 67] sts using provisional CO method. Work in stockinette st until work measures 1.5 inches, ending with a WS row.
P 1 RS row, forming turning ridge for hem.

Set Pattern for Sleeve:
Using larger needle, p 1 WS row. From this point, sleeve is worked using larger needle.

Set-up Row [RS]: K1, [p1, k1 tbl] 0[0, 1, 2, 3, 0] times, k1, place marker, work Leaf Pattern motif 3[3, 3, 3, 3, 4] times, place marker, [k1 tbl, p1] 0[0, 1, 2, 3, 0] times, k1.

This row sets pattern for sleeve. Continue in pattern, working center panel in Leaf Pattern and sts at sides in 1x1 Twisted Rib as set, until work measures 1.5 inches, ending with a WS row. Turn and join hem as for Lower Body.

Work 5[5, 5, 5, 3, 3] rows in pattern.

Increase Row [RS]: K1, m1, work in pattern to last st, m1, k1.

Repeat these 6[6, 6, 6, 4, 4] rows 4[4, 3, 3, 25, 25] times more, working increased sts in 1x1 Twisted Rib. 61[61, 61, 65, 115, 119] sts.

Sizes S[M, L, XL] Only:
Work 3 rows in pattern. Work Increase Row.
Repeat these 4 rows 14[15, 17, 17, -, -] times more. 91[93, 99, 103, -, -] sts.

All Sizes:
Continue in pattern until work measures 17[17, 18, 18, 19, 19] inches or desired length to underarm, ending with a WS row.

Shape Sleeve Cap:
BO 5[6, 8, 9, 10, 12] sts at beginning of next 2 rows. 81[81, 83, 85, 95, 95] sts.

Decrease Row [RS]: K1, k2tog, work in pattern to last 3 sts, ssk, k1.
Work 1 row in pattern.
Repeat these 2 rows 9[11, 14, 19, 18, 22] times more. 61[57, 53, 45, 57, 49] sts.

Work Decrease Row.
Next Row [WS]: P1, ssp, work in pattern to last 3 sts, p2tog, p1.
Repeat these 2 rows 6[4, 3, 1, 3, 1] times more. 33[37, 37, 37, 41, 41] sts.

BO 3[4, 4, 4, 5, 5] sts at beginning of next 4 rows.
BO remaining 21 sts.

FINISHING

Weave in ends and block pieces.
Sew shoulder seams and sleeve seams. Sew sleeves into armholes.

Neckband:
Using smaller circular needle, with RS facing and beginning at right front edge, pick up and k 1 st in each bound off st and 3 sts for every 4 rows around neckline, ending at left front edge. Work in 1x1 Twisted Rib until neckband measures 2 inches or desired depth. Loosely BO all sts.

Insert Zipper:
Lay sweater flat, with front edges together. Position zipper behind front edges; front edges should just meet over zipper teeth. Pin closed zipper into place, pinning from top of collar to lower edge of jacket.
Machine or hand sew in place, stitching close to zipper teeth.
Open zipper and sew edges of zipper tape to inside front edges.

schematic
ABOUT THE DESIGNER

Jillian Moreno is gets her motor running and heads out on the highway in Ann Arbor, Michigan.

She also edits Knittyspin.