Knitty�: little purls of wisdom
spacer
sponsor
Potter Craft

Find exactly what you're looking for

spacer

The answer to your question about Knitty is probably here!

spacer

Take home something Knitty today

spacer

Advertise with Knitty

spacer

Get your cool stuff reviewed in Knitty

spacer

Full information about how to get published in Knitty

spacer

Read exactly what FREE PATTERNS really means...respect our designers and authors rights [and thank you]

spacer

Read exactly what FREE PATTERNS really means...respect our designers and authors rights [and thank you]

sidebarwhiterule

Knitty is produced in a pro-rabbit environment

spacer

© Knitty 2002-2008. All rights reserved. Unauthorized reproduction prohibited. This means you.spacer
 

Blank
Patterns<click for more! Print With Images Print Without Images
upperLeft upperRight
lowerLeft lowerRight
Pink Needles
ul
ml
Knitpicks
ur
b
Title
asdf
spacer model: Iona spacer photos: Meg Bakewell, Katherine Tombeau Cost, David Bay

Tangy

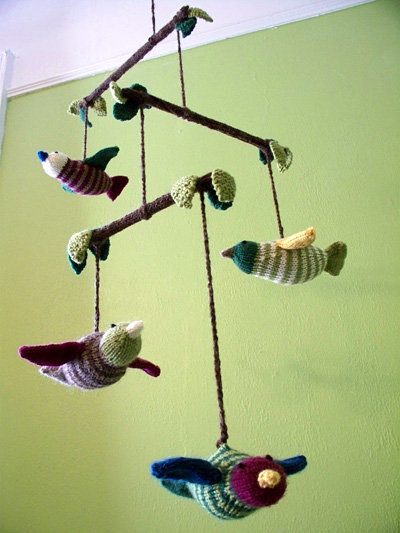
For each of my three children, my sister’s gift to the newborn was a mobile to hang over the crib. Her first baby was born in December and it’s my turn to be auntie and to provide the mobile. Since it’s baby who spends most time looking at the mobile, my first design consideration was that it should be interesting to look at from a baby’s-eye view, below.

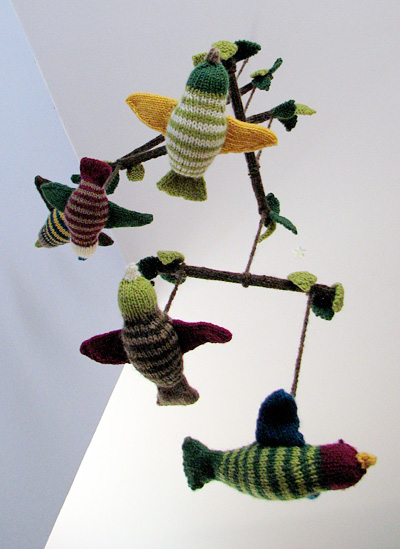
One of my favorite spring-time activities is watching the birds as they go about the busy business of courting and nest building up in the branches of the trees in my backyard. So inspired, I composed the mobile of branches and birds for my new niece to look up at. I disguised the structural parts of the mobile as tree branches using I-cord twigs and garter-stitch leaves. From the branches, colorful birds hang by crochet chains. No two birds are alike, but they are all worked in different combinations of the same eight colors. By substituting a different palette, this mobile could fit in well with any nursery décor. I imagine a version with white birch branches, and baby pastels for the leaves and birds would look beautiful, too.

You can use any combination of colors you like for your birds. This is an ideal knit-from-stash project because it uses small amounts of many different colors, and as long as they are of similar weights, they don’t need to be the same yarn. For the branch and leaf colors, 100 yards is more than enough, and for the other colors, 50 yards each is plenty. If you wanted to buy yarn for the project, you could substitute Wool of the Andes in Chocolate, Daffodil, Hollyberry and Winter Night for the Lamb's Pride, the Cascade 220, the Swish Superwash and the now discontinued Blueberry colorway, and the total project cost would be under $20, even with the dowel rod.
SIZE

One

 
FINISHED MEASUREMENTS

Height: approx. 42 inches

 
MATERIALS
spacer [MC] Brown Sheep Lamb’s Pride Worsted [85% wool, 15% mohair; 190yd/174m per 4oz skein]; color: #M07 Sable; 1 skein

Knit Picks Wool of the Andes [100% Peruvian Highland Wool; 110yd/101m per 50g skein]; 1 skein each color
spacer [CC1] #23439 Grass
spacer [CC2] #23766 Avocado
spacer [CC3] #23432 Cloud
spacer [CC4] #23428 Blueberry
spacer [CC5] #24075 Camel Heather

spacer [CC6] Knit Picks Swish Superwash [100% Superwash Merino Wool; 110yd/101m per 50g skein]; color: #23877 Bordeaux; 1 skein

spacer [CC7] Cascade Yarns Cascade 220 [100% Wool; 220yd/201m per 100g skein]; color: #9476 Maize; 1 skein

Recommended needle size:
spacer 1 set US #5/3.75 mm double-point needles
spacer 1 set US #4/3.5 mm straight needles (or one size smaller than size used to achieve gauge)
[always use a needle size that gives you the gauge listed below -- every knitter's gauge is unique]

spacer Approx. 3yd/2.7m black yarn or embroidery floss (used for eyes)
spacer Crochet hook, approx. size US #I/9 / 5.5mm
spacer Waste yarn
spacer Yarn needle
spacer 48 inches wooden dowel, 0.25 inch diameter (to be cut into shorter lengths)
spacer Fiberfill stuffing

 
GAUGE

24 sts/32 rows = 4 inches in stockinette stitch using larger (double-point) needles
Note: Gauge is not critical for this project, but it is important to work more tightly than receommended ball band gauge for yarns used. This will produce a firm fabric, which will help pieces maintain their shape and prevent stuffing from leaking out.

 
PATTERN NOTES
[Knitty's list of standard abbreviations and techniques can be found here.]

color chart
In the mobile shown, each bird uses five different colors: one color each for the body (including tail), body stripe, head, beak and wings.

The chart at right lists the colours used for each of these parts of each bird. The pattern will refer to 'body color', 'stripe color', etc.


Crochet Cast On
Using waste yarn, work a crochet chain several sts longer than the number of sts to be cast on. Starting 1 or 2 sts in from end of chain and using working yarn, pick up and k 1 st in the back loop of each ch until the required number of sts have been picked up. Later, the chain will be unraveled and the resulting live sts picked up.

Jogless Stripes:
This technique may be used to avoid the jog that happens at the beginning of a round, when stripes are worked in the round.
Step 1: Work first round of new color.
Step 2: Before working first st of second round of new color, lift stitch below first st of first round onto left needle. (The st you lift onto left needle will be in previous stripe color.)
Step 3: Knit first st of second round together with st that has been lifted onto left needle, then continue knitting as usual.

Instructions for working a French Knot can be found here.

Instructions for grafting can be found here.

sk2p: Sl 1, k2tog, pass slipped st over. 2 sts decreased.


flock
DIRECTIONS
heartALTblank

BIRD (Make 5)
With body color, using Crochet Cast On or other provisional cast on method and leaving a tail approx. 18 inches long, CO 24 sts onto double-point needles.
Divide sts between needles and join to begin working in the round, being careful not to twist.

Tail:
Rounds 1-4: K all sts.
Round 5: [K1, ssk, k6, k2tog, k1] twice. 20 sts.
Rounds 6-7: K all sts.
Round 8: [K1, ssk, k4, k2tog, k1] twice. 16 sts.
Rounds 9-15: K all sts.

Body:
K first 4 sts of next round. This point (center of bird's back) will now be beginning of round; redistribute sts as needed. Join stripe color, leaving a tail approx. 18 inches long.

Body is worked in 2-round stripes, using body color and stripe color. To avoid jog at beginning of each stripe, use 'Jogless Stripe' technique (see Pattern Notes). Carry yarn not in use up inside of work. When beginning a new stripe, be sure to bring the new color up from under the old color; this will twist the strands, preventing holes from forming at color-change points.

Color used for each round is indicated in brackets next to round number. See color chart in Pattern Notes.

Rounds 1-2 [Stripe]: K all sts.
Round 3 [Body]: K all sts.
Round 4 [Body]: [K2, m1, k4, m1, k2] twice. 20 sts.
Rounds 5-6 [Stripe]: K all sts.
Round 7 [Body]: K all sts.
Round 8 [Body]: [K3, m1, k4, m1, k3] twice. 24 sts.
Rounds 9-10 [Stripe]: K all sts.
Round 11 [Body]: K all sts.
Round 12 [Body]: [K4, m1, k4, m1, k4] twice. 28 sts.
Rounds 13-14 [Stripe]: K all sts.
Round 15 [Body]: K all sts.
Round 16 [Body]: [K5, m1, k4, m1, k5] twice. 32 sts
Rounds 17-18 [Stripe]: K all sts.
Rounds 19-20 [Body]: K all sts.
Rounds 21-22 [Stripe]: K all sts.
Round 23 [Body]: K all sts.
Round 24 [Body]: [K5, k2tog, k2, ssk, k5] twice. 28 sts.
Round 25 [Stripe]: K all sts.
Round 26 [Stripe]: [K4, k2tog, k2, ssk, k4] twice. 24 sts.
Round 27 [Body]: K all sts.
Round 28 [Body]: [K3, k2tog, k2, ssk, k3] twice. 20 sts.
Round 29 [Stripe]: K all sts.
Round 30 [Stripe]: [K2, k2tog, k2, ssk, k2] twice. 16 sts.
Rounds 31-32 [Body]: K all sts.
heartALTblank

Head:
Round 1: Using head color, k all sts.

Break body color. Knot body color tail together with head color tail, forming knot very close to inner surface of work. Cut knotted ends, leaving tails approx. 1 inch long; tuck these tails inside body. Break stripe color and secure end inside work.

Continue in head color as follows.

Round 2: [K2, m1, k4, m1, k2] twice. 20 sts.
Rounds 3-8: K all sts.

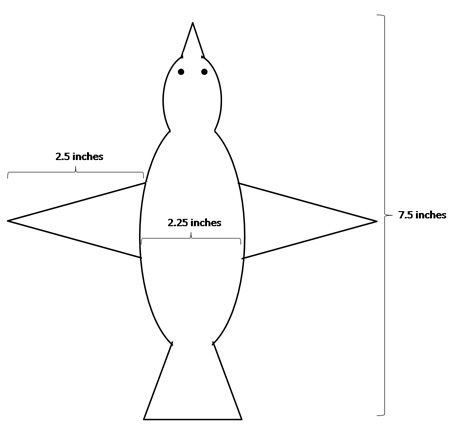
This is a good time to embroider the eyes onto the head of the bird, as you have access to both sides of the fabric. Working approx. 2 rows back from row currently on needles, use black yarn or embroidery floss to work French knots (see schematic below for placement). See Pattern Notes for link to directions for French knots. If you haven't worked a French knot before, you may wish to practice on a swatch before you begin.

Round 9: [K2, k2tog, k1] four times. 16 sts.
Round 10: [K1, k2tog, k1] four times. 12 sts.
Round 11: [K2tog, k1] four times. 8 sts.
bird schematicBeak:
Round 1: Using beak color, k all sts.

Break head color. Knot head color tail together with beak color tail, forming knot very close to inner surface of work. Cut knotted ends, leaving a tail approx. 1 inch long; tuck these inside head. Continue in beak color as follows.

Rounds 2-3: K all sts.
Round 4: [K2tog] four times. 4 sts.
Round 5: K all sts.
Break yarn and draw through all sts, pull tight.

Shape beak to a nice point and draw yarn end to inside of head. Turning bird inside out, tighten knots, trim and secure ends as needed, leaving long tails at beginning of stripe color and body color.

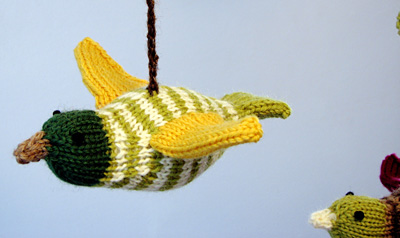
Turn bird right side out. Stuff head and body, but not tail. Use long tail of stripe color to sew body closed at point where body joins tail; sew top of body to bottom of body in a straight line, so that tail is flattened out at base (see photos). Sew in remaining end of stripe color.

Carefully remove waste yarn from CO end, placing resulting live sts on needles; place first 12 sts one one needle, and last 12 sts on another needle. When needles are held together, tail should lay flat. Graft sts on first needle to sts on second needle. Sew in remaining end.

Wings:
Using wing color and double-point needles, CO 19 sts, leaving a tail approx. 18 inches long. Divide sts between needles and join to begin working in the round, being careful not to twist.

Rounds 1-5: K all sts.
Round 6: K7, k2tog, k1, ssk, k7. 17 sts.
Rounds 7-10: K all sts.
Round 11: K6, k2tog, k1, ssk, k6. 15 sts.
Rounds 12-14: K all sts.
Round 15: K5, k2tog, k1, ssk, k5. 13 sts.
Round 16: K all sts.
Round 17: K4, k2tog, k1, ssk, k4. 11 sts.
Round 18: K all sts.
Round 19: K3, k2tog, k1, ssk, k3. 9 sts.
Round 20: K2, k2tog, k1, ssk, k2. 7 sts.
Round 21: K1, k2tog, k1, ssk, k1. 5 sts.

Break yarn and draw through all sts, pull tight.

Shape wing to a nice point and draw yarn end to inside of piece. Weave in end, but leave long tail at beginning of wing.
Knit another wing in the same way.

Flatten wings, folding so that decrease line forms fold at one side of wing. This decrease-line fold will form back edge of wing. Use yarn tails to sew wings to sides of body (see photos), ensuring that decrease-line folds are correctly positioned toward back of bird.
heartALTblank

BRANCHES
Using MC and double-point needle, CO 6 sts. Work I-Cord until piece measures 15.5 inches. Break yarn, draw through all sts and pull tight. This piece will be Branch 1.
Work three more l-Cord branches in the same way, of the following lengths:
Branch 2: 12.5 inches
Branch 3: 10.5 inches
Branch 4: 8 inches

LEAVES
Make 12 leaves using CC1, and 12 using CC2. Leaves are worked back and forth in garter st. Although [RS] and [WS] rows are indicated in directions, leaves are reversible.

Using smaller (straight) needles, CO 1 st.
Row 1 [RS]: Kfb. 2 sts.
Row 2 [WS]: Kfb, k1. 3 sts.
Row 3 [RS]: Kfb, kfb, k1. 5 sts.
Row 4 [WS]: K all sts.
Row 5 [RS]: K1, kfb, kfb, k2. 7 sts.
Rows 6-13: K all sts.
Row 14 [WS]: K1, ssk, k1, k2tog, k1. 5 sts.
Rows 15-17: K all sts.
Row 18 [WS]: Ssk, k1, k2tog. 3 sts.
Row 19 [RS]: K all sts.
Row 20 [WS]: Sk2p.
Break yarn and draw through remaining st. Weave in tail at end of leaf, but leave tail at beginning (CO end).

FINISHING

Cut four pieces of dowel, with the following lengths: 15 inches, 12 inches, 10 inches and 7.5 inches. These correspond to Branches 1, 2, 3 and 4.
Lightly sand cut ends of dowel. Insert lengths of dowel into I-cord branches, sewing end of each branch closed using yarn tail at CO end.

Use attached yarn tails to sew three leaves to each end of each branch. Weave in and trim all ends.

Using MC, work crochet chains of the following lengths, leaving tails at least 4 inches long at the beginning and end of each chain. Measure lengths of chains when stretched; chains will stretch when piece is hung, so measuring length when stretched will give a better indication of final results.
Four chains 8.5 inches long (short chains)
Four chains 10 inches long (mid-length chains)
One chain 11.5 inches long (long chain)

Note about ceiling heights: This mobile measures 42 inches in height when fully assembled, which works well for high ceilings (10 feet or higher). If you prefer a shorter mobile, reduce the length of the chains. Reducing each chain by 1 inch will make a mobile 37 inches in height, and reducing each by 2 inches will make a mobile 32 inches in height.

Wrap the end of one of the mid-length chains around your index finger to create a loop at the end. Use the tail of yarn to sew the loop securely. Weave in and trim the end. Repeat for the other end of the chain. This chain, with a loop at each end, should measure approx. 8.5 inches when stretched. Form loops at each end of remaining three mid-length chains in the same way.

Form a loop at one end of each short chain. Sew free end of each short chain to the back of a bird, sewing through several stitches to avoid stretching fabric out of shape. Weave in ends; be sure to try hanging bird from chain before sewing in ends, to ensure that the bird will hang in a pleasing way.

Form a loop at one end of long chain, and sew remaining end to back of remaining bird.

To attach the top of a chain to a branch, fold the loop at the top of the chain over, then pull some of the chain through the loop, forming an adjustable loop. (If you've ever used a yo-yo, this will be familiar to you.) Slide the adjustable loop over the end of a branch, past the leaves, then pull to tighten.

In this way, assemble mobile as shown in diagram, using mid-length chains to connect branches. After each step, dangle the assembled piece to see if it is balanced; adjust positions of pieces as needed.
- Beginning at the bottom, hang two birds on the shortest branch (branch 4).
- Hang branch 4 from the end of branch 3, then hang another bird from the other end of branch 3.
- Hang branch 3 from the end of branch 2, then hang another bird from the other end of branch 2.
- Fasten a chain around the center of branch 1. Hang branch 2 from the end of branch 1, then hang another bird from the other end of branch 1.

Dangle mobile to see if it is balanced; adjust positions of pieces as needed. Once all pieces are placed and mobile is balanced, tighten loops. These may be sewn in place if desired, but for mobile shown, pulling the loops tightly was sufficient to keep everything in place.

schematic

 
ABOUT THE DESIGNER

designernameBlank Meg likes to knit toys (and other stuff, too). She has two daughters, one son, five nieces and a husband who is a kid at heart, so there's always someone ready to adopt the toys she knits. She's also a grad student in evolutionary biology and once had her research featured on The Colbert Report. That was cool, but she thinks having a pattern published in Knitty is even better!

Her Ravelry name is meggles and she blogs here.

spacer
spacer