Knitty: little purls of wisdom
Loop
Title
beauty shot

Tangy

My daughter and I enjoy searching vintage stores for 1940s and 50s fashion. We love the flirty, feminine silhouettes and delicate prints. While designing Que Sera I was inspired by these outings. 

Que Sera is a long sleeved, lacy cardigan with a vintage feel. It falls at mid hip and has a slightly scooped neckline. The body of this cardigan and the front bands are worked in one piece up to the armholes, it is then divided and the fronts and back are worked separately.  The sleeves are worked separately and set in.

This versatile cardigan may be worn with zero ease as in the pattern photos for a fitted look, or looser with more ease for a casual look. It works equally well paired with well-loved jeans or a flirty spring skirt. In the modeled version glittery rhinestone buttons are added to lend to its vintage appeal.

spacer model: Sofie spacer photos: Kirsten Kapur

SIZE
XS[S, M, L, 1X, 2X, 3X] (shown in size XS)

spacer

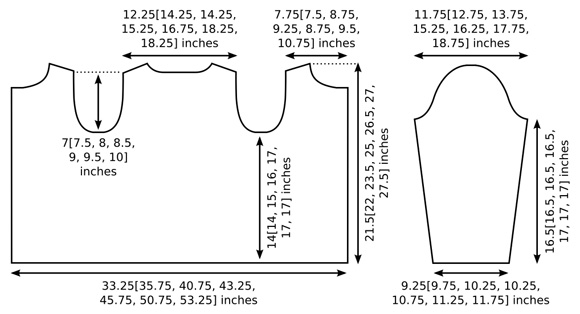
FINISHED MEASUREMENTS
Chest: 31.75[34.25, 39.25, 41.75, 44.25, 49.25, 51.75] inches
Length: 21.5[22, 23.5, 25, 26.5, 27, 27.5] inches
Note: Chest measurement given for sweater with front edges overlapped 1.5 inches. Measurement shown in schematic includes front bands.

spacer

MATERIALS
Yarn

spacer Blue Sky Alpacas Dyed Cotton [100% organically grown cotton; 150 yd/137 m per 100g skein]; color: #618 Orchid; 5[6, 7, 8, 8, 9, 10] skeins


Recommended needle size
[always use a needle size that gives you the gauge listed below -- every knitter's gauge is unique]
spacer 1 US #8/5mm circular needle, 32 inches or longer (larger sizes may prefer a longer needle)
spacer 1 US #6/4mm circular needle, 16 inches or longer (used for neckband only)
Note: If desired, sleeves may be knit on straight needles. Body will require a circular needle due to large number of sts.

Notions
spacer Stitch markers
spacer Waste yarn or stitch holders
spacer Yarn needle
spacer 5[5, 7, 7, 7, 7, 7] buttons, 3/8 inch diameter (buy buttons after sweater is complete to ensure correct size)

spacer

GAUGE

spacer16 sts/24 rows = 4" in Lace Pattern using larger needles

PATTERN NOTES
[Knitty's list of standard abbreviations and techniques can be found here.]

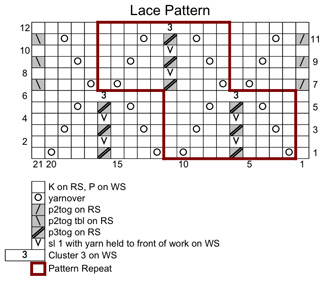
Shaping Note: Within the lace pattern, each yarnover increase is paired with a decrease. When increasing or decreasing at edge of work (shaping at neckline, armholes, etc), be sure to work a yarnover with its paired decrease (either p2tog, p2tog tbl, or p3tog). If there are not enough sts to work both the yarnover and its paired decrease, work those sts in stockinette st instead. A p3tog decrease compensates for both the yarnover that comes before it and the yarnover that comes after it; if only one of these yarnovers is worked, work p2tog instead.

Cluster 3 (worked on WS rows only): Sl 3 sts with yarn held to front of work, bring yarn between needles to back of work, sl same 3 sts back to left needle, bring yarn between needles to front of work, p same 3 sts.

Double Moss Stitch (Worked over an odd number of sts):
Row 1 [RS]: K1, [p1, k1] to end.
Row 2 [WS]: P1, [k1, p1] to end.
Row 3 [RS]: K2, [p1, k1], to last st, k1.
Row 4 [WS]: P2, [k1, p1], to last st, p1.

DIRECTIONS
LOWER BODY

Lower Band:
Using larger needle, CO 133[143, 163, 173, 183, 203, 213] sts. Do not join; piece is worked back and forth in rows.

Work 4 rows in Double Moss Stitch.

First Buttonhole Row [RS]: K1, p1, k1, yo, k2tog, [p1, k1] to end.

Next Row [WS]: Work 6 sts in pattern, place marker, work in pattern to last 6 sts (outlined pattern repeat will be worked 11[12, 14, 15, 16, 18, 19] times), place marker, work last 6 sts in pattern.

Begin Lace Pattern:
From this point, lower body is worked in Lace Pattern, with first and last sts worked in Double Moss Stitch as set to form front bands.

Note: If you wish to use additional markers to mark 10-st repeats of Lace Pattern, place them to correspond with vertical red lines in chart. To avoid markers shifting as increases and decreases are worked within pattern, markers will need to be moved on Rows 1 and 7 of chart.

Work Rows 1-12 of Lace Pattern once, then work Rows 1-10[10, 4, 4, 10, 10, 10] once more.

Buttonhole Row [RS]: K1, p1, k1, yo, k2tog, p1; work Row 11[11, 5, 5, 11, 11, 11] of Lace Pattern to last marker A, [p1, k1] to end.

From this point until neckline shaping begins, work Buttonhole Row every 24[24, 18, 18, 24, 24, 24] rows. For sizes XS, S, 1X, 2X, and 3X, this will always be Row 11 of Lace Pattern, and will be worked every other 12-row repeat of pattern. For Sizes M and L, this will always be either Row 11 or Row 5 of Lace Pattern. A total of 5[5, 7, 7, 7, 7, 7] buttonholes will be worked. A buttonhole on Row 11 of the lace pattern is worked as above; when working a buttonhole on Row 5 of Lace pattern, work the first 6 sts of the row as follows:  k2, p1, yo, p2tog, k1.

Continue in pattern as set until work measures 14[14, 15, 16, 17, 17, 17] inches, ending with Row 6 or Row 12 of Lace Pattern.
Note: If changing length of cardigan, note that directions for length, neckline, etc. have been calcuated to ensure that buttonholes are correctly placed. Changing garment length will affect buttonhole placement.

Next Row [RS]: Work 34[34, 38, 43, 43, 47, 52] sts in pattern, then place all sts just worked on st holder or waste yarn for right front; BO 5[5, 7, 7, 7, 9, 9] sts, work in pattern until there are 55[65, 73, 73, 83, 91, 91] sts on right needle, then place all sts just worked on st holder or waste yarn for back; BO 5[5, 7, 7, 7, 9, 9] sts, work in pattern to end. Upper left front will be worked over remaining 34[34, 38, 43, 43, 47, 52] sts.

UPPER LEFT FRONT

Shape Armhole:
Work 1 WS row in pattern.

Next Row [RS]: K1, ssk, work in pattern to end.

Repeat these 2 rows 2[3, 3, 5, 7, 8, 8] times more. 31[30, 34, 37, 35, 38, 43] sts.

Continue in pattern until work measures 17[17, 19, 19, 21, 21, 21] inches (3[3, 4, 3, 4, 4, 4] inches from beginning of armhole), ending with a RS row.

Shape Neckline:
Row 1 [WS]: BO 14[14, 15, 15, 15, 16, 18] sts, work in pattern to end. 17[16, 19, 22, 20, 22, 25] sts.

Row 2 [RS]: Work in pattern to last 3 sts, k2tog, k1.

Row 3 [WS]: P1, p2tog, work in pattern to end.
Work Rows 2-3 twice more. 11[10, 13, 16, 14, 16, 19] sts.

Continue in pattern until work measures 21[21.5, 23, 24.5, 26, 26.5, 27] inches (7[7.5, 8, 8.5, 9, 9.5, 10] inches from beginning of armhole), ending with a WS row.

Shape Shoulder:
Row 1 [RS]: BO 4[4, 5, 6, 4, 6, 7] sts, work in pattern to end. 7[6, 8, 10, 10, 10, 12] sts.

Rows 2, 4 [WS]: Work in pattern.

Row 3 [RS]: BO 4[3, 4, 6, 5, 5, 6] sts, work in pattern to end. 3[3, 4, 4, 5, 5, 6] sts.

Row 5 [RS]: BO remaining sts.

UPPER RIGHT FRONT

Important: Don't forget to continue working buttonholes as set, until neckline shaping begins.

Place 34[34, 38, 43, 43, 47, 52] held sts of right front on needle with WS facing, and join yarn at armhole edge.

Work 1 WS row in pattern.

Next Row [RS]: Work in pattern to last 3 sts, k2tog, k1.

Repeat these 2 rows 2[3, 3, 5, 7, 8, 8] times more. 31[30, 34, 37, 35, 38, 43] sts.

Continue in pattern until work measures 17[17, 19, 19, 21, 21, 21] inches (3[3, 4, 3, 4, 4, 4] inches from beginning of armhole), ending with a WS row.

Shape Neckline:
Row 1 [RS]: BO 14[14, 15, 15, 15, 16, 18] sts, work in pattern to end. 17[16, 19, 22, 20, 22, 25] sts.
Row 2 [WS]: Work in pattern to last 3 sts, p2tog tbl, p1.
Row 3 [RS]: K1, ssk, work in pattern to end.
Work Rows 2-3 twice more. 11[10, 13, 16, 14, 16, 19] sts.

Continue in pattern until work measures 21[21.5, 23, 24.5, 26, 26.5, 27] inches (7[7.5, 8, 8.5, 9, 9.5, 10] inches from beginning of armhole), ending with a RS row.

Shape Shoulder:
Row 1 [WS]: BO 4[4, 5, 6, 4, 6, 7] sts, work in pattern to end. 7[6, 8, 10, 10, 10, 12] sts.

Rows 2, 4 [RS]: Work in pattern.

Row 3 [WS]: BO 4[3, 4, 6, 5, 5, 6] sts, work in pattern to end. 3[3, 4, 4, 5, 5, 6] sts.

Row 5 [WS]: BO remaining sts.

UPPER BACK
Place 55[65, 73, 73, 83, 91, 91] held sts of back on needle with WS facing, and join yarn at left armhole edge.

Work 1 WS row in pattern.

Next Row [RS]: K1, ssk, work in pattern to last 3 sts, k2tog, k1.
Repeat these 2 rows 2[3, 3, 5, 7, 8, 8] times more. 49[57, 65, 61, 67, 73, 73] sts.

Continue in pattern until work measures 21[21.5, 23, 24.5, 26, 26.5, 27] inches (7[7.5, 8, 8.5, 9, 9.5, 10] inches from beginning of armhole), ending with a WS row.

Shape Left Shoulder and Neckline:
Row 1 [RS]: Work 13[12, 15, 18, 16, 18, 21] sts in pattern, then place these sts on st holder or waste yarn for right shoulder; BO 23[33, 35, 25, 35, 37, 31] sts, work in pattern to end. 13[12, 15, 18, 16, 18, 21] sts.

Row 2 [WS]: Work in pattern.

Row 3 [RS]: K1, ssk, work in pattern to end. 12[11, 14, 17, 15, 17, 20] sts.

Row 4 [WS]: BO 4[4, 5, 6, 4, 6, 7] sts, work in pattern to end. 8[7, 9, 11, 11, 11, 13] sts.

Row 5 [RS]: K1, ssk, work in pattern to end. 7[6, 8, 10, 10, 10, 12] sts.

Row 6 [WS]: BO 4[3, 4, 6, 5, 5, 6] sts, work in pattern to end. 3[3, 4, 4, 5, 5, 6] sts.

Row 7 [RS]: Work in pattern.

Row 8 [WS]: BO remaining sts.

Shape Right Shoulder and Neckline:
Place 13[12, 15, 18, 16, 18, 21] held sts of right shoulder on needle with WS facing and join yarn at neckline edge.

Row 1 [WS]: Work in pattern.

Row 2 [RS]: Work in pattern to last 3 sts, k2tog, k1. 12[11, 14, 17, 15, 17, 20] sts.

Rows 3, 5, 7 [WS]: Work in pattern.

Row 4 [RS]: BO 4[4, 5, 6, 4, 6, 7] sts, work in pattern to last 3 sts, k2tog, k1. 7[6, 8, 10, 10, 10, 12] sts.

Row 6 [RS]: BO 4[3, 4, 6, 5, 5, 6] sts, work in pattern to end. 3[3, 4, 4, 5, 5, 6] sts.

Row 8 [RS]: BO remaining sts.

SLEEVES (Make 2)
Using larger needle, CO 37[39, 41, 41, 43, 45, 47] sts.

Work 6 rows in Double Moss Stitch.

Set-up Row [RS]: K3[4, 5, 5, 1, 2, 3], place marker, work Lace Pattern to last 3[4, 5, 5, 1, 2, 3] sts (outlined pattern repeat will be worked 2[2, 2, 2, 3, 3, 3] times), place marker, k to end.

As sleeve is worked and sts are increased, move markers and work additional repeats of lace pattern once there are enough sts to do so. Work sts before first marker and after last marker in stockinette st. Always maintain 1 st at each edge in stockinette st.

Increase Row [RS]: K1, m1, work in pattern to last st, m1, k1.

Work 13[11, 11, 7, 7, 5, 5] rows in pattern.

Repeat these 14[12, 12, 8, 8, 6, 6] rows 4[5, 6, 9, 10, 12, 13] times more. 47[51, 55, 61, 65, 71, 75] sts.

Continue in pattern until sleeve measures 16.5[16.5, 16.5, 16.5, 17, 17, 17] inches or desired length to underarm, ending with a WS row.

Shape Sleeve Cap:
BO 4[4, 5, 5, 5, 6, 6] sts at beginning of next 2 rows. 39[43, 45, 51, 55, 59, 63] sts.

Next Row [RS]: K1, ssk, work in pattern to last 3 sts, k2tog, k1.

Work 1 row in pattern.

Repeat these 2 rows 4[6, 7, 9, 11, 12, 13] times more. 29[29, 29, 31, 31, 33, 35] sts.

Work 12[12, 12, 12, 10, 10, 10] rows in pattern without further shaping.

Next Row [RS]: K1, ssk, work in pattern to last 3 sts, k2tog, k1.

Next Row [WS]: P1, p2tog, work in pattern to last 3 sts, p2tog tbl, p1.

Repeat these 2 rows 3 times more. 13[13, 13, 15, 15, 17, 19] sts.

BO 2 sts at beginning of next 2 rows.

BO remaining 9[9, 9, 11, 11, 13, 15] sts.

spacer

FINISHING
Weave in ends and block to measurements shown in schematic. Note that after seaming, sleeves and shoulders will be 0.5 inch narrower than measurements shown.

Neckband:
Sew shoulder seams.

Using smaller needle, with RS facing and beginning at right front neckline edge, pick up and k 89[101, 103, 105, 109, 117, 121] sts around neckline, ending at left front neckline edge.

Note: Don't worry if you are a few sts off. It is more important to pick up sts evenly than to have the exact number given. Be sure you have an odd number of sts; if necessary, increase or decrease 1 st when working the first row to obtain an odd number of sts.

Row 1 [WS]: [P1, k1] to last st, p1.

Row 2 [RS]: K1, [p1, k1] to end.

Row 3 [WS]: P2, [k1, p1] to last st, p1.

BO all sts in pattern (as per Row 3 of Double Moss Stitch).

Sew sleeve seams.

Baste sleeve caps into armholes, easing to fit.

Sew sleeve caps into armholes.

Use safety pins to mark positions of buttons on left front edge, opposite buttonholes.

Sew buttons in place.

ABOUT THE DESIGNER

When Kirsten isn’t schlepping her kids and assorted gear to various music venues she can be found knitting and designing in her little house on a hill in New Jersey.

She blogs here.

spacer