Knitty: little purls of wisdom
Natural Obsessions
Title

Tangy

The ancient story of Daedalus and his son Icarus appeals to me. Daedalus was a handy guy to have in your kingdom. Have a minotaur to imprison? Daedalus is your man. In fact, when King Minos of Crete had just such a problem, Daedalus built a spiffy labyrinth to contain it. Unfortunately Daedalus blabbed “The Secrets of the Labyrinth” to the king’s enemy. That enemy used the leaked info to kill the beastie and elope with Minos’ daughter. In the aftermath, a royally ticked-off king banished Daedalus and Icarus to the now minotaur-free labyrinth.

Daedalus—having built the labyrinth in the first place—was able to quickly escape. Once free father and son wisely decided not to hang about Crete. Daedalus built wings out of feathers and wax so that they could escape by air. As the pair prepared for take-off, Daedalus cautioned Icarus not to fly too near the sun as it would cause the wings to melt. Predictably, Icarus got his first taste of flying and promptly forgot daddy’s warning. His wings melted and he fell to his death.

When most people hear this story, they focus upon the colossal mistake of the idiot boy. I, however, prefer to focus upon the ingenuity of the brilliant creator. It took inspiration and courage to take simple components (perhaps as simple as sticks and string?) and leap for the sky. Wearing the Daedalus wrap one can almost grasp the moment of hope in potential flight captured in this wings-turned-garment creation. Daedalus—a simple rectangle with kimono sleeves—creates a surprisingly comfortable and visually pleasing wrap that is evocative of wings. Daedalus is a breeze to knit and features mock cable edging and a minimalist eyelet design. It is pictured here in a handspun created by talented fiber artist Helen Van Doren and a hand-dyed, mill-spun yarn purchased directly from an alpaca farm.

spacer model: Jodie Gordon Lucas, Stephanie Hayes spacer photos: Nancy Baur

SIZE
XS [S, M, L, 1X, 2X, 3X]
Shown in sizes S and 2X

spacer
FINISHED MEASUREMENTS
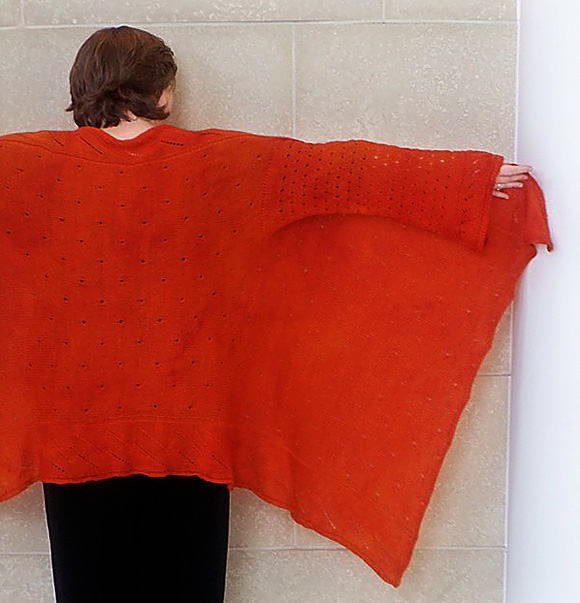
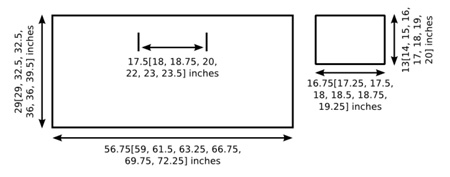
Measurement of the body rectangle after blocking:
Width (neck to hem): 29[29, 32.5, 32.5, 36, 36, 39.5] inches
Length (side to side): 56.75[59, 61.5, 63.25, 66.75, 69.75, 72.25] inches
Across back, between armholes: 17.5[18, 18.75, 20, 22, 23, 23.5] inches

Measurement of the sleeve rectangle after blocking
Width (circumference): 13[14, 15, 16, 17, 18, 19, 20] inches
Length: 16.75[17.25, 17.5, 18, 18.5, 18.75, 19.25] inches

How to select a size:
The back of the cardigan allows for 5.5[5, 4.75, 5, 6, 6, 5.5] inches of ease. Pick the size with the back measurement that best corresponds to 5 inches more than the measurement between your arms across your back.

To check sizing:
Cut two pieces of yarn, one the length and one the width of the body for the size you have selected.  Place a safety pin at the midpoint and at each end of the long yarn. Drape the yarn around your neck and over the fullest part of your bust with the center pin aligned at the center of your neck. If you are satisfied with where the ends of this yarn hang (do not include the safety pin in this assessment), then proceed to the next step. If you’d like the center front of the cardigan longer or shorter then repeat the process with the next size larger or smaller.

With the longer yarn still around your neck, have a friend hold the short yarn so that it creates a 135 degree angle with the long yarn.  Hold the short yarn straight so that it extends beyond your leg without curving around it.  The point where the yarn ends is an estimate of the longest possible point Icarus could reach.

Finally, hold the short yarn at the center point of the long yarn at the back of your neck and let it hang down. This is where the center back of the cardigan will end. If you are satisfied with these points then continue with this size. If you’d like a shorter or longer cardigan repeat the process with the next size larger or smaller.

spacer

MATERIALS
Fiber:
spacer 100% Dorset wool roving; color: natural; 11.5[12, 13.75, 14.5, 16.5, 17.5, 19.5] oz, Shown in size S, brown version.

spacer Spittin’ Creek Fingering [33% suri alpaca, 33% huacaya alpaca, 33% llama; 420 yds / 384 m per 100g skein]; Natural White (hand dyed with Jacquard Acid Dye, color#604; Burnt Orange); 5[5, 6, 6, 7, 7, 8] skeins. Shown in size 2x, orange version.

Finished Yarn:
spacer Wraps per inch: 20 wpi
spacer Ply: 2-ply
spacer Yardage used: Approximately 1900[2025, 2350, 2450, 2800, 3000, 3300] yards required.

Drafting Method:
spacer Long draw

Commercial Yarn Alternative

spacer Berroco Ultra Alpaca Fine [50% wool, 30% nylon, 20% alpaca; 433 yds/396 m per 100 g skein]; Turquoise Mix, 1294; 5[6, 6, 7, 7, 8, 8].

Recommended needle size
[always use a needle size that gives you the gauge listed below -- every knitter's gauge is unique]
spacer 1 32 inch or longer US #3/3.25 mm circular needle
spacer 1 24 inch or longer US #4/3.5 mm circular needle
spacer 1 US #F/5 /3.75mm crochet hook

gearbox

Spinning Tool: Ashford traditional wheel using scotch tension.
Niddy Noddy: 43 inch handmade niddy-noddy
Lazy Kate: Ashford Lazy Kate

Tools
spacer Safety pins
spacer Colorfast scrap yarn
spacer Stitch markers
spacer Tapestry needle
spacer Blocking supplies of your choice (I used wires, pins and mats)

GAUGE

20 sts/32 rows = 4 inches in stockinette stitch after light blocking.


PATTERN NOTES
[Knitty's list of standard abbreviations and techniques can be found here.]

spacer
The entire body of the cardigan is worked in one piece. The pattern indicates Right Edge, Right Side, Back, Left Side and Left Edge—with each section continuing into the next without binding off.

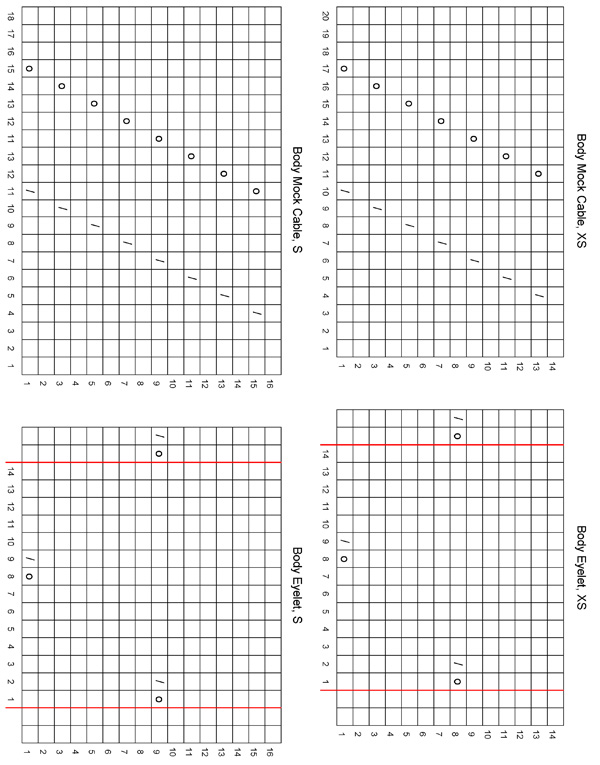
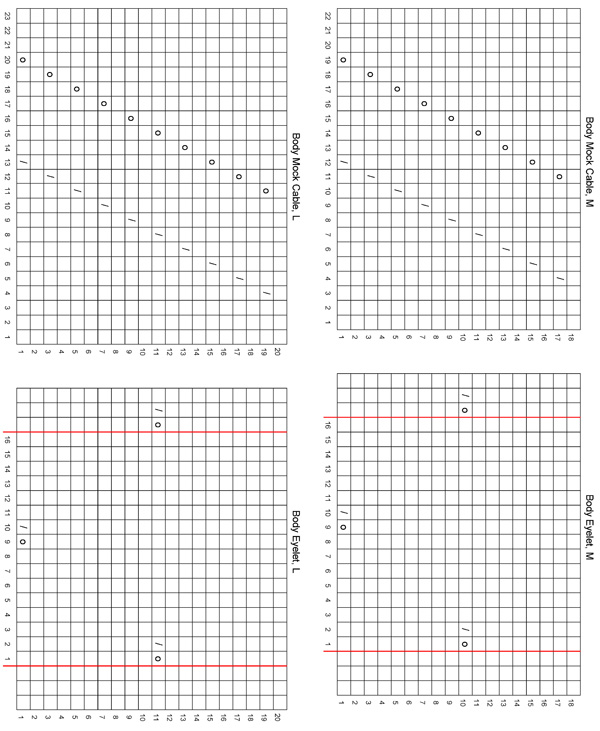
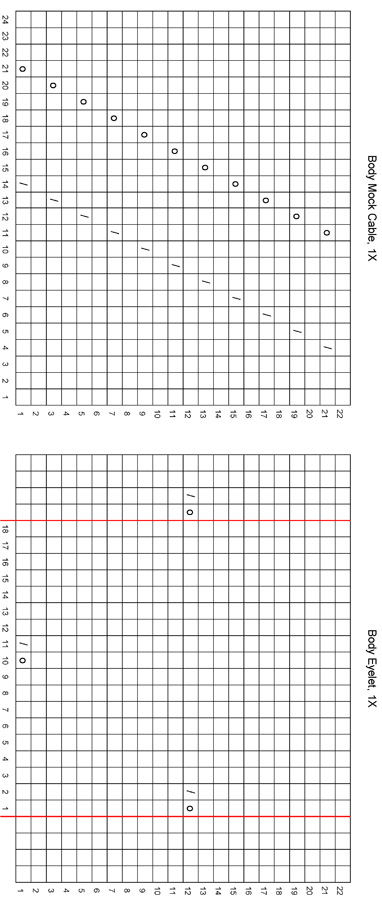
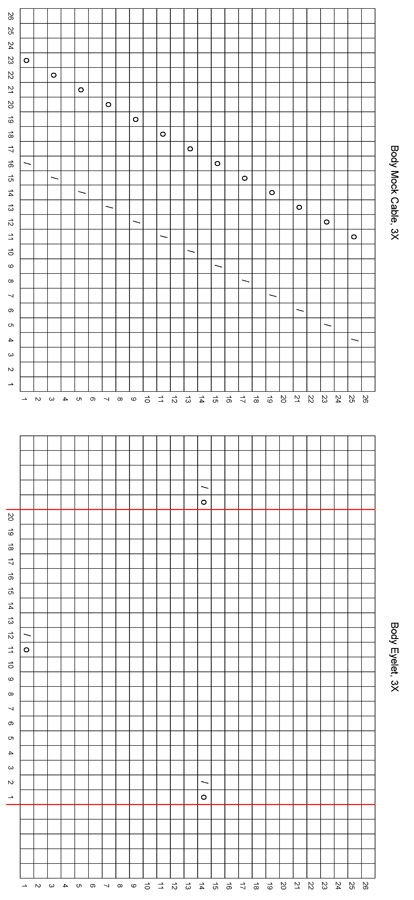
Directions for the crochet chain provisional cast on can be found here.

Sl1p: slip one purlwise.

The body has an I-cord edging:
Most rows begin with the first 4 stitches slipped to the right needle. After slipping the first four stitches, take the yarn to the wrong side and keep it snug and work the fifth stitch. Most rows end with the final 4 stitches slipped back to the left needle and worked a second time in stockinette with yarn held snugly on the wrong side for the first stitch. I-cord instructions are included for the rows that require them.

Body—Mock Cable Motif Worked over 20[21, 22, 23, 24, 25, 26] sts and 14[16, 18, 20, 22, 24, 26] rows to correspond with the Eyelet Motif.

XS
Row 1 [RS]: K9, k2tog, k9, yo, k3.
Rows 2 and following even rows [WS]: P.
Row 3 [RS]: K8,  k2tog, k6, yo, k4.
Row 5 [RS]: K7, k2tog, k6, yo, k5.
Row 7 [RS]: K6, k2tog, k6, yo, k6.
Row 9 [RS]: K5, k2tog, k6, yo, k7.
Row 11 [RS]: K4, k2tog, k6, yo, k8.
Row 13 [RS]: K3, k2tog, k6, yo, k9.
S
Row 1 [RS]: K10, k2tog, k6, yo, k3
Row 2 and following even rows [WS]: P.
Row 3 [RS]: K9,  k2tog, k6, yo, k4.
Row 5 [RS]: K8 k2tog, k6, yo, k5.
Row 7 [RS]: K7, k2tog, k6, yo, k6.
Row 9 [RS]: K6, k2tog, k6, yo, k7.
Row 11 [RS]: K5, k2tog, k6, yo, k8.
Row 13 [RS]: K4, k2tog, k6, yo, k9.
Row 15 [RS]: K3, k2tog, k6, yo, k10.
M
Row 1 [RS]: K11, k2tog, k6, yo, k3.
Row 2 and following even rows [WS]: P.
Row 3 [RS]: K10, k2tog, k6, yo, k4.
Row 5 [RS]: K9,  k2tog, k6, yo, k5.
Row 7 [RS]: K8 k2tog, k6, yo, k6.
Row 9 [RS]: K7, k2tog, k6, yo, k7.
Row 11 [RS]: K6, k2tog, k6, yo, k8.
Row 13 [RS]: K5, k2tog, k6, yo, k9.
Row 15 [RS]: K4, k2tog, k6, yo, k10.
Row 17 [RS]: K3, k2tog, k6, yo, k11.
L
Row 1 [RS]: K12, k2tog, k6, yo, k3.
Row 2 and following even rows [WS]: P.
Row 3 [RS]: K11, k2tog, k6, yo, k4
Row 5 [RS]: K10, k2tog, k6, yo, k5
Row 7 [RS]: K9, k2tog, k6, yo, k6.
Row 9 [RS]: K8, k2tog, k6, yo, k7.
Row11 [RS]: K7, k2tog, k6, yo, k8.
Row 13 [RS]: K6, k2tog, k6, yo, k9.
Row 15 [RS]: K5, k2tog, k6, yo, k10.
Row 17 [RS]: K4, k2tog, k6, yo, k11.
Row 19 [RS]: K3, k2tog, k6, yo, k12.
1X
Row 1 [RS]: K13, k2tog, k6, yo, k3.
Row 2 and following even rows [WS]: P.
Row 3 [RS]: K12, k2tog, k6, yo, k4.
Row 5 [RS]: K11, k2tog, k6, yo, k5.
Row 7 [RS]: K10, k2tog, k6, yo, k6
Row 9 [RS]: K9, k2tog, k6, yo, k7.
Row 11 [RS]: K8, k2tog, k6, yo, k8.
Row13 [RS]: K7, k2tog, k6, yo, k9.
Row 15 [RS]: K6, k2tog, k6, yo, k10.
Row 17 [RS]: K5, k2tog, k6, yo, k11.
Row 19 [RS]: K4, k2tog, k6, yo, k12.
Row 21 [RS]: K3, k2tog, k6, yo, k13.
2X
Row 1 [RS]: K14, k2tog, k6, yo, k3
Row 2 and following even rows [WS]: P.
Row 3 [RS]: K13, k2tog, k6, yo, k4
Row 5 [RS]: K12, k2tog, k6, yo, k5
Row 7 [RS]: K11, k2tog, k6, yo, k6
Row 9 [RS]: K10, k2tog, k6, yo, k7
Row 11 [RS]: K9, k2tog, k6, yo, k8.
Row 13 [RS]: K8, k2tog, k6, yo, k9.
Row15 [RS]: K7, k2tog, k6, yo, k10.
Row 17 [RS]: K6, k2tog, k6, yo, k11.
Row 19 [RS]: K5, k2tog, k6, yo, k12.
Row 21 [RS]: K4, k2tog, k6, yo, k13.
Row 23 [RS]: K3, k2tog, k6, yo, k14.
3X
Row 1 [RS]: K15, k2tog, k6, yo, k3.
Row 2 and following even rows [WS]: P.
Row 3 [RS]: K14, k2tog, k6, yo, k4.
Row 5 [RS]: K13, k2tog, k6, yo, k5.
Row 7 [RS]: K12, k2tog, k6, yo, k6.
Row 9 [RS]: K11, k2tog, k6, yo, k7.
Row 11 [RS]: K10, k2tog, k6, yo, k8.
Row 13 [RS]: K9, k2tog, k6, yo, k9.
Row 15 [RS]: K8, k2tog, k6, yo, k10.
Row17 [RS]: K7, k2tog, k6, yo, k11.
Row 19 [RS]: K6, k2tog, k6, yo, k12.
Row 21 [RS]: K5, k2tog, k6, yo, k13.
Row 23 [RS]: K4, k2tog, k6, yo, k14.
Row 25 [RS]: K3, k2tog, k6, yo, k15.
 

Body—Eyelet Motif
Worked over 88[88, 102, 102, 116, 116, 130] sts and 14[16, 18, 20, 22, 24, 26] rows to correspond with the Mock Cable Motif.

XS
Row 1 [RS]: K9, yo, k2tog, [k12, yo, k2tog] 5 times, k7.
Rows 2, 4, 6, 10, 12, 14 [WS]: P.
Rows 3, 5, 7, 9, 11, 13 [RS]: K.
Row 8 [WS]:  P2tog, yo, [p12, p2tog, yo] 6 times, p2.
S
Row 1 [RS]: K9, yo, k2tog , [k12, yo, k2tog] 5 times,  k7.
Rows 2, 4, 6, 8, 10, 12, 14, 16 [WS]: P.
Rows 3, 5, 7, 11, 13, 15 [RS]: K.
Row 9 [RS]:  K2, [yo, k2tog, k12] 6 times, yo, k2tog.
M
Row 1 [RS]: K11, yo, k2tog [k14, yo, k2tog] 5 times, k9.
Rows 2, 4, 6, 8, 12, 14, 16, 18 [WS]: P.
Rows 3, 5, 7, 9, 11, 13, 15, 17 [RS]: K.
Row 10 [WS]:  P1, [p2tog, yo, p14] 6 times, p2tog, yo, p3.
L
Row 1 [RS]: K11, yo, k2tog [k14, yo, k2tog] 5 times, k9.
Rows 2, 4, 6, 8, 10,  12, 14, 16, 18, 20 [WS]: P.
Rows 3, 5, 7, 9, 13, 15, 17, 19 [RS]: K.
Row 11 [RS]:  K3, [yo, k2tog, k14] 6 times, yo, k2tog, k1.
1X
Row 1 [RS]: K13, yo, k2tog [k16, yo, k2tog] 5 times, k11.
Rows 2, 4, 6, 8, 10, 14, 16, 18, 20, 22 [WS]: P.
Rows 3, 5, 7, 9, 11, 13, 15, 17, 19, 21 [RS]: K.
Row 12[WS]:  P2, [p2tog, yo, p16] 6 times, p2tog, yo, p4.
2X
Row 1 [RS]: K13, yo, k2tog [k16, yo, k2tog] 5 times, k11.
Rows 2, 4, 6, 8, 10, 12, 14, 16, 18, 20, 22, 24 [WS]: P.
Rows 3, 5, 7, 9, 11, 15, 17, 19, 21, 23 [RS]: K.
Row 13 [RS]:  K4, [yo, k2tog, k16] 6 times, yo, k2tog, k2.
3X
Row 1 [RS]: K15, yo, k2tog [k18, yo, k2tog] 5 times, k13.
Rows 2, 4, 6, 8, 10, 12, 16, 18, 20, 22, 24, 26 [WS]: P.
Rows 3, 5, 7, 9, 11, 13, 15, 17, 19, 21, 23, 25[RS]: K.
Row 14 [WS]: P3, [p2tog, yo, p18] 6 times, p2tog, yo, p5.
 

Sleeve—Mock Cable Motif worked over 12 sts and 8 rows.
Row 1 [RS]: K5, k2tog, k3, yo, k2
Row 2, 4, 6, and 8 [WS]: P8.
Row 3 [RS]: K4, k2tog, k3, yo, k3.
Row 5 [RS]: K3, k2tog, k3, yo, k4.
Row 7 [RS]: K2, k2tog, k3, yo, k5.

Sleeve— Eyelet Motif  worked over 8 sts and 8 rows.
Row 1 [RS]: K4, yo, k2tog, k2.
Row 2, 4, 6, and 8 [WS]: P.
Row 3 [RS]: K.
Row 5 [RS]: YO, k2tog, k6.
Row 7 [RS]: K.

spacer
I-cord bind off
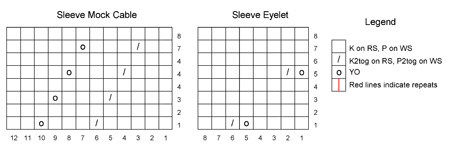
With right side facing, cast on 3 stitches to start of current row using knitted cast on.
[K2, sl1, k1, PSSO and off of the needle. Return 3 stitches to the left needle. Without turning, pull the yarn firmly behind your work]. Repeat until all stitches have been cast off. Break your yarn and pull the tail through the final three stitches.

spacerCharts
The charts for this pattern are very large. Each fits on a letter-sized page.
Click below and print each resulting page.

size XS+Ssize M+Lsize 1Xsize 2Xsize 3X

DIRECTIONS

spacer
BODY
Using crochet chain provisional cast on and using the smaller needle, cast on 144[146, 162, 164, 180, 182, 198].

Right Edge
Row 1 [RS]: K6, pm, k20[21, 22, 23, 24, 25, 26], pm, k2, pm, k88[88, 102, 102, 116, 116, 130], pm, k2, pm, k20[21, 22, 23, 24, 25, 26], pm, k6, turn

Row 2 [WS]: P4, k until 4 stitches rem, p4, slip final four stitches back onto the left needle and p them again, turn

Row 3 [RS]: Sl first 4 sts, k to end of row. Slip last 4 stitches back onto the left needle and k them again, turn.

Row 4 [WS]: Sl first 4 sts, k until 4 stitches rem, p4, slip final four stitches back onto the left needle and p them again, turn

Right Side of Body
Row 1 [RS]: Slip first 4 stitches, p2, work first row of mock cable motif, p2, work first row of eyelet motif to marker, p2, work first row of mock cable motif, p2, k4, slip four stitches back onto the left needle and k them again, turn.

Row 2 [WS]: Sl first 4 stitches, k2, p20[21, 22, 23, 24, 25, 26], k2, p88[88, 102, 102, 116, 116, 130], k2, p20[21, 22, 23, 24, 25, 26], k2, p4, slip final four stitches back onto the left needle and p them again, turn. Second row of mock cable and eyelet motifs completed.

From this point, work proceeds as follows:
Odd rows [RS]: Slip first 4 stitches, work in established pattern to first marker; work mock cable motif; work in established pattern to next marker; work 6 reps of eyelet motif; work in established pattern to next marker; work mock cable motif; work in established pattern to last stitch, rework final 4 stitches.

spacer
Even rows [WS]: Slip first 4 stitches, work in established pattern to end of row, rework final 4 stitches.

Work until a total of 11[10, 9, 8, 8, 7, 7] repeats of the mock cable motif are completed.

Work for a further 0[0, 6, 10, 0, 16, 10] rows in established pattern, 158[164, 172, 174, 180, 188, 196] rows to first armhole.

Armhole row [RS]: Work 30[31, 33, 34, 36, 37, 39] stitches in established pattern to the third marker (beginning of eyelet section); using scrap yarn k32[34, 36, 39, 41, 44, 46] stitches, slip all stitches worked with the scrap yarn to the left needle and k them again with the working yarn, k5. Complete the remainder of the row in the established pattern. Note: the armhole stitches do not shift the eyelet pattern.

Back
Continue in pattern until you have completed 10[9, 8, 8, 8, 7, 7] repeats of the Mock Cable Motif beginning at the armhole row. For sizes Medium, Large, 2x and 3x the repeats begin and end at the same point of the cable.

Work a further 0[0, 6, 0, 0, 16, 6] rows in established pattern when the back is complete. 140[144, 150, 160, 176, 184, 188] rows across back (includes first armhole row).

Repeat armhole row.

spacer
Left Side
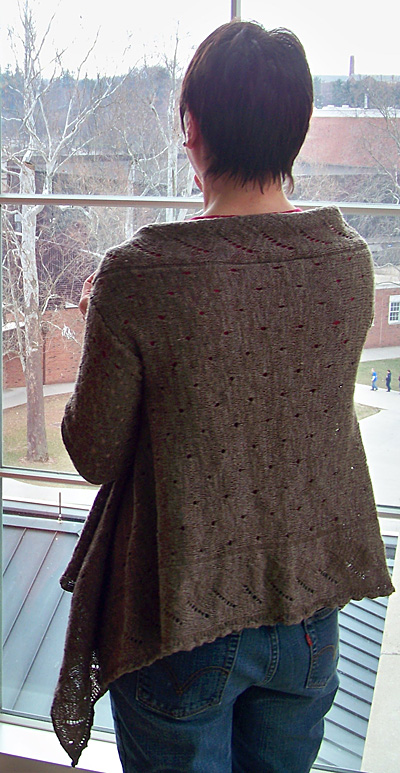
Work until a total of 11[10, 9, 8, 8, 7, 7] repeats of the mock cable motif are completed from the second armhole row.

Work for a further 0[0, 6, 10, 0, 16, 10] rows in established pattern. The completed body will have 32[29, 27, 25, 24, 23, 22] repeats of the motifs.

Left Edge:
Rows 1 and 2: Work in established pattern (first two rows of pattern motifs).

Row 3 [RS]: Sl 4 sts, p to four stitches from the end, k4, slip 4 stitches to left needle and k them again.

Row 4 [WS]: Sl 4 sts, p to four stitches from the end, p4, slip 4 stitches to the left needle and p them again.

Rows 5 [RS]: Repeat row 3.

Row 6 [WS]: P.

Bind off with an I-cord bind off.

Remove provisional cast on and slip the stitches of the cast on edge onto a needle. Bind these stitches off with an I-cord bind off.

Armhole Edge Reinforcement:
Remove the scrap yarn at the arm hole of one sleeve opening and slip the 64[68, 72, 78, 82, 88, 92] stitches onto the larger needle.

Beginning at the underarm, with RS facing, rejoin yarn and work around as follows [RS]: [K32[34, 36, 39, 41, 44, 46] stitches, pick up and k two stitches in the gap] twice.

Bind off loosely.

Using colorfast scrap yarn, whip stitch the finished armhole closed for blocking.

Repeat this process for the second armhole opening.

SLEEVES (make 2)
Using the smaller needle loosely cast on 84[86, 88, 90, 92, 94, 96] stitches.

Set up row [WS]: P4[5, 6, 3, 4, 5, 6] pm, p56[56, 56, 64, 64, 64, 64], pm, p6[7, 8, 5, 6, 7, 8], pm, p12, pm, p6.

Row 1 [RS]: K4, p2, work first row of Sleeve Mock Cable, p2, k4[5, 6, 3, 4, 5, 6], work 7[7, 7, 8, 8, 8, 8] reps of Sleeve Eyelet, k4[5, 6, 3, 4, 5, 6] to end.

Row 2 [WS]: Bring yarn to the front, sl1p, p63[65, 67, 69, 71, 73, 75], k2, p12, k2, p4, return final 4 stitches to left needle and p them again.

Row 3 [RS]: Slip first 4 stitches, p2, work third row of Sleeve Mock Cable, p2, k4[5, 6, 3, 4, 5, 6], work 7[7, 7, 8, 8, 8, 8] reps of Eight Stitch Eyelet, k4[5, 6, 3, 4, 5, 6] to end.

Note: Only the stitches at the end of wrong side rows are returned to the left needle and worked a second time.

Continue in pattern established until 13[14, 15, 16, 17, 18, 19] reps of the eight stitch motifs have been completed. On the final wrong side row do not return the final 4 stitches to the left needle and rework them.

Bind off loosely.

spacer

FINISHING
Block all pieces before assembly to the measurements provided above. After blocking, remove the whip stitching at the armholes.

Set in sleeves.  Lining up motifs, sew the underarm sleeve seams.

Weave in all ends.

spacer
ABOUT THE DESIGNER

designernamespacer Jodie lives in the beautiful foothills of the Appalachian Mountains where she knits and designs while homeschooling her two sons. She strongly identifies with the frustration Daedalus must have felt when his son wrecked his wings—as might any knitter who has seen their work felted in the hands of a recipient who didn’t bother to follow the washing instructions!

Jodie is very grateful to have a friend like Helen Van Doren who loves spinning yarn every bit as much as Jodie loves knitting it. More of Jodie’s work can be found at queenieknits.com. She is Jodiemom on Ravelry.

spacer