|
|
 |
|
|
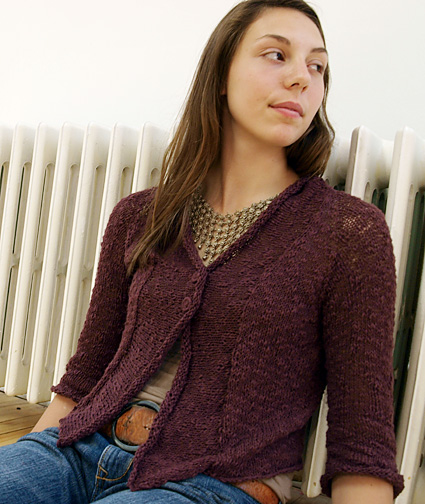
I really designed this to be my idea of the perfect warm-weather-grab
for those long, uncertain days. You may never know when you will
encounter an over-cooled office, a breezy picnic or a late night
outdoor cafe. Many of us live where summers are just plain hot
and often humid. Rarely is there need for something to protect
us from chills. But when you do need that “little something” to
toss on, it is a joy to have it at easy reach. Amiga weighs next
to nothing. It scrunches up to fit into a very little space.
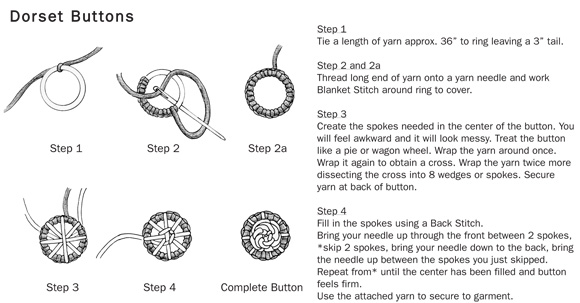
It will always be at the ready. To make my life easier and to ensure buttons that would not
weigh down or pull the drapey Cotton
Flamme fabric… I made my own! I am also
quite happy with the way the buttons just blend in creating
a hint of interest. |
|
|
|
 |
|
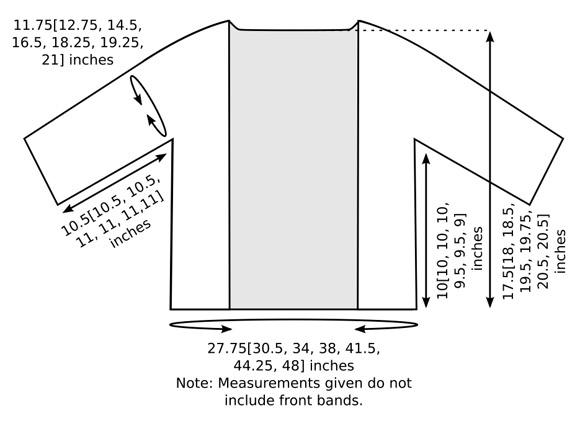
SIZE |
|
FINISHED MEASUREMENTS |
|
MATERIALS Notions |
|
GAUGE |
17 sts/ 24 rows = 4 inches in stockinette st after gentle blocking |
|
PATTERN NOTES |
|
yo2: Yarn over twice (wrap yarn twice around right needle, from front to back). Instructions for the Backward Loop Cast
On can be found here. |
|
DIRECTIONS Raglan Increase Row [RS]: [K to 1 st before marker, kfb, slip
marker, kfb] four times, k to end. 8 sts increased. LOWER BODY Loosely BO all sts. SLEEVES Sizes
XS, S, M Only: Sizes L, 1X, 2X, 3X Only: Try on sweater to determine best placement for two buttons. Mark buttonhole placement on right front edge using safety pins or split ring markers. Recommended placement is at bust if you are small-busted, or slightly below bust if you are large-busted. Centers of buttons on sweater shown are placed approx. 2 inches apart. With RS facing, using circular needle and beginning at lower right front corner, pick up and k 3 sts for every 4 rows along right front edge, placing stitch marker on needle at each button location; pick up and k 1 st in every st along CO neck edge, and 3 sts for every 4 rows along left front edge, ending at lower left front corner. Beginning and ending with WS row, work 15[17, 19, 19, 21, 25,
29] rows in stockinette st. |
|
FINISHING
|
|
| ABOUT THE DESIGNER |
|
Mags Kandis is a writer of books, designer of things and maker of stuff.
Her latest book is Gifted:
Lovely Little Things to Knit and Crochet (Interweave Press 2010). |
|
Pattern & images © 2011 Mags Kandis. Contact Mags |