|
|
 |
|
|
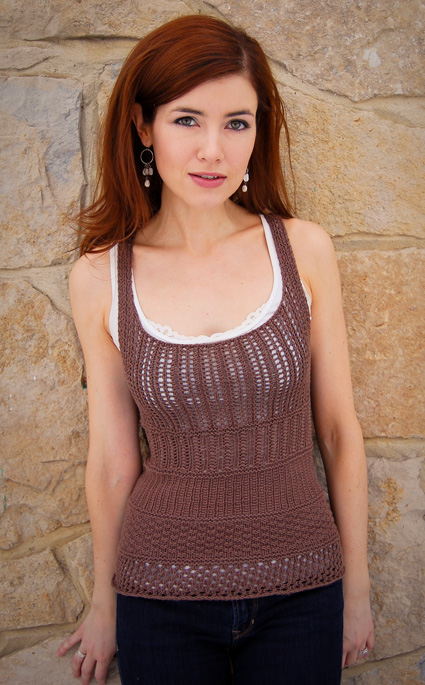 |
Racerbacks are great way to have a summery knit that you can wear and not sweat to death in. This textured tank is meant to be layered over another lightweight item like a tank top or a t-shirt, and provides lots of visual interest. The bands change stitches 5 times so the knitting doesn’t get dull, and the lovely cotton blend yarn is lightweight, breathable and fantastic to wear. The Kollage yarn didn’t grow a lot in wet blocking, which was wonderful, and the generous yardage meant fewer ends to weave in. |
|
|
 |
|
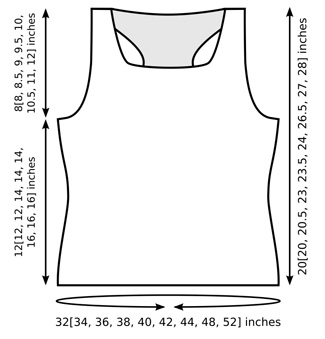
SIZE |
|
FINISHED MEASUREMENTS |
|
MATERIALS Notions |
|
GAUGE |
| 16 sts/32 rows = 4” in Checkerboard Pattern, after blocking |
|
PATTERN NOTES |
|
Shaping Note: Within the lace pattern, each yarnover increase is paired with a decrease. When increasing or decreasing at edge of work (shaping at neckline, armholes, etc), be sure to work a yarnover with its paired decrease (k2tog or ssk). If there are not enough sts to work both the yarnover and its paired decrease, work those sts in stockinette st instead. 3-st cluster: P3tog but do not drop sts from left needle; k same 3 sts together but do not drop from left needle, p same 3 sts together again and drop from left needle. Total number of sts has not changed. inc1: The increase used for this pattern is the backward loop
increase. It is the first increase shown here, referred to as
m1. Instructions for grafting can be found here. |
|
DIRECTIONS 
CO 129[138, 144, 153, 162, 168, 177, 192, 210] sts. Place marker and join to begin working in the round, being careful not to twist. K 1 round. FIRST BAND (Cellular Stitch, from Barbara Walker's
A Third Treasury of Knitting Patterns) P 1 round. SECOND BAND (Checkerboard Stitch) P 1 round. THIRD BAND (Linen Rib Stitch) P 1 round. FOURTH BAND (Hindu Pillar Stitch, from Connie
Chang Chinchio's Trellis and Keyhole
Tank) P 1 round. Sizes A, C, D, E, F, H, J Only: Sizes B, G Only: 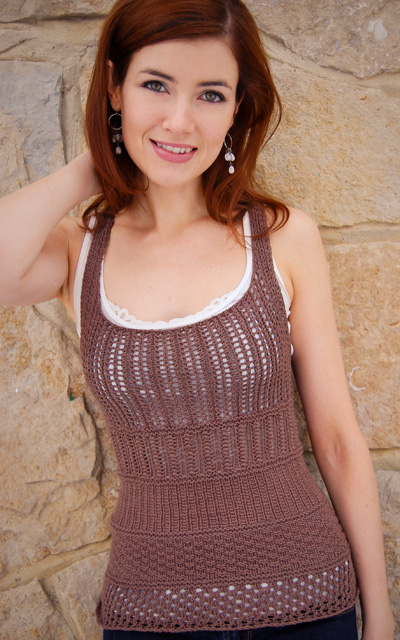 Round 1: [Yo, ssk, k2tog, yo, k1] to end. Round 2: K all sts. Repeat Rounds 1-2 until work measures 12[12, 12, 14, 14, 14, 16, 16, 16] inches or desired length to underarm, ending with Round 1. Note: If altering length, note that armholes are quite deep; see schematic for measurements. Next Round: BO 6[6, 6, 7, 7, 8, 8, 9, 10] sts, k44[46, 51, 55, 57, 60, 62, 71, 76] (45[47, 52, 56, 58, 61, 63, 72, 77] sts on right needle after bound off sts), BO 6[6, 6, 7, 7, 8, 8, 9, 10] sts, k to end. Upper front will be worked back and forth over last 73[76, 81, 85, 88, 93, 96, 105, 113] sts worked; place remaining 45[47, 52, 56, 58, 61, 63, 72, 77] sts on st holder for upper back. UPPER FRONT Work 1 RS row in pattern. Continue in pattern until work measures 4[4, 4.5, 5, 5.5, 6, 6.5, 7, 7.5] inches from beginning of armhole shaping, ending with a RS row. Shape Neckine: Left Strap: Continue in pattern until work measures 8[8, 8.5, 9, 9.5, 10, 10.5, 11, 12] inches from beginning of armhole shaping, ending with a RS row. Place sts on st holder. Right Strap: Work 1 RS row in pattern. Continue in pattern until work measures 8[8, 8.5, 9, 9.5, 10, 10.5, 11, 12] inches from beginning of armhole shaping, ending with a RS row. Place sts on st holder. 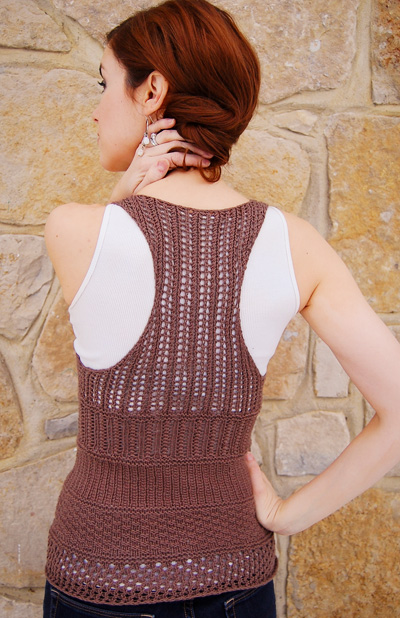 Place held sts of back on needle and join yarn with RS facing. Sizes A, B, C, D, E, F Only: All Sizes: Work 3 rows in pattern. Work 1 RS row in pattern. Continue in pattern until work measures 8[8, 8.5, 9, 9.5, 10, 10.5, 11, 12] inches from beginning of armhole shaping, ending with a WS row. It is a good idea to check length before working next row. Pin front straps to upper back and try on top; garter stitch ridge at base of bust section should sit just below bust. Adjust length of upper front and back as necessary before continuing. Next Row [RS]: Work 10[10, 10, 12, 12, 12, 14, 14, 16] sts in pattern, BO next 33[33, 36, 36, 40, 43, 41, 46, 45] sts, work in pattern to end. Two sets of 10[10, 10, 12, 12, 12, 14, 14, 16] sts remain. Graft each set of sts to held sts of corresponding front strap. |
|
FINISHING |
|
| ABOUT THE DESIGNER |
|
|
|
Pattern & images © 2011 Julie Crawford. Contact Julie |