
|
|
 |
|
|
 |
Sarah V. Miller
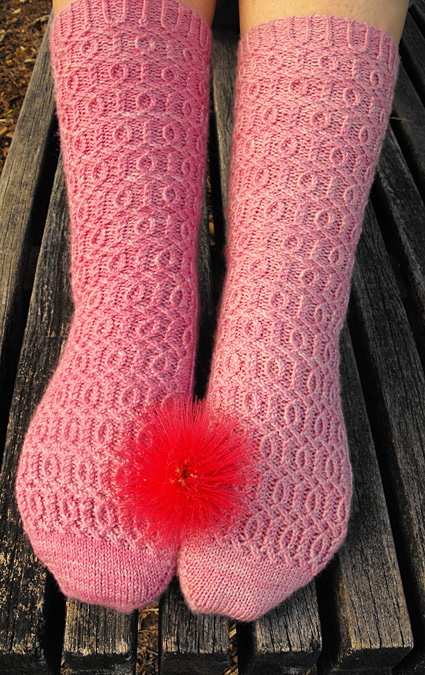
There was once a time when I decided to knit a scarf. Not just
any scarf – a cabled scarf of many colors, where every
cable was a color of its own. I loved the cable
pattern of this scarf. I loved it so much that,
even after six feet of it plus massive intarsia,
I wanted to put it on socks. Well, not the
exact cable -- I changed it up a little bit.
I changed where some of the cables went, micro-sized
the motif, made the cables one twisted stitch
instead of two, and adapted it to working in the round. Then
I put it on a sock, and Primrose was born. |
 |
|
SIZE |
|
FINISHED MEASUREMENTS |
|
MATERIALS Notions |
|
GAUGE |
| 32 sts/48 rounds = 4 inches in stockinette stitch |
|
PATTERN NOTES |
|
RLI: Insert right needle into right loop of stitch just below next stitch. Place it onto left needle and knit it, then knit the stitch on needle Left Cross:
Left Twist:
3-Stitch Twist: |
|
DIRECTIONS Foot Foot Round: Work Foot Chart on 40[48] instep sts, k
to end of round. Gusset Repeat these two rounds 10[11] more times. 55[61] sts on the sole. You should end on round 7 if you started the gusset after round 5[3], or round 17 if you started the gusset after row 15[13]. Turn HeelWork Foot Chart across instep as established. Work needle 2 as follows: Knit to end of round, knitting the wrapped stitches together with their wraps, as you come to them. 63[69] sts on sole. Heel Flap Work sole sts as follows: Work rows 2 and 3 13[14] times Leg setup round, size M: K1 tbl, p1; work round 20 or 10 (as appropriate) of the Leg Chart to end of instep (you will be 2 sts short of a full repeat when you get to the end of the needle); p1, k1 tbl the first two sts of the sole onto the instep needle; k1 tbl, p2, k1 tbl, [kfb, p1, k1 tbl] 7 times, k1 tbl, p2, k2 tbl, p1, work a Left Twist on first 2 sts of round, transferring them from the instep to the sole. Leg setup round, size L: K1 tbl, p1; work round 20 or 10 (as appropriate) of the Leg Chart to end of instep (you will be 2 sts short of a full repeat when you get to the end of the needle); p1, k1 tbl the first two sts of the sole onto the instep needle; k1 tbl, p2, k1 tbl, [kfb, p1, k1 tbl] 10 times, kfb, work a Left Twist on first 2 sts of round, transferring them from the instep to the sole. 80[96] sts total – 40[48] each on instep and sole. Work Leg Chart, starting on round 1 or 11 as appropriate, until 1 inch short of desired length, ending on round 14. Sock as photographed has leg measuring 8.5 inches, and has 3 full repeats of the pattern plus the 14 extra rounds. Note: For Rounds 1 and 11 on the leg chart, the cable crossing at the end of the round is worked over the last st of the sole and the first st of the instep. Hence there is no stitch at the beginning of rounds 2 and 12. Cuff Ribbing round: [K1 tbl, p1] to end of round. |
|
FINISHING |
| ABOUT THE DESIGNER |
|
Sarah V Miller is currently working on
her BS in Marine Biology and Chemistry from the Rosenstiel School
of Marine and Atmospheric Science at the University of Miami. She
is often found knitting on
campus, both in and out of class, as well
as writing various lab reports. Off campus, she can be seen
raising aplysia, harvesting macroalgae, scuba diving, and ogling
all the yarn at the LYS. Nine times out of ten, there is a pair
of socks on her needles. |
|
Pattern & images © 2011 Sarah V Miller. Contact Sarah. |
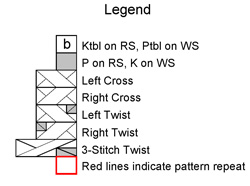 LLI: Insert left needle into left loop of
stitch two rows below last completed stitch,
place it onto the left needle. Knit this stitch through the
back loop.
LLI: Insert left needle into left loop of
stitch two rows below last completed stitch,
place it onto the left needle. Knit this stitch through the
back loop.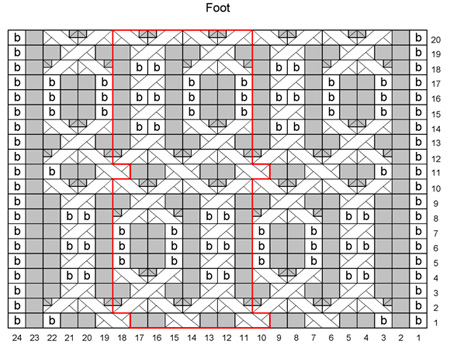 Right Cross:
 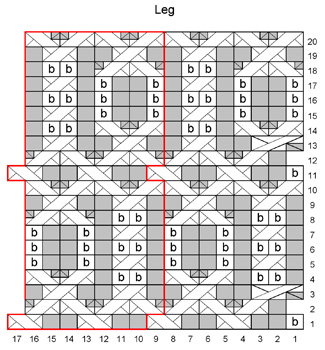 Right Twist: