
|
|
 |
|
|
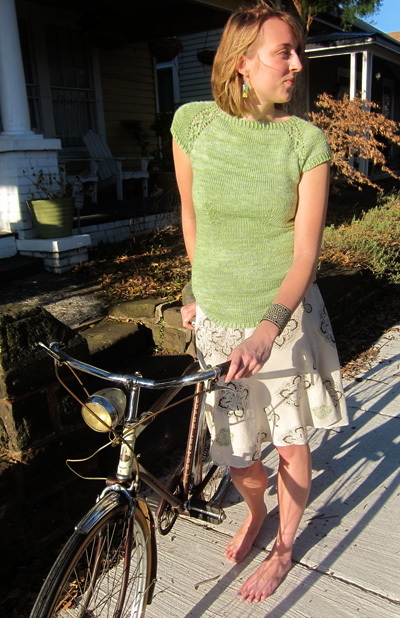 |
Curves, it's all about the curves. From the arching lacey cable
to the hug of the hip to the graceful swoop of the hemline, this
little tee is an ode to the curve. |
|
|
 |
|
SIZE |
|
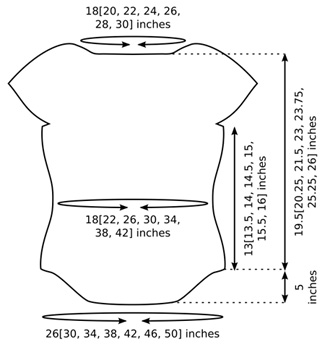
FINISHED MEASUREMENTS |
|
MATERIALS Notions |
|
GAUGE |
20 sts/24 rows = 4" in stockinette st using larger needle, after blocking |
|
PATTERN NOTES |
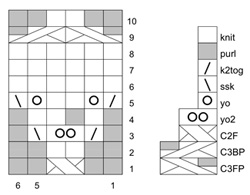 (Worked in the round over an even number of sts): All Rounds: [K1 tbl, p1] to end. C2F: Sl 1 st to cable needle and hold to front of work; k1 from left needle, k1 from cable needle. C3BP: Sl 2 sts to cable needle and hold to back of work; k1 from left neede, p2 from cable needle. C3FP: Sl 1 st to cable needle and hold to front of work; p2 from left needle, k1 from cable needle. M1L (left-leaning increase): Insert left needle, from front to back, under horizontal strand of yarn running between last stitch on left needle and first stitch on right needle; knit this stitch through back loop. 1 stitch increased. M1R (right-leaning increase): Insert left needle, from back to front, under horizontal strand of yarn running between last stitch on left needle and first stitch on right needle; knit this stitch through front loop. 1 stitch increased. yo2: Yarn over twice (wrap yarn twice around right needle, from front to back). Instructions for the Backward Loop Cast
On can be found here. |
|
DIRECTIONS Switching to larger circular needle, establish pattern for yoke
as follows, beginning with Round 1 of chart: Next Round: Remove end-of-round marker, k3, replace end-of-round marker (this point will now be beginning of round), k3, remove marker, *k to next marker, remove marker, k3, place marker, k3, remove marker; repeat from * twice more, k to end of round. 38[40, 44, 50, 54, 60, 62] sts for each sleeve, 55[63, 71, 81, 89, 97, 105] sts each for front and back. K 5 rounds. LOWER BODYRemove existing markers when working next round, and place new markers as indicated. Use backward loop method for casting on underarm sts. Dividing Round: Place all sts to first marker on waste yarn for sleeve, CO 10[12, 14, 14, 16, 18, 20] sts for underarm, placing end-of-round marker after first 5[6, 7, 7, 8, 9, 10] sts; k to second marker, place all sts to third marker on waste yarn for sleeve, CO 10[12, 14, 14, 16, 18, 20] sts for underarm, placing side marker after first 5[6, 7, 7, 8, 9, 10] sts; k to end of round. 130[150, 170, 190, 210, 230, 250] sts. K 1 round, placing markers for waist shaping as follows: *k20[24, 27, 31, 34, 37, 40], place marker, k24[26, 30, 32, 36, 40, 44], place marker, k21[25, 28, 32, 35, 38, 41]; repeat from * once. Continue in stockinette st until work measures 3[3.25, 3.5, 3.75, 4, 4.25, 4.5] inches from underarm, or approx. 4 inches less than desired length to waist. Decrease Round: [K to 2 sts before marker, ssk, slip marker,
k1, k2tog] twice, k to side marker; [k to 2 sts before marker,
ssk, slip marker, k1, k2tog] twice, k to end of round. 8 sts
decreased. Continue in stockinette st until work measures 7.25[7.5, 7.5, 8, 8, 8.5, 8.5] inches from underarm, or desired length to waist. Increase Round: [K to marker, M1R, slip marker, k1, M1L] twice,
k to side marker; [k to marker, M1R, slip marker, k1, M1L] twice,
k to end of round. 8 sts increased. When working next round, remove waist shaping markers, leaving
side marker and end-of-round marker in place. Work either curved hem or straight hem as follows. Curved Hem:Curved hem is shaped using short rows. Row 1 [RS]: K to 8[9, 10, 11, 12, 13, 14] sts before side marker, W&T. Row 2 [WS]: P to 8[9, 10, 11, 12, 13, 14] sts before end-of-round marker, W&T. *Row 3 [RS]: K to 1 st before wrapped st, W&T. Row 4 [WS]: P to 1 st before wrapped st, W&T. Repeat Rows 3-4 nine times more. Next Row [RS]: K to 2 sts before wrapped st, W&T. Next Row [RS]: K to side marker, working wraps together with
wrapped sts; k to 8[9, 10, 11, 12, 13, 14] sts before end-of-round
marker, W&T. Straight Hem: SLEEVE EDGING |
|
FINISHING |
|
| ABOUT THE DESIGNER |
|
Mercedes Tarasovich-Clark is an indie dyer, knitwear designer,
and artist living in Alabama. |
|
Pattern & images © 2011 Mercedes Tarasovich-Clark. Contact Mercedes |