
|
|
 |
|
|
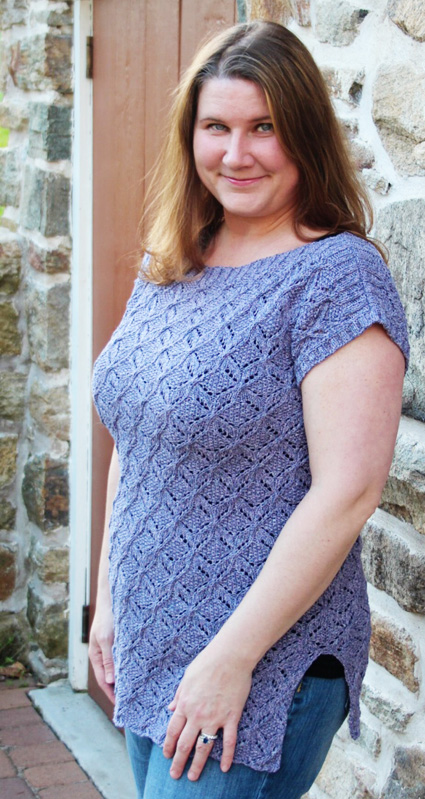
This stretchy lace tunic uses a recycled silk/cotton/viscose yarn and is perfect for warm summer days. Pair it with your favorite tank top and summer skirt, or a long sleeve t-shirt and jeans for the transitional seasons! Jirachi starts by working two identical panels for the tunic bottom. Once complete, you join them to work the lace pattern in the round for the body, to the armholes. At the break, small "sleeves" are added to the top portion, ending with ribbing and a three needle bind-off at the shoulders. It is intended to be worn with little or no ease. Named for the adorably star-shaped Pokemon, Jirachi, who has the power to grant wishes and hibernates for extensive periods of time. Perhaps wearing this sweater will bring you prosperity and more sleep? |
||
|
|
 |
Tweet
 |
|
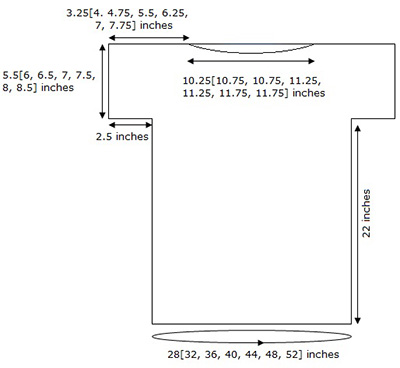
SIZE |
|
|
FINISHED MEASUREMENTS |
|
MATERIALS Notions |
|
GAUGE |
| 24 stitches/32 rows = 4 inches in pattern stitch |
|
PATTERN NOTES |
|
It is more important to match the designated stitch gauge since this determines the size of the garment. You can adjust the length of the garment by knitting additional or fewer vertical pattern repeats. RPC: slip 3 stitches to cable needle and hold to back of work, knit 2 stitches from left hand needle, bring yarn to front, slip last stitch on cable needle (purl stitch) back to left handle needle, purl this stitch, bring yarn to back of work, knit remaining 2 stitches from cable needle JIRACHI-CHART A (ROWS 1-28) |
The charts for this pattern is very large and fit on a letter-sized page. Click here and print the resulting page. |
|
DIRECTIONS The first and last stitches will be worked as selvedge (knit on RS, purl on WS) until underarm. All other stitches will be worked in pattern. Row 1 [RS]: K1, pm, work across row 1 of Jirachi Chart A, repeating highlighted section 5[6, 7, 8, 9, 10, 11] times, pm, k1. Continue in this manner, repeating rows 1-28 of Jirachi Chart A, until piece measures 6 inches from CO edge, ending on a RS row. Next row [WS]: P2tog, remove marker, work in pattern as set to one stitch before marker, remove marker, p2tog. 84[96, 108, 120, 132, 144, 156] sts. Set this aside and work from beginning to make second, identical panel using second circular needle or spare cable. Make a note of the last row worked so you remember where to resume when working in the round (next section). Join sections to work in the round. Continue working rows 1-28 of Jirachi Chart B until body measures 22 inches from CO edge or to desired length of garment to armhole, ending with an even numbered round. Make a note of the last row worked so you remember where to start in next section, and where to start when you work the back section later on. Divide for front and back:Place 84[96, 108, 120, 132, 144, 156] stitches (the last half worked) on a spare circular needle or cable, do not break working yarn as you will continue using it, carrying yarn from the held stitches to cast onto the left hand needle of the Front section. Any gap can be closed when you seam underarm tabs together later on. FRONT Row 2 [WS]: Using working yarn and cable cast-on, CO 14 sts at beg of row, then work these sts as follows: p2, pm, p12, work next row of Jirachi Chart A as established to next marker, sm, p2. 112[124, 136, 148, 160, 172, 184] sts. 14 sts increased. You will now be working two additional chart reps using these new cast-on stitches, and you will work the first and last 2 stitches of each row in stockinette stitch. Continue working from Jirachi Chart A until length from armhole cast-on is 5.5[6, 6.5, 7, 7.5, 8, 8.5] inches, ending with a WS row and removing markers on the last row. Rib set-up row [RS]: K1, k2tog, p2, *k2, p2, rep from * until 3 sts remain, k2tog, k1. 110[122, 134, 146, 158, 170, 182] sts. 2 sts decreased.Next row [WS]: P2, *k2, p2, rep from * to end. Next row [RS]: K2, *p2, k2, rep from * to end. Rep last 2 rows until ribbing measures 1 inch, ending with a WS row. Neck bind off row [RS]: Work 22[26, 32, 36, 42, 46, 52] sts in rib as set, bind off (in rib) the next/center 66[70, 70, 74, 74, 78, 78] sts, work 22[26, 32, 36, 42, 46, 52 sts in rib to end. Leave shoulder sts on space circular needle or cable. Rejoin yarn and work as for FRONT. Shoulder seams: Armhole seaming and ribbing: Using circular needle or dpns, with RS facing pick up and knit 92[96, 100, 104, 108, 112, 116] sts around armhole. Pm at beg of rnd. Rnd 1: *K2, p2, rep from * to end of rnd. Rep Rnd 1 until ribbing measures 0.5 inches. Rep for second armhole. |
 |
|
FINISHING |
| ABOUT THE DESIGNER |
|
Karen knits on the "choo choo" while commuting between NYC and her home in NJ where she lives with her husband, son, daughter, and their very talkative dog. |
|
Pattern & images © 2013 Karen Clark. Contact Karen |