Casting
on
"Jamie snorted
briefly and picked up a needle and a ball
of yarn.
"It's no
verra difficult, Sassenach. Look- this is
how ye cast up your row."
Drawing the thread
out through his closed fist, he made a loop
round his thumb, slipped it onto the needle,
and with a quick economy of motion, cast on
a long row of stitches in a madder of seconds.
Then he handed me the other needle and another
ball of yarn. "There – you try.""
-- Diana Gabaldon,
Drums of Autumn

There are tons of
different techniques for casting on and most
experienced knitters likely have a favorite.
New knitters will perhaps only be familiar
with one type -- the favorite of the person
who taught them to knit. Learning several
different types of cast on lets you choose
based on the effect you want to achieve. Some
techniques give a firm, stable cast on edge
while others yield a softer, more elastic
cast on edge.
One thing you never
want is a cast on that's overly tight. On
a garment (socks, sleeves, caps, hems of all
sorts) a too tight cast on row is not only
uncomfortable, it will be under constant strain
and therefore wear out well before the rest
of the knitting. And a sweater hanging like
a sack over a tight cast on? Definitely a
case of What Not to Wear.
If you have trouble
-- like me -- keeping your cast on loose enough
just use a needle a couple of sizes larger
(remember to switch to the proper needles
when you start to knit!) or two needles held
together. I find that my own cast on rows
vary depending on my mood and surroundings
and have learned to force myself to rip out
and start over if I'm not pleased with the
cast on after knitting the first couple of
rows. Not always easy, but it makes a huge
difference to final result.
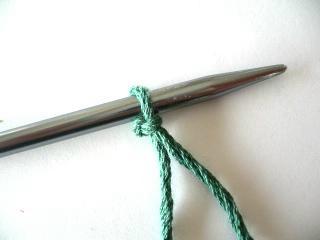
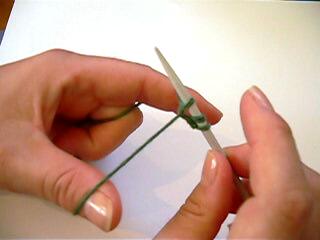
The first thing to
do when beginning a cast on is make a slip
knot -- a loop-type knot that comes unraveled
by pulling on one end -- and place it on your
needle.
To
make a slip knot, arrange the yarn like this:
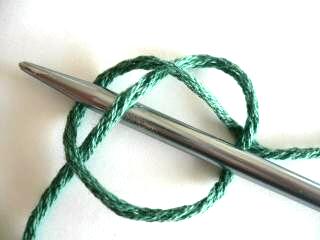
...then simply raise
the needle and tug the yarn end. Make sure
the loop gets tighter when you pull on the
loose yarn end rather than the end that is
attached to the yarn ball. If not, you'll
inevitably wind up with a sloppy looking knot
at the beginning of the cast on row.
The length of your
loose yarn end will depend on what type of
cast on you're going to be using. The description
of the cast on usually gives this information.
The two-needle casting on techniques -- "knitting-on"
and cable for example -- don't require a yarn
tail at all. Just be sure to leave enough
yarn to effectively weave in or to start a
seam later. The one-needle cast on technique
I'm going to illustrate here depends on having
a yarn tail long enough to complete the cast
on row. Too long and you're wasting precious
yarn. Too short and you'll likely be throwing
the needles across the room in frustration,
though it is possible to join an extra length
of yarn if this happens -- you'll just have
a couple extra ends to weave in afterwards.
Perhaps the simplest
cast on is known as "knitting
on". Fortunately it's also a marvelous
method of casting on -- even and nicely elastic.
You'll need 2 needles for this type of cast
on.
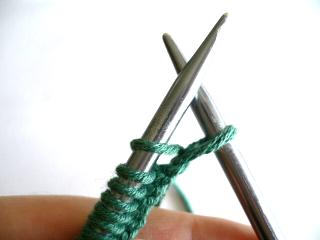
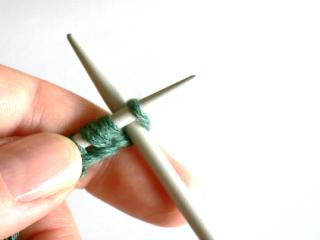
Start with a slip
knot on the left hand needle. Leave a short
tail. Insert the right hand needle into the
slip knot as if to knit, wrap and pull through,
just like a regular knit stitch.
Place the newly created
stitch back onto the left hand needle. There
are two ways to accomplish the transfer of
the newly created stitch:
transferring it directly...
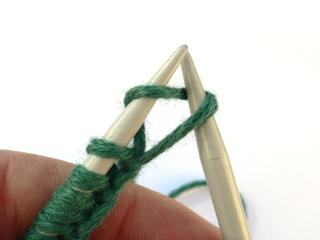
Or with a twist...
I find that transferring
it directly makes a neater cast on row, while
twisting it tends to be a bit looser. The
most important thing is to be consistent across
the row.
Knitting on stitches
in this manner results in a cast on row that
looks like this...
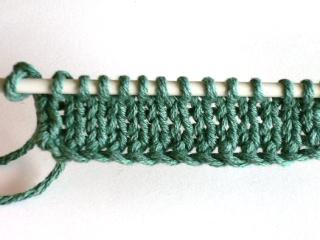
...and leaves you
ready to start a right side row in stockingette
stitch. (Some cast on methods leave purl bumps.
We'll get to that later.)
First off let me
say that the cable cast on has nothing to
do with cables and I don't know why it's called
that.
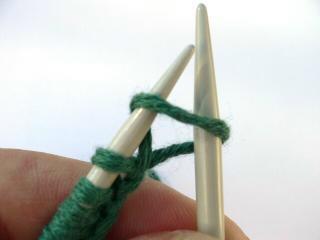
Start by placing
a slip knot on the left hand needle. Again,
you can leave just a short tail. Knit on one
stitch leaving 2 stitches now on the left
hand needle. Now insert the needle between
the two stitches, wrap and bring through.
Transfer the newly created stitch onto the
left hand needle.
The cable cast on
will also you leave you set up to start with
a knit row. It is strong yet flexible and,
according to Elizabeth Zimmerman, "looks
equally well on both sides".
Leave a long tail
on the slip knot. I've seen several ways to
guesstimate how long the tail needs to be.
One good way is to cast on a small number
of stitches, 10 for example, then unravel
to find out how much yarn is required for
that number of stitches and work out the amount
of yarn needed for the total number of stitches.
Another good way to avoid this problem is
by using two balls of yarn -- or both ends
of the same ball of yarn -- joined at the
slip knot. Just cast on one extra stitch and
unknot the slip knot when you're finished
casting on. You'll only need one needle for
this method. Make a slip knot and place it
on the needle. Grab both ends of the yarn
in your hand and secure with your fingers.
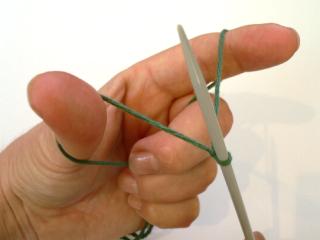
Then insert your thumb and forefinger between
the strands of yarn and pull the needle downwards,
creating a V shape with the yarn, like so...
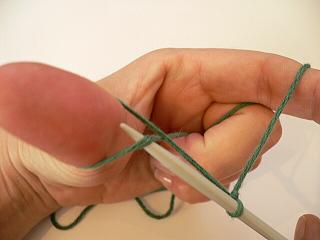
Holding the needle
in your right hand, bring the tip up through
the loop on your thumb...
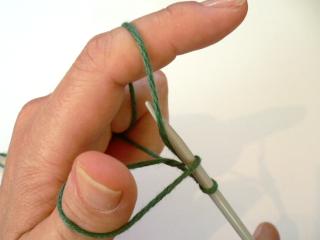
Then down through
the loop on your finger, grabbing the yarn...
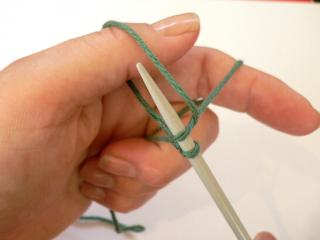
And pulling it down
through the loop on your thumb...
...let the loop of
yarn on your thumb slip off. Bring your thumb
back under the loose strand of yarn to tighten
the stitch on the needle.
Repeat for each stitch
to be cast on.
And since I have
a sneaking suspicion that still images alone
might be difficult to follow, I've prepared
this Quicktime
movie of the long tail cast on. Right-click
[PC] or option-click [mac] to save it to your
hard drive to watch it as much as you need
to, and save Knitty a little bandwidth.
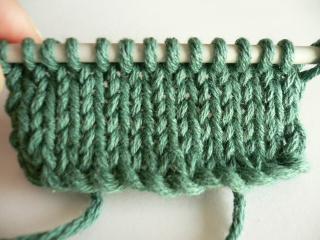
This type of cast
on is quite sturdy, but does have a tendency
to be too tight. I often use a larger needle
than the one that I'll be knitting with or
two needles held together. The long-tail cast
on leaves a row of purl bumps, so if you'll
be knitting in stockinette stitch, begin with
a wrong side row.
Next issue:
Yet more ways to cast on!


