Do you hate to purl? Or just
hate the constant flip-flopping of a narrow
project? Knitting back backwards may be just
the technique for you!
Knitting back backwards is
the technique of knitting from the left edge
to the right edge of a piece of knitted fabric,
in the reverse of the normal direction, as a
replacement for turning and purling across the
wrong side. It won't replace purling entirely,
but it has a number of really useful applications:
- In entrelac, where you
work back and forth in small strips, there's
a lot of turning, which can be unwieldy on
large projects. Knitting back backwards lets
you avoid that, in entrelac or any other project
which involves narrow strips.
- In charted designs, knitting
back backwards keeps you facing the fabric
surface shown on the chart, and may make it
easier to see the design develop.
- If you just plain don't
like to purl, you may find this easier, especially
if you're a Continental knitter and typically
struggle with purling. You can't use it for
mixed knits and purls on a single row, but
you can definitely use it for purl rows in
stockinette, and similar situations.
Knitting terminology isn't
always perfectly settled, and some sources will
refer to the same technique as purling
back backwards. That makes some sense, as it
replaces purling in the normal direction. However,
because you are forming knit stitches, not purl
stitches, on the side facing you, I prefer the
knitting back backwards term, and reserve purling
back backwards for the technique that produces
purl stitches on the facing side of the fabric.
I think this terminology especially makes sense
if you are going to employ these techniques
for charted designs, since usually the same
symbol will indicate both stitches to be knit
on the forward rows, and stitches to be knit
back backwards on the reverse rows.
And before we get into the
technique, a brief note on what knitting back
backwards is not: it is not the same
as left-handed knitting. True left-handed knitting
is a mirror of right-handed knitting, with a
mirrored stitch orientation. Knitting back backwards
maintains the same stitch orientation, and requires
a slightly different technique.
GETTING STARTED
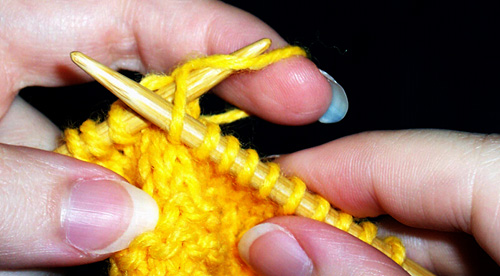
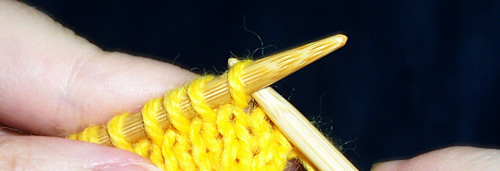
Let's first take a good look
at how the yarn and needles move when you purl.
As you can see in the photograph below, the
right needle goes between the left needle and
the front loop of the stitch, entering the stitch
from right to left.
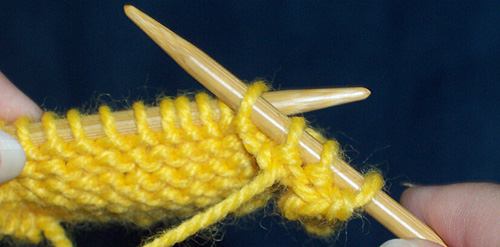
The working yarn comes up
in front of the right needle, over the top of
it, and then down between the right and left
needles.
The right needle tip pulls
the new stitch through the old stitch from front
to back, and the stitch sits on the right needle
with the working yarn extending from the back
of the needle.
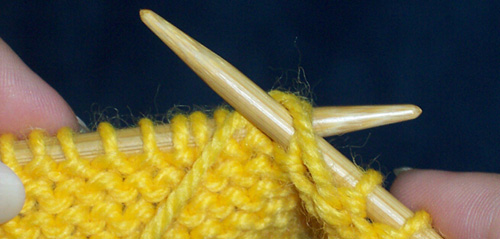
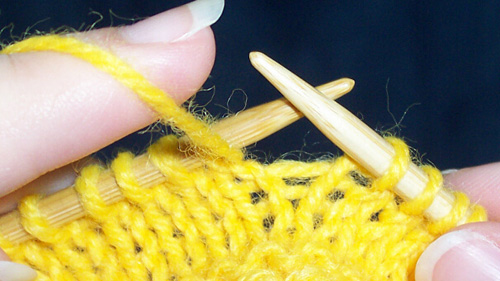
When you knit back backwards,
you want the yarn and needles to move with each
other in exactly the same way, except that you
will be on the other side of the entire
operation. Therefore, everything needs to be
reversed.
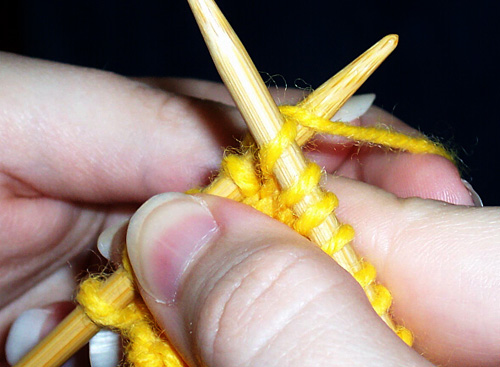
Your stitches will begin on
the right needle, and the left needle will be
your working needle. The left needle goes between
the right needle and the back loop of the stitch,
entering the stitch from left to right.
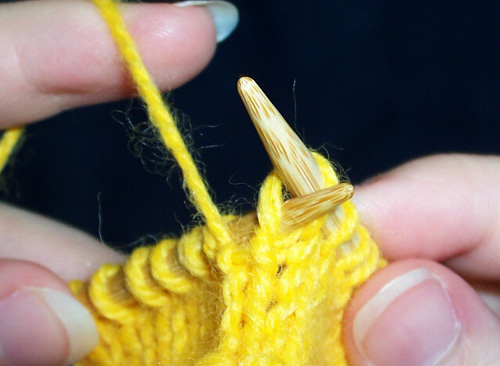
The working yarn comes up
behind the left needle, over the top of it,
and then down between the left and right needles.
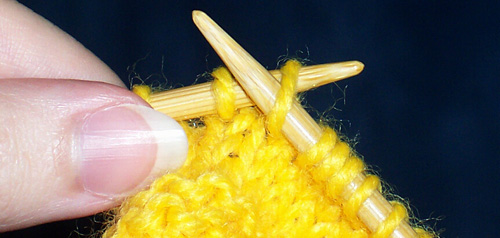
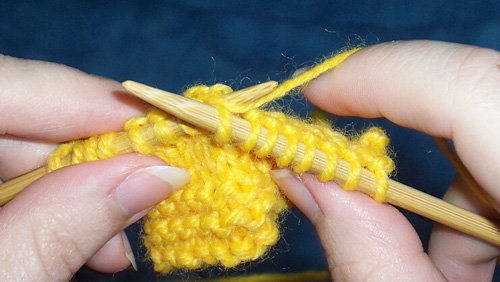
The left needle tip pulls
the new stitch through the old stitch from back
to front, and the stitch sits on the left needle
with the working yarn extending from the front
of the needle.
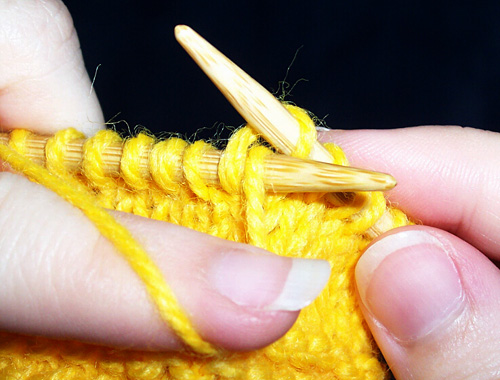
Be careful with your yarn
wrapping! That's the easiest place to go wrong
when knitting back backwards. Check your stitch
orientation carefully, until you know you've
got it down; the completed stitches should sit
on the needle with their left legs in back and
their right legs in front.

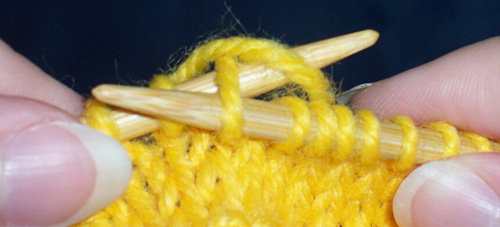
If you have difficulty making
your left needle move properly, you can hold
it still and move the right needle against it;
what's important is making the yarn and needles
go into the correct respective positions, not
how you get them to do that.
YARN MANAGEMENT
Now that you understand the
basic motions of knitting back backwards, it's
time to integrate it with your usual knitting
style. Continental knitters, who hold the yarn
in their left hands and usually scoop, will
be throwing the yarn around the left needle
tip when knitting backwards. English knitters,
who hold the yarn in their right hands and usually
throw, will be scooping.
CONTINENTAL
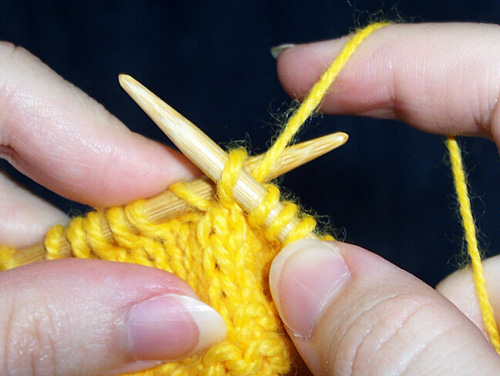
When you have your left needle
inserted in the stitch, extend your left forefinger
to bring the yarn over the left needle tip from
the back, and down between the needles.
If you have sufficient dexterity,
you can do this without letting go of the left
needle. I usually grasp the needles where they
cross with my right forefinger and thumb, so
I can let go with my left hand (see below);
it does slow me down a little, but it helps
me maintain good tension, whereas if I flick
the yarn over without dropping the needle, I
tend to play out too much yarn, and have to
adjust my hold before I can knit forward again.
Play with it, and find what works for you.
ENGLISH
English knitters knitting
backwards face some of the same issues that
Continental knitters face when purling, and
for the same reason -- the direction of pull
on the yarn tends to make it pop off the tip
of the working needle. You'll deal with these
issues in basically the same way that Continental
knitters do.
When you have your left needle
inserted in the stitch, bring the yarn from
behind the left needle tip, and push it down
between the needles; a firm downward pressure
will help keep the yarn from popping off the
needle tip.
Scoop the yarn through the
old stitch with the tip of the left needle;
holding tension on the yarn will make this easier
to do.
If you find this motion too
difficult to master, you may want to try knitting
back backwards in combination style. To do this,
you will wrap your yarn in the opposite direction,
bringing it up between the needles.
It's much easier to pull the
yarn through this way, but it will cause the
stitches that you form to sit on the needle
in the opposite orientation.

This will need to be addressed
on the knitting-forward rows by working the
stitches through the back loop.
KBB2TOG
Where a pattern calls for
you to purl two stitches together on the WS,
knitting back backwards requires you to knit
the two stitches together backwards. This is
actually quite easy; simply place the left needle
into two stitches instead of one, and then proceed
as usual.
PURLING BACK BACKWARDS
Knitting back backwards is
most commonly used on stockinette, replacing
rows of plain purl stitches, but it's also possible
to purl back backwards, where stitches would
be knit on the WS rows. This is an extremely
useful skill for charted designs which include
both knits and purls on the WS rows, since you
will always be working on the side shown by
the chart. It's also useful for narrow strips
of garter stitch.
To purl back backwards, the
yarn must be brought to the front of the work,
between the needles.
The left needle must be inserted
between the back leg of the stitch and the right
needle, from right to left.
The left needle is then twisted
around so the tips of the needles point in opposite
directions, and the yarn is brought up between
the needles, over the top of the left needle,
and down the front of it.
The left needle tip pulls
the stitch through from the front to the back,
and the new stitch sits on the left needle with
the working yarn extending from the front of
the needle.
Again, check your stitch orientation
carefully, until you are sure you've gotten
this down correctly.
It's common to experience
some awkwardness with this technique at first,
as your hands are picking up a new set of motions.
A little practice, however, such as a small
entrelac project, should have you clicking along
in no time.