The
second dimension: adjusting knitting
patterns for width
In the last
article,
we looked at length adjustments. Altering
the length of a garment that's knit vertically
-- either from hem to shoulder, or top-down
from shoulder to hem -- is relatively
easy. Really, there are only a few ways
that you can make adjusting the length
of a garment hard:
- If you are lengthening or shortening
an item with horizontal stripes or
horizontal patterning, you should make
sure that you are happy with where
the patterning will begin or end.
- If your length alteration affects
the armscye for a set-in or modified
drop-shoulder sleeve, then you will
need to recalculate the instructions
for the sleeve cap. However, upper
front and back length alterations to
a drop shoulder sweater do not necessary
require that the sleeve be reshaped.
- If your length alteration also results
in making the sleeve narrower,
make sure the sleeve does not wind
up being too tight.
Even these tricky bits
about length adjustments are easily handled
with a little bit of forethought. But
changing the width of a garment
is a different matter. Although it depends
on the amount of alteration required,
it's generally more challenging to adjust
somebody else's knitting pattern in this
dimension. Why?
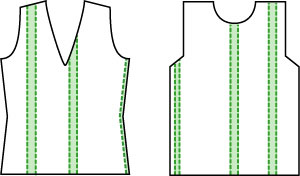 |
| If
you needed to adjust the width of
these tops, where can you add or
remove that extra width without distorting
the fit of the rest of the garment?
At the side edges, shoulders, neckline,
or some combination of the three? |
- The pattern may lack sufficient finished
measurement information (or a schematic)
for computing width alterations.
- The pattern
may lack information about the appropriate
amount of wearing or design ease.
- Just because you need to add or subtract
width in one part of the garment doesn't
mean that you need to make that same
adjustment everywhere else.
- The adjustment you need to make might
require adjustments in more than one
place.
- You may have chosen the wrong pattern
size as your starting point.
- The alteration
you wish to make is not merely a fitting
adjustment; it's a style change.
Some
of these factors, such as a lack of
pattern measurements or ease information,
simply aren't your fault, but you can
correct them. The last two factors
are within your control, and can make
the difference between a successful
alteration and throwing your calculator
at the wall.

Choosing the
best pattern size as a starting point
The need to pick the
right starting size is probably a no-brainer.
You'll minimize the amount of alteration
you need to do, of course. But there's
also a little bit of strategy behind
choosing the size that will make fitting
adjustments easiest:
- For a set-in
sleeve style, pick the size with
the cross-shoulder measurement that
fits you best for the design style. That
way, you won't have have to fuss
with widening or narrowing the shoulders.
This also means that even
if there's a finished bust measurement
that looks perfect for you, don't
use it if the shoulders won't fit!
Generally, it's easier to tweak the
size of a garment around the torso
than it is to adjust the upper body
width.
- For a raglan
sleeve style, pick the size with
the full bust measurement that fits
you best for the design style,
provided the armhole depth is sufficiently
deep to be comfortable. The raglan
style doesn't have a defined shoulder
line, so fitting the shoulder is
usually less crucial; the biggest
fitting problem is usually the armhole
depth. Usually, the armhole depth
will be just fine, but sometimes
(especially in body-conscious styles),
it might be on the shallow side,
and potentially tight and uncomfortable.
However, raglan yoke shaping lends
itself to easy armhole depth adjustments,
so it's generally safe to pick the
size that matches your target bust
measurement, and alter the armhole
depth if necessary.
Your
cross-shoulder measurement
is the distance between your
shoulder points. But where
is your shoulder point, anyway?
It's hard to find the bony
mass that so many knitting
references mention.
The
shoulder point is not the
exterior of your upper arm,
and it's not the protruding
bit of your clavicle that
sticks up; it's somewhere
in between, and a fair estimate
is halfway between those
two reference points. The
cross-shoulder measurement
is the distance between these
two shoulder points, measured
from the front. As you age
and gain (or lose) weight,
this measurement will stay
fairly constant, and in reality
the variation in this measurement
across women's sizes is less
than current knitting standards
might have you believe. The
real-life variations in fit
at the shoulder are due more
to the amount of flesh on
people's frames than on
the bones themselves. |
- For a drop-shoulder
style, pick the size with the full
bust measurement that fits you best
for the design style. Most
drop-shoulder styles are designed
with generous ease and significant
differences between adjacent sizes,
so it's not too hard to identify
the right pattern size.
- For a modified
drop-shoulder style where the sleeve-body
seam is dropped and falls across
the upper arm, pick the size with
the full bust measurement that fits
you best for the design style. If
the sleeve-body seam does fall
at the shoulder, then treat it like
the set-in sleeve style, and choose
the size that puts the sleeve-body
seam in the right place.
In other words, if
the garment style relies on a sleeve-body
seam falling in just the right location,
choose the size that makes this work
on your body so that you can avoid having
to make adjustments to the upper body.
Otherwise, if you have to make alterations
in that area, then not only do you have
to worry about armscye depth and decreases,
but you might have to rejig the shoulder
slope and neck opening.
Previously, we've discussed how
to pick the right starting size.
If you've forgotten about that in the
meantime, it might be a good idea to
go back and read it, because we're
going to pick up right where that left
off. From here on in, we're going to
assume that you've already picked out
the best pattern size as a starting
point. Hopefully, the pattern may include
some information on ease, which is
important in helping you pick the right
size to begin with. Without it, you're
reliant on the subtle clues that might
have been provided in the finished
measurements, the accompanying photographs,
and what pattern writer's idea of a
size small/medium/large/etc. might
be. Is the garment supposed to be roomy?
If the schematic suggests a loose fit,
but it looks tight on the model, read
through the pattern to see if there's
an explanation: perhaps part of the
garment is gathered, tied, or laced
up.
Understanding
the difference between altering to fit and
altering the style
You
need to recognize what kind of "adjustment" you're
making to the pattern: do you really just
want to tweak it
to fit your body shape,
or is your intention to change the
style? These are two different types
of alteration.
If you just want to
add a couple of inches to the finished
bust measurement because your target
finished size is between two pattern
sizes, or if you just need to size the
pattern up or down because the pattern
sizes aren't quite large or small enough,
that's probably just a size alteration.
But
if you find yourself saying "I'd love this sweater if only
it had raglan sleeves (or set-in sleeves,
drop shoulders, etc.) or if it was tighter
(or looser) fitting" or "I need to alter
the pattern because this type of sweater
makes me look like I'm wearing a tent",
then chances are you're wishing you could
change the style lines of the garment.
While it may certainly be possible to
do this, that's not a size alteration
-- that's a redesign. For example, consider
the traditionally-styled Fair Isle or
Aran sweater: the fabric looks beautiful,
and may blend color and texture like
a painting by an old master... but just
like an old master's painting, the garment
is shaped like a big rectangular canvas.
Cutting it down to a figure-conscious
shape may be possible, but takes a lot
more planning and computation than a
mere fitting alteration to preserve the
colour or texture pattern that drew your
fancy to the design in the first place.
(There are some measures you can take
to reduce the boxiness of a big, sack-like
Fair Isle or Aran pullover, while preserving
its general structure... but that's a
later column.)
Certainly both types
of alteration will involve some kind
of width adjustement, but changing the
garment style is a significantly
bigger undertaking; in some cases, it's
easier to simply start from scratch rather
than alter an existing pattern. In the
meantime, we'll focus on the easier tasks:
adjusting a pattern when you're between
two sizes, or increasing or decreasing
a size or two beyond the pattern's size
range.
A broader (or
narrower) view: adjusting the hip measurement
Having picked out the
correct starting size in the pattern,
the next step is to figure out what kind
of alteration is necessary. For this,
we'll work through a series of exercises.
Let's assume that we're
trying to fit a narrow-shouldered woman
with a cross-shoulder measurement of
14.5 inches [37 cm], a full bust measurement
of 35 inches [89 cm] (with a cup size
that does not require the addition of
short rows), a 28 inch [71 cm] waist,
and 38 inch [96.5 cm] hips. Let's also
assume that the pattern to be fit is
a slim-fitting style with waist shaping
and about an inch of ease in the body,
and that we managed to find a pattern
size that fit the upper body (from the
waist to the shoulders) perfectly:
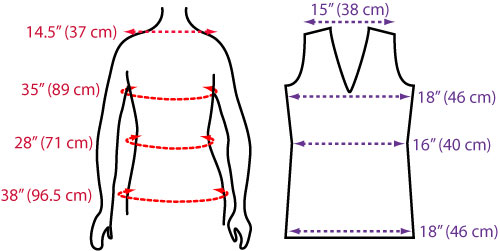 |
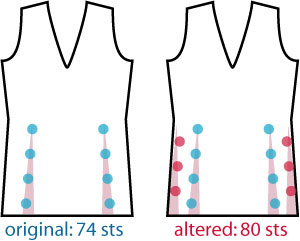
| Our
fit model for this exercise, and
the first pattern to be adjusted.
While the patterns we adjust may
be close-fitting, We will assume
that the pattern will have the typical
proportions of a hand knitting pattern:
the widths of the front and back
pieces at all points are equal (e.g.
full bust measurement, shoulders,
hips). Recall that pattern schematics
show flat dimensions: a hip measurement
across the front of 18 inches corresponds
to a 36 inch circumference. |
As you can see, our
pattern here has a finished bust measurement
of 36 inches [91.5 cm] (which is twice
width of the front, shown in the pattern
schematic at right), but the hips are
the same dimension: a touch too narrow
for 38 inch [96.5 cm] hips. While it's
still wearable, it will have
to stretch to fit the wearer's hips.
You'll
often find that in hand knitting
patterns with waist shaping,
the circumference of the garment
at the hem is often very close,
or equal, to the circumference
at the bust. The shape of the
garment body thus resembles an
hourglass, like the schematic
of our pattern above.
On
real bodies, hips and full
bust measurements are not usually
equal -- hence the fitting
problem we have here. Usually,
the hourglass shape of the
pattern does not pose a problem,
because pullovers with waist
shaping typically end above
the fullest part of the hip.
However, if the garment is hip
length or longer, then this
hourglass shape may not fit,
and you'll need to make an
adjustment like the one we're
about to make. |
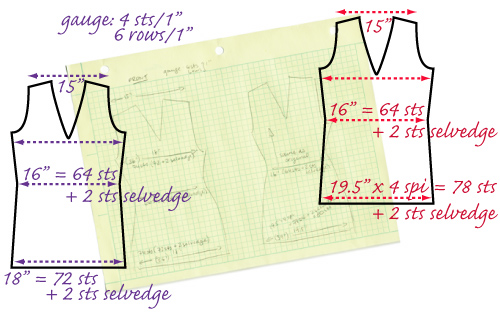
If your pattern lacks
measurements or a schematic, you'll want
to supply your own in advance of calculating
your alterations. In fact, even if your
pattern does have schematics, you might
want to draw your own, anyway, in a larger
size with more room for writing in numbers
and dimensions. In fact, make two: one
set labelled with the original dimensions
of the chosen size of your pattern, and
one with your target dimensions. Your
schematics don't have to be to scale,
they just need to be big enough to scribble
on.
On your schematic with
the original dimensions, run through
the pattern numbers at the key points
to calculate the original measurements:
the beginning and/or end of each shaping
zone, such as the wrist, bicep, hem,
hip, waist, full bust, shoulder, and
the neckline width, too. Also pencil
in any finishing bands, like neckbands,
and make a note of their depth; look
at all those numbers, and compare them
to the measurements you need to fit the
wearer (taking ease into account). Make
a note of the dimensions and the stitch
counts at each point, according to the
original pattern; if you're going to
be making adjustments, you might as well
write down your starting information
now. Keep in mind whether there are selvedge
stitches, which are incorporated into
seams, or not; your finished measurements
should not include the selvedge stitches,
but you should keep track of those stitches
as well.
On your other schematic,
write down your target dimensions. Your
target finished dimensions should take
the design ease into account, and figuring
them out should be a simple exercise
in arithmetic. In this example, the finished
hip circumference will be too tight,
so in keeping with the overall ease of
the garment we've decided that we need
to add 3 inches [7.5 cm] at the hips
(our model's 38 inch [96.5 cm] hips plus
1 inch [2.5 cm] ease equals a total of
39 inches [99 cm], 3 inches [7.5 cm]
more than the original pattern).
 |
| When
you sketch your schematics, don't
forget to make a note of selvedge
stitches. While they don't count
towards the finished dimensions,
you certainly need to remember them
when you're knitting. For simplicity,
not all measurements and stitch counts
are shown in this diagram. |
Next, having figured
out the target dimensions for the garment,
it's time to figure out what to do to
the pattern itself. According to our
gauge in this case, 4 stitches per inch
[2.5 cm], we're adding 12 stitches to
the hip circumference to provide that
additional 3 inches [7.5 cm] required.
This translates to an additional 6 stitches
for each of the front and back: each
of the front and back now has 80 stitches
(78 stitches plus 2 selvedge stitches),
whereas the original pattern only had
74 (72 stitches plus 2 selvedge stitches).
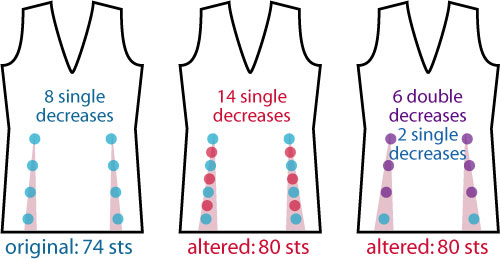 |
| Having
added in the extra stitches, there
are a number of ways to decrease
them to reach the original stitch
count at the waist. You could convert
some rows previously worked even
to decrease rows (center; red dots
represent new decrease rows), or
you could convert some decrease rows
to double-decrease rows (right; purple
dots represent double decreases).
The light red shading shows how the
added width is gradually removed
towards the waist. |
Because this alteration
only requires a change to the region
below the waist, we now need to figure
out how to subtract these extra stitches
by the time we reach the waist. Six stitches
will need to be decreased on each of
the front and the back; how they're
decreased will be determined by how other
decreases are handled in the same region.
Depending on your pattern instructions,
you may simply choose to insert extra
decrease rows between the decrease rows
already provided, or if the decreases
are all single decreases (two stitches
reduced to one), you might decide to
substitute double decreases for three
pairs of decreases on the front and back,
as shown in the figure above.
 |
| If
the patterning of the fabric doesn't
allow for additional decreases to
be inserted into the existing (blue)pattern
of decreases, then add the extra
stitches at the edges of the piece,
and decrease them at the edge of
the piece as well. |
The above suggestion
works for plain fabrics, but it's not
always that easy, of course. Perhaps
the sweater starts out with ribbing,
or some other hem treatment that doesn't
lend itself to the increased stitch count.
Or perhaps the sweater is textured or
patterned in a way that will be thrown
off kilter by incorporating extra decreases
into the existing line of decrease stitches.
In that case, consider adding or subtracting
stitches at the sides, for example in
a background stitch (stockinette, reverse
stockinette, or a texture or colour pattern
with a small repeat).
Another example:
reducing the garment circumference
and cross-shoulder measurement
Again, with the fit
model we used above, let's assume that
now we want to fit a cropped, set-in
sleeve pattern that's meant to fit with
2 inches [5 cm] of ease at the bust.
The closest pattern size has the correct
bust measurement, but it's written for
a woman with broader shoulders: while
the sleeves are set in to the armscye
and are not meant to be dropped, the
schematic (and stitch count) tells us
that the distance across the shoulders
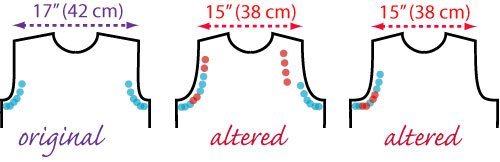
and neck is 17 inches [43 cm]. We happen
to know that for this style of sweater,
our wearer is happiest with a sweater
with a cross-shoulder measurement of
no more than 15 inches [38 cm].
Based on these numbers,
you can see that we need to reduce the
cross-shoulder width of the garment by
2 inches [5 cm] on each of the
front and the back, but without affecting
the dimensions of the body from the bust
area downwards. So, whatever changes
we're making, we need to keep above the
bust point.
 |
| The
original schematic (left), and the
target dimensions (right). What our
fit model (center) needs here is
an adjustment that brings the cross-shoulder
measurement in to the proper width,
but depending on the original dimensions
of the pattern, there are three different
places where adjustments may be made. |
Depending on the overall
shape of the garment front and back,
an adjustment to the shoulder width might
need to be made in a number of places.
We need to identify where that extra
cross-shoulder width is coming from:
is it due to an extra-wide neckline or
extra-wide shoulders?
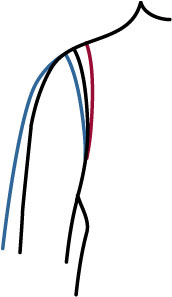 |
| An
extended shoulder (blue) extends
the edge of the armscye past the
natural shoulder point; a narrow
shoulder (right) results in a narrower
shoulder seam, ending closer to the
neck. |
As a rule of thumb
(which is as variable as all other rules
of thumb), in a set-in sleeve style where
the sleeve-body seam is intended to sit
at the shoulder point, the cross-shoulder
measurement will remain constant for
a particular wearer regardless of the
design ease. Naturally, there are exceptions;
if a garment is intended to be worn over
multiple layers, then the overall fit
of the garment will be looser and additional
shoulder room may be provided by extending
the shoulder line past the shoulder point.
If the garment is styled with narrow
shoulders, then the sleeve-body seam
may fall short of the shoulder point,
for example at the end of the clavicle
(like a tank top). But the rule of thumb
does allow you to assume that the
wider the neckline, the narrower the
shoulders will be, and the narrower the
neckline, the wider the shoulders will
be.
Typically, in a set-in
sleeve garment where the sleeve-body
seam falls at the shoulder point, the
width of the shoulder seam itself (the
seam that joins the front and back at
the shoulder), extending between the
shoulder point and the neckline, is between
4.5 and 5.75 inches [11.5 and 14.5 cm].
Some garments are intended to have wide
necklines as a design feature. Thus,
in a set-in sleeve garment with a wide
neckline, the shoulder seam should be less than
that typical range; if your schematic
tells you that the neckline is wide and the
shoulder seam is just as wide as a typical
shoulder seam, then either the neckline
must be narrowed, or the shoulders, or
both.
In order to determine
whether the neckline is too wide, you'll
need to compare the width of the neckline
from the schematic to where it would
fall on your body -- but don't forget
about the neckline finish! If you included
that in your schematic, then you won't
erroneously conclude that the neckline
requires narrowing when in fact the neckline,
once finished, is just the right width.
In this case, we'll
assume that the neckline width is just
fine, and that it is not in need of adjustment.
But if you do choose to reduce (increase)
the width of the neckline without making
any compensatory adjustments in the shoulders,
note that you will not only reduce (increase)
the cross-shoulder measurement; you'll
also wind up reducing (increasing) the
overall size of the garment below the
neckline.
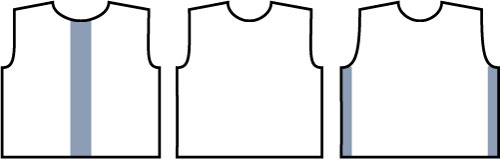 |
| A garment
with an extra-wide neckline (left)
can be adjusted to bring its neckline
width to an appropriate size (center),
but this will result in a loss of
width throughout the garment (indicated
by the shaded rectangle at left).
If this is not the intention, a compensatory
adjustment must be made, for example
by extending the sides of the body
by an equal amount (shaded areas
at right). |
If the excess width
is to be removed from the shoulder fabric,
there are a few ways to do it -- which
method is best depends on the patterning
in the garment fabric, and whether any
changes are to be made to the sleeve
cap (or whether changes to the sleeve
cap are to be avoided altogether).
When faced with the
need to decrease a substantial amount
of width from each shoulder area -- here,
1 inch [2.5 cm] per side, in order to
bring the cross-shoulder width from 17
to 15 inches [42 to 38 cm] -- the easiest
solution might seem to be to
simply decrease the extra stitches as
quickly as possible, for example at the
underarm bind-off or in the series of
rapid decreases typically worked immediately
after a bind-off in a set-in sleeve armscye.
In the diagram below, this is the technique
used in the far right-hand example: the
original decreases are shown in blue,
and the added decreases are red. In the
far right-hand drawing, the added decreases
are inserted into the bind-off, and very
soon afterwards.
 |
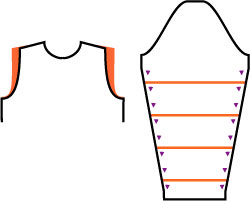
| Three
different ways to decrease the shoulder
width. At far right, the additional
decreases (red) are inserted into
the bind-off edge and in the rapid
decreases following the bind-off;
in the center, two ways of inserting
the additional decreases that minimize
the change to the armscye. |
The potential difficulty
with this technique is that it results
in a significant change to the shape
of the armscye. While a change to the
armscye is inevitable in this kind of
width adjustment, altering the decreases
in this manner results in the most extreme
change. If you make this alteration,
then you will have to consider what changes
will need to be made to the shape of
the sleeve cap: making the initial bind-off
deeper and squaring the shape of the
armscye will probably necessitate changing
the initial bind-offs of the corresponding
sleeve cap, and the perimeter of the
armscye may be lengthened as well.
Two alternatives are
shown in the center example. On the side
closest to the left, the additional decreases
(red) are interspersed with the original
decreases (blue), but the depth of the
initial bind-off is not altered; instead,
the decreases continue over more rows
than they had in the original pattern
(left-hand drawing). While the armscye
is also reshaped in this example, the
change from the original is not as severe
as in the far right example; you may
be able to get away with using the sleeve
cap as originally drafted in the pattern;
even though it will not be an exact fit,
it will probably be close enough.
 |
| The
extra width that you removed (or
added) to the cross-shoulder measurement
may need to be added (or substracted)
from the sleeve. |
In the center drawing
on the right in the above diagram, the
added decreases (red) are not incorporated
into the armscye shaping at the edge
at all. Instead, they are worked in the
middle of the shoulder portion. As with
the other example shown in the center
drawing, the change to the armscye shape
is minimized. However, this set of additional
decreases may be more prominent, so unless
you wanted to make these decreases a
design feature, this method may only
be suitable if the stitch pattern will
help camouflage the decreases.
However this alteration
is made, though, you aren't finished
yet. Because you have changed the cross-shoulder
width, the wingspan of the garment (i.e.,
the measurement from wrist to wrist)
will have been changed, as well. As a
result, you may have to make a compensatory
change to the sleeve length as well.
This alteration would be made below the
sleeve cap, for example by inserting
extra rows between some of the increase
rows of the sleeve (right).
Next time,
more examples of width adjustments:
asymmetric adjustments to accommodate
a full bust, and more alterations that
affect the shape of the armscye and
the sleeves. |


 Snarly on the outside
with a soft, chewy filling.
Snarly on the outside
with a soft, chewy filling.