|


![Read exactly what FREE PATTERNS really means...respect our designers and authors rights [and thank you]](../images/OFFnavLEGAL.gif)

 
|
|
 <click
for more! <click
for more!
 
|

 by Marnie MacLean by Marnie MacLean

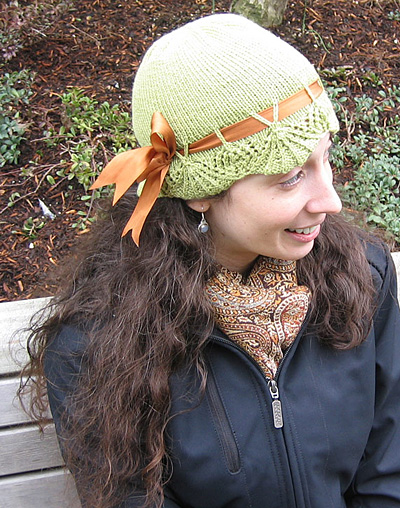
The cloches of the 1920s have always held a fascination for me and I think they adapt really well to knitting, with their tight fit and minimal or non-existent brim.
This cute little hat is really just a glorified
beanie with a fun lace brim and a soft silk ribbon bow. Its knit
with fingering weight yarn and meant to be worn when theres just
a little chill in the air.
Because the lace pattern is so wide,
it's hard to get incremental size differences by changing the
number of repeats, so instead, I've modified the lace (Barbara
Walker's Peri's Parasols) pattern
to have two additional stitches per repeat for the larger size.
You can get even more sizes by changing the gauge; using either
larger or smaller needles or a slightly different weight of yarn.
The fibers are two different merino and silk
blends; one from Angora Cottage, the other is of unknown origin
a gift from my brother. You can see the entire process of spinning
these fibers by visiting this
page.
The
hats have two different loop formations for the ribbon. For the
sake of brevity, I’ve only charted out the version for
the darker handspun hat. You can get the green version from my
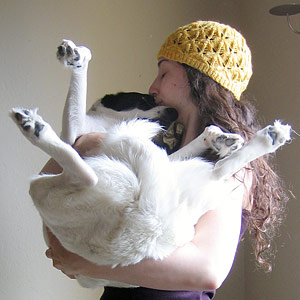
site. |  model: Marnie MacLean photos: Marnie MacLean and Leonardo Guevara model: Marnie MacLean photos: Marnie MacLean and Leonardo Guevara
| | | |
| S/M [M/L] (shown in size S/M) | |
|
Hat circumference: 17.25[20] inches
Circumference at lower edge: 21[23] inches
Length: 8.25 inches
Note: This hat is knit with negative ease.
The smaller size fits my 21" head, which is a nearly 4" difference
from the size of the hat unstretched. Keep that in mind when choosing
your size. |
|
|
Grey
hat:
150[185]yd/137[169]m
fingering weight handspun yarn
Note: I recommend a plied yarn to avoid biasing.
Green hat:
Louet Pearl Gem [Superwash merino; 185yd per 50g skein];
color: Willow; 1 [1 skein]
1 16-inch US #2/2.75mm circular needle
1 set US #2/2.75mm double-point needles
1 US #6/4mm needle (used for casting on only)
Stitch markers
Approx. 46 inches of 1.5-inch wide ribbon
Tapestry needle
Sewing needle and thread to match ribbon | |
|
| 25 sts/37 rows = 4 inches in stockinette stitch | |
|
[Knitty's list of standard abbreviations and techniques can be found here] | S2KP (Sl 2, k1, psso): Slip next 2 sts knitwise, together, to right needle, as if working a k2tog. Knit next st, then pass both slipped sts, together, over st just knit. Forms a centered double decrease.
CL3[5] (Cluster 3[5]): Slip next 3[5] sts to right needle, bring yarn between needles to front of work, slip 3[5] sts back to left needle, bring yarn between needles to back of work, slip 3[5] sts again to right needle. Pull yarn tightly to gather sts together before working next st.
W3 (Wrap 3 times): Insert right needle into st as if to knit, wrap yarn around right needle 3 times, draw right needle through st and drop st from left needle. |
|
|
 Using US #6/4mm needle, CO 133[144] sts, placing a marker every 22[24] sts. Using US #6/4mm needle, CO 133[144] sts, placing a marker every 22[24] sts.
Note: For the smaller size only, there will be 23 sts after the last marker, instead of 22. Also for the smaller size only, omit the yo at the beginning of the first row. K1 instead.
Work Row 1 of chart pattern using US #2/2.75mm circular needle. Place marker and join to begin working in the round, being careful not to twist. (Use a marker that is different from the others to indicate beginning of round.) 144[156] sts.
Work Rounds 2-10 of chart pattern.
Round 11: Remove marker, k1, replace marker, work Round 11
of chart pattern. When working this round, the stitch markers
will fall in the centers of the S2KP decreases. Each time you
work one of these decreases, remove the marker, then replace
the marker afterthe decrease.
Work Rounds 12-13 of chart pattern.
Round 14: Remove marker, k1, replace marker, work Round 14 of chart pattern. When working this round, each stitch marker will fall in the center of a CL3[CL5]. Each time you work one of these clusters, remove the marker, then replace the marker afterthe cluster.
Work Rounds 15-16 of chart pattern.
Round 17: [K7; (drop 2 wraps from W3 and slip remaining wrap to right needle) 3 times, k to marker] 6 times. 108[126] sts.
At this point, the sts which had been wrapped 3 times in Round 16 will look very long and loose. These elongated sts will form the loops which hold the ribbon around the brim of the cloche.
Rounds 18-23: [K7, sl 3 elongated sts, k to marker] 6 times.
Round 24: [K5; sl 2, drop first elongated st to front of work, sl 2 sts from right needle back to left needle, pick up and k dropped st, k2; sl next elongated st, drop third elongated st to front of work, k2, pick up and k dropped st, k to marker] 6 times.
Brim pattern is complete. All markers except end-of round marker may be removed.
Work in stockinette st until hat measures 7 inches from lowest point of lower edge, or 1.25 inches less than desired total length.
Shape crown as follows, switching to double-point needles when
necessary:
Round 1: [K7, k2tog] to end. 96[112] sts.
Even-numbered
Rounds 2-14: K all sts.
Round 3: [K6, k2tog] to end. 84[98] sts.
Round 5: [K5, k2tog] to end. 72[84] sts.
Round 7: [K4, k2tog] to end. 60[70] sts.
Round 9: [K3, k2tog] to end. 48[56] sts.
Round 11: [K2, k2tog] to end. 36[42] sts.
Round 13: [K1, k2tog] to end. 24[28] sts.
Round 15: [K2tog] 12[14] times.
Round 16: [K2tog] 6[7] times.
Break yarn, leaving a 6-inch tail. Thread tail on tapestry needle and draw tail twice through remaining 6[7] sts; pull tight. |
|
Weave
in ends. Block hat to open up lace pattern.
Run ribbon around hat through loops formed by elongated
sts (see photo). Put on hat and adjust length of ribbon
to be snug and comfortable. (Do not proceed without trying
on hat!!) Tie ribbon into a tight knot to fix length.
Remove hat and tie ribbon into a bow, trimming ends.
From inside of hat, sew bow’s knot into place so
ribbon stays tied and doesn’t flop around.
The band of ribbon will be very loose when the hat is
off, but will fit nicely when the hat is worn. | |
Marnie
MacLean lives in Portland, Oregon with her dog and boyfriend.
She started knitting when she was very young but didn't
take up designing knitwear until 2003. Recently, she's
taken up spinning in earnest, which means she's always
looking for unique ways to make her less-than-perfect
handspun look attractive.
Between all the fiber fun, working, and
enjoying quality time at the beach with the ones she
loves, Marnie maintains a website at marniemaclean.com where
she has dozens of free patterns, a blog and other bits
of this and that. |
| Pattern & images © 2007 by
Marnie MacLean. Contact Marnie |
|
|
|
|
|