Multisize
me more
More on grading a knitting pattern
for multiple sizes
Refining the
selected target sizes
In the last
issue,
we looked at how a knitting pattern,
written for one original size, can be
rewritten for multiple sizes. The example
worked in that article, however, was
a simple example: there was an implicit
assumption that there would be little,
if any, difficulty in upsizing/downsizing
the pattern to different dimensions.
In reality, design details like stitch
pattern repeats -- whether small, like
a finely textured stitch pattern, or
large like a cable panel or stranded
colorwork pattern -- will dictate where,
and by how much, a garment piece can
be altered without throwing the overall
design off-kilter.
You may have determined,
in advance of actually computing the
numbers for additional sizes, that you
wished to write up instructions for a
given range of sizes, with a given frequency;
say, from 30 inches to 60 inches full
bust measurement, with sizes incremented
by 6 inches: this would give you target
finished full bust dimensions of 30,
36, 42, 48, 54, and 60 inches.
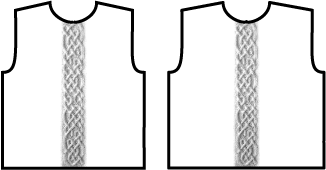 |
| It's
easy to adjust the width of a garment
piece when there is only a single
focal design element on the body.
The diagram at right shows a garment
front that is wider than the one
at left. |
If your garment design
consisted of only a simple pattern repeat
or texture (say, stockinette or a small-sized
repeat such as moss or seed stitch),
writing the pattern instructions for
each target size is relatively easy.
Even if the design
consisted of a single focal design element
-- for example, a single, centered cable
panel, set off on either side by a simple
background stitch -- resizing the garment
will still be easy, because most (if
not all) of your size adjustments will
occur in the background stitch area,
and the construction of the garment incorporating
the design element will be left more
or less untouched.
But let's say that
the design feature of your garment repeats
horizontally, and is not merely a single
centered occurrence -- for example, a
series of 4-inch wide cable panels, each
separated by half an inch.
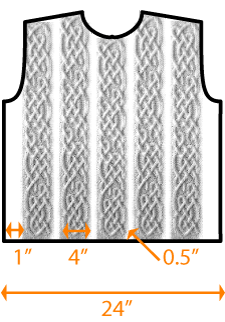  Your
original design, written for a 48-inch
full bust measurement, might have a front
(and back) designed like the one at left.
In this diagram of a sweater front, four-inch-wide
cable panels are separated by half-inch
columns (which may consist of a background
pattern or a dividing pattern stitch),
except at the edges, where they are framed
by one inch of background. The total
width of the piece is 24 inches; doubled
for both the front and back, the full
bust measurement would be 48 inches. Your
original design, written for a 48-inch
full bust measurement, might have a front
(and back) designed like the one at left.
In this diagram of a sweater front, four-inch-wide
cable panels are separated by half-inch
columns (which may consist of a background
pattern or a dividing pattern stitch),
except at the edges, where they are framed
by one inch of background. The total
width of the piece is 24 inches; doubled
for both the front and back, the full
bust measurement would be 48 inches.
Minor changes in the
width of the garment pieces can be easily
accommodated in this design.
For example,
say that the next smaller size was to
have a 46-inch finished bust measurement,
which is only a difference of one inch
on each of the front and back. Where
you choose to subtract (or add) the extra
width will be determined by how the garment
is supposed to fit and look.
If the
extra width is removed from the left
and right edges, that extra width would
probably (although not necessarily) be
eliminated in the armscye shaping so
as to keep a cable panel right at the
sleeve-body seam; the cross-shoulder
width of the garment would be the same
as the original, 48-inch size.
If the
subtracted width is distributed throughout
the front and back by omitting a stitch
in some of the background columns (if
the design can accommodate that), then
you might leave the armscye shaping as
it was in the original 48-inch size,
but the cross-shoulder width of the front
and back will be greater than for the
48-inch size.
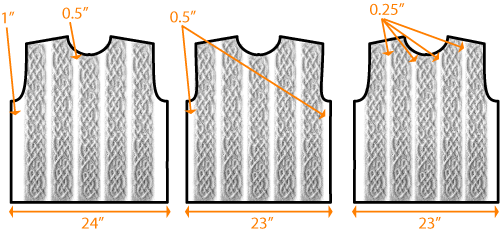 |
| When
the front or back requires only a
small adjustment in width (here,
one inch), the change can be easily
made without interfering with the
overall garment design. The original
at left; at center, half an inch
is removed at either side (in the
underarm region); at right, one-quarter
inch is removed from each of four
locations between the cable panels. |
  Larger changes to the
garment size, however, might not be as
easy to make. Larger changes to the
garment size, however, might not be as
easy to make.
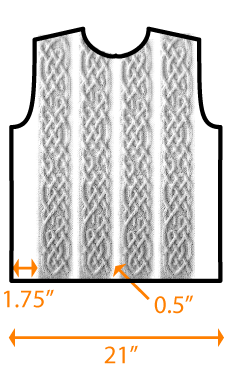
Consider the next smaller
target size of 42 inches: assuming the
front and back follow the same patterning
and are of equal width, this means that
each of the front and back must be reduced
by 3 inches.
One solution is to
remove one cable panel, and increase
the width of the background framing the
left- and rightmost cable panels, as
shown at right.
However, by removing
one cable panel, the overall arrangement
of the cables has been altered: there
is no longer a centered cable panel,
which may or may not wreak havoc with
the neckline shaping. And if the sample
garment for the pattern is shown for
a single size only, it will be misleading
to knitters working a different size.
A more radical alternative is to remove two cable
panels, and respace the remaining panels
accordingly:
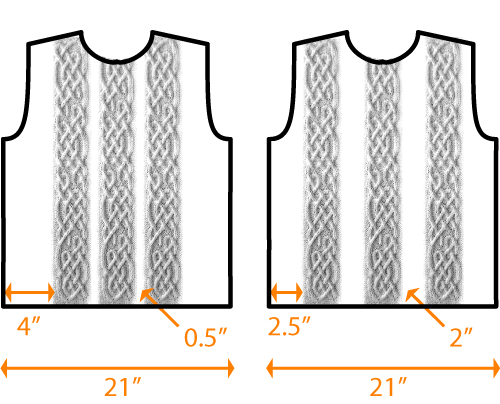 |
| At left,
an extra-wide border of background
stitches frames three cables, spaced
as they were in the original design.
At right, the three cable panels
are repositioned from their original
locations. |
These solutions might
make the design look a little odd --
there is now a lot of "empty" space.
A further solution
would be to add "filler" cables to the
extreme left and right, or even between
each of the cable panels:
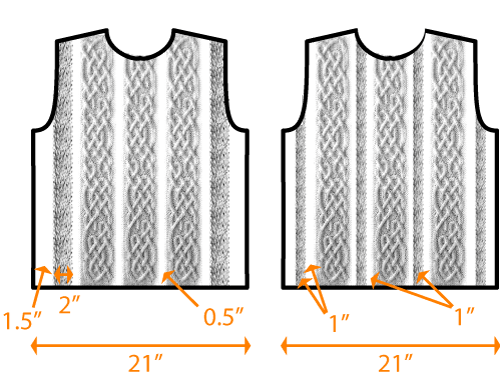 |
| Additional
filler cables are added in these
examples to fill in the empty space
resulting from the removal of two
of the original cable panels. At
left, two filler cables are added
at the sides; at right, four narrower
filler cables are inserted. |
But each of these alternatives
is a redesign of the original cable pattern
that will also require a rethink of the
original design -- if you insert filler
cables between each original
cable panel, then for consistency, your
original size should have these filler
cables, as well; if you simply add filler
cables to the left and right edges, it
may not be necessary for every size
to have that filler.
In other words, the
larger the constraining pattern repeat,
the more difficult it may be to rewrite
the pattern instructions for a specific
target size while maintaining a consistency
of design for all sizes. This is probably
one reason why you might find that some
patterns for garments with big cable
or colorwork repeats are offered in only
a few sizes, and are typically oversized
-- it's the easiest way to maintain a
consistent design for each size, without
having to create alternative filler patterns
or respacing the original pattern repeats.
(This is often compounded by the fact
that many designs with large pattern
repeats are oftened offered in drop-shoulder
or other styles that are typically loose
fitting to begin with.) However, reducing
the number of sizes offered isn't always
a desirable solution; in those cases,
think about adding filler design elements
instead, if the design can bear that
kind of alteration.
While the example here
deals with cables, the same logic applies
to other techniques with pattern repeats,
like colorwork, other textures, and lace.
Colorwork can be more flexible when it
comes to multisizing: you can often (although
not always) truncate the repeat at the
sides of a garment (whether there is
actually a side seam or not); if the
pattern is mirrored on the other side
of the side "seam", the design may look
deliberate (and even attractive). If
the colorwork pattern repeat is just
a little bit short of the required width,
a different panel can be added at the
sides, just like a "filler" cable or
background in a cable design. A cable
panel, of course, cannot always be cut
off as the colorwork pattern is in the
left-hand example without significantly
altering the cable design itself. A lace
or other texture pattern may or may not
survive this kind of treatment.

Other ways
to make the grade
Grading by number-crunching,
as described in the previous issue, is
not the only way of multisizing. One could knit
to fit the hypothetical fit model for
each size of the pattern, which is more
or less like test-knitting the pattern
in each size -- but this does drive the
cost of pattern development up significantly
in both supplies and labor.
You could also take
a practical approach by drawing the garment
pieces in the prototype size to scale
on paper, and by grading the pattern
for different sizes by drawing the pattern
shapes directly on the paper; the new
shapes would then be measured at key
points, and knitting instructions written
to match these shapes. In effect, this
is like the approach described in the
last issue, but with an intermediate
step of creating a scale model of every
piece.
Another option is the
soft solution: using knitting pattern
software to carry out your computations.
There are a number of software products
available now that will work out the
numbers and instructions for a knitting
pattern in a single size, based on the
parameters input by the user and a starting
size. By applying the same or similar
parameters to a different starting size,
numbers can be generated for multiple
sizes, then consolidated into a single
set of pattern instructions.
Knitting pattern programs
are a type of specialized computational
tool -- unlike a calculator, they're
preprogrammed with certain assumptions
about garment shapes. Because of those
assumptions, this type of software can
do a good job of generating the numbers
to be used for the basic garment shapes
for which it was programmed, and save
you the labor of computing the numbers
yourself; however, because of those same
assumptions, the software is potentially
limiting when it comes to drafting your knitting
patterns.
Some software is capable
of generating numbers and instructions
only for simple sleeves, such as trapezoidal
set-in sleeves or simple raglan sleeves,
which isn't too useful when you've designed
a pullover with a fitted sleeve cap (the
type with an S-curve or point of inflection)
or a compound raglan seam involving multiple
decrease angles. Some software may come
pre-programmed with certain fitting assumptions,
like the amount of ease required for
a "fitted" silhouette or whether armscye
depth should be a fixed value for a given
size, regardless of style. If you don't
share those assumptions, then the numbers
generated by the software should be treated
with caution. (In addition, the written
instructions generated by pattern software
may not be the best way of expressing
your instructions to other knitters,
and are probably not in the proper format
if you are planning to submit your pattern
for publication by a third party -- you'll
probably find yourself rewriting the
instructions generated by the program
as well as revising the numbers it calculated.)
Even if pattern software
was used to generate basic numbers as
a starting point for a prototype garment,
the process of design and pattern writing
often involves changing those numbers
to fit the designer's vision and to accommodate
sizing requirements. Plus, the more complex
the design (in terms of construction
method or stitch patterns), the less
likely it is that pattern software will
perform adequately; you'll probably find
yourself reviewing all the numbers it
generates, and rewriting them to fit
your design parameters. This may negate
any time savings you might have otherwise
realized by using the software in the
first place.
Alternatively, you
can create your own labor-saving, customized
computational tool using a spreadsheet
program -- for the initial investment
of time and effort in setting up the
spreadsheet and formulas, you can automate
many of of the calculations required
to multisize your pattern. These calculations
will also be tailored to suit your design
and fitting assumptions, which is an
advantage over using somebody else's
off-the-shelf pattern software.

Estimating
yarn requirements
Estimating the amount
of yarn required for the various sizes
in a pattern is another exercise in basic
mathematics. Assuming that knitters may
be substituting yarns and will require
as much useful information as possible,
it's best to express the yarn quantity
as a length (in yards or metres), as
well as provide other information about
the yarn's characteristics if they are
important for yarn selection (for example,
the yarn's weight -- that is to say,
gauge -- is important).
1. Determine how
much yarn was used in your prototype.
You might have kept
track of the yardage of the yarn you
consumed in making your prototype. If
you didn't or couldn't do this, you'll
need to determine the yardage a different
way: for example, you can compute the
length per unit weight of your yarn (e.g.,
yards per pound or metres per kilogram),
and weigh either your finished product
or the remaining yarn (if you knew the
starting weight) as accurately as possible.
A postal scale or a kitchen scale will
probably work nicely; the more accurate,
the better, although you'll be rounding
up this value later.
If you are weighing
the item and it has a zipper, ignore
its weight contribution; just include
it in your measurement -- it's safer
to slightly overestimate the weight of
the finished garment. However, if the
item is beaded or has particularly heavy
buttons, it would be better to discount
their weight, or to weigh the remaining
yarn instead.
2. Estimate the
increase/decrease in surface area for
each additional size as a ratio.
For each size in the
pattern, there will probably be an increase
or decrease in the lengths and widths
of each garment piece, and consequently
an increase or decrease in the total
surface area of the garment, when compared
to your prototype size.
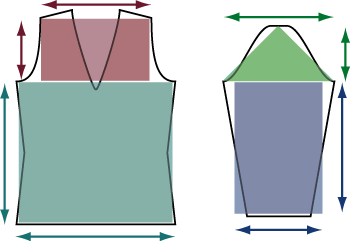 |
| For
the purpose of estimating yarn estimates
for other sizes, you can approximate
the surface area of garment pieces
using rectangles and triangles. |
First, work out the
approximate surface area of your original
size. Fortunately, you don't need to
be precise; you can approximate the garment
shapes with rectangles and triangles.
You might want to be more precise if
you actually needed to know the surface
area of the garment, but in this case
we're not interested in the actual surface
area numbers -- we're more interested
in the percent increase or decrease for
each size.
For the simplest body
shapes of all -- a rectangular body,
such as that used for a drop shoulder
pullover -- the surface area computation
is simply the width of the body
times its length. In a more complex
shape, like a set-in sleeve pullover,
we can break up the front or the back
into two rectangles. The upper rectangle
has a width equal to the cross-shoulder
width of the upper body (after all the
armhole decreases are done); the length
is the armscye depth. For this approximation,
we can just ignore the fact that there's
a bit of surface area at the lower armscye
and at the shoulder not covered by the
rectangle (see the diagram), and the
fact that the rectangle covers a lot
of empty space at the neckline -- it's
just an estimate.
The lower rectangle
is given the maximum width of the lower
body (one of the hem, hip or the bust
measurement), and the length is measured
from the hem to the beginning of the
armscye shaping. Any waist shaping or
other shaping in the lower body is ignored.
So, the front (or back) of the garment
has a surface area roughly equal to:
 |
cross-shoulder
width times armscye depth |
plus |
 |
widest body
measurement times length
from hem to armscye |
A set-in sleeve can
be represented by a triangle and a rectangle.
The triangle represents the sleeve cap,
with a height equal to the height of
the sleeve cap, and a base equal to the
width of the sleeve at the bicep (usually
the maximum width of the sleeve, unless
the sleeve is flared). The rectangle
represents the rest of the sleeve: its
length is the length from sleeve hem
to the beginning of the sleeve cap shaping,
and its width is the average width
of the sleeve (here, the average of the
bicep and the hem measurement: add them
together, and divide by 2). The total
surface area of the garment is therefore
approximately:
 |
bicep width times sleeve
cap height divided by 2 |
plus |
 |
(width at
hem plus width at bicep)
divided by 2, times length
from hem to bicep |
The total approximate
surface area is, of course, the sum of
approximate surface areas for each major
piece of the garment: front(s), back,
sleeves (don't forget, there are two
sleeves!). Minor bits such as collar
bands can be ignored, but if the garment
has a hood or a large collar, you might
want to add those in as well: hoods and
big collars take more yarn than you think,
and depending on your design and sizing
may or may not scale up or down at the
same rate as other parts of the garment.
Once you've worked
out the approximate total surface area
for each size, you can also express these
numbers with reference to your original
size. Let's say that the original had
a surface area of approximately 1150
square inches, and took 1310 yards of
yarn. If three other sizes of your pattern
had approximate total surface areas of
1121, 1172, and 1201 respectively, then
you could express these sizes like this:
|
Size
1 |
Size
2
(original) |
Size
3 |
Size
4 |
approx.
sq. in. |
1121 |
1150 |
1172 |
1201 |
ratio |
1121/1150
= 0.975 |
1 |
1.02 |
1.04 |
3. Apply this percentage
to your prototype quantity.
These ratios can then
be used to estimate the yardage requirement
for the other sizes. If the original
size required 1310 yards, then size 1
would require approximately 0.975 times
1310, or 1277 yards. Sizes 3 and 4 would
require 1336 and 1362 yards, respectively.
4. Add a "fudge
factor", and (optionally) round off
your yardage requirements to the nearest
5 or 10.
Now, add an extra percentage
(the "fudge factor") to account for variations
in knitting styles, because not everybody
will use exactly the same quantity
of yarn, and some people will knit larger
swatches than others. For example, you
might choose to round up the quantities
by 10%. So, if you estimated a yardage
requirement of 1362 yards, with the fudge
factor added in you'll have 1498 yards.
You can see that the
selection of this fudge factor is not
insignificant: we've just added 136 yards,
which can be equivalent to one or two
skeins of yarn, to the yardage requirements.
The purchase of a couple of extra skeins
can add a substantial cost to the project;
on the other hand, underestimating
the yardage requirement can be fatal
to a project if the knitter runs out
of yarn and can't get more in the same
dye lot. While you might feel comfortable
adding in only 5% extra, a 10% allowance
will probably provide enough yarn for
a good-sized swatch (which can be ripped
out and used if the knitter runs out
of yarn), and/or some leeway in lengthening
the garment.
Next, you can choose
to round off your yardage requirement
to a tidy-looking number ending in 5
or 0. This isn't necessary, but it might
seem kind of silly to be precise about
a number like "1183", when you've already
added in a fudge factor. You may as well
express this value as "1180", "1185",
or "1190".
Finally, if you are
specifying a particular yarn brand or
put-up, convert your quantities to a
number of skeins (rounding up to the
nearest whole skein).

References
Marnie MacLean has
written a series of detailed tutorials
for using Microsoft Excel for knitting
patterns, in three parts: one, two,
and three. |

