An ounce
of prevention is worth a pound of cure.
Hand-knitted socks are a glorious thing. As
a project, they’re supremely portable
and help make many a boring commute or lunch
hour more interesting. As a finished object,
they’re delightful. Even Albus Dumbledore
claimed his deepest desire was thick woolen
socks. And since socks are a
significant investment of time and energy -
about 34,000 stitches in an average pair of
adult socks made in sock-weight yarn - we naturally
want them to stay whole and in good condition
for as long as possible. Fortunately there
are many ways to encourage your socks to hold
up well over time.
First, know your yarn qualities. A softly
spun merino yarn would make very comfy socks
but they are simply not going to hold up to
rough usage. For hard-wearing wool socks, you
want a tightly spun yarn with some nylon content – preferably
25-30%. This is not to say that you can’t
make yourself a pair of extremely luxurious
cashmere socks to wear while curled up in your
favorite chair knitting - just don’t
try hiking in them. It is also possible to
hold a nylon-based reinforcing thread together
with your working yarn for the heels and toes
of your socks, but some sources say these tougher
reinforcing threads may – perversely – cut
into your “weaker” working yarn,
so proceed with caution.
The techniques that you use to knit can also
help keep your socks healthy. A tighter gauge
results in a denser and stronger fabric, so
try to find a pattern in which you can get
gauge with your yarn on smaller needles. However
you want to try to keep your cast-on (or bind-off,
if you’re knitting toe-up) loose enough
that the top edge doesn’t get “stressed” when
you’re pulling them on. If the upper
edge is too tight, the socks will not only
be rather uncomfortable and you risk the yarn
at the cast on edge weakening and fraying.
Heels get a lot of friction from your shoes,
so making sure they’re strong is crucial.
The “heel stitch” (as seen in the
Knitty pattern “Thuja”)
creates a stronger heel flap and goes like
this…
Right side rows: *slip 1 as if to purl,
knit 1*
Wrong side rows: purl
Reinforcing the heel after you’re finished
knitting is also possible. Just turn your finished
sock inside out and - using the same yarn as
you knit the heel with – weave the yarn
over and under the purl bumps. Work from the
top of the heel towards the bottom, then reverse
and work up again.
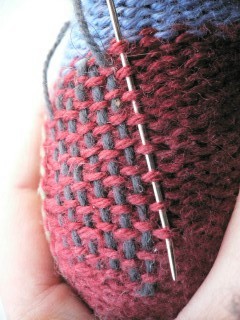
I’m using
a different color yarn here so you can see
it better.
An afterthought heel, as shown in the Knitty
sock pattern ”Red
Herring” leaves you with the option
of removing the heel entirely and re-knitting
it if a hole develops. Elizabeth Zimmerman’s
book Knitter’s
Almanac includes
a pattern for a pair of “Moccasin
socks” knit so that the entire foot can
be removed and re-knitted.

She calls them “The Eventually Totally
Re-footable Sock”. I can’t wait
for mine to wear through so I can try!
It’s a good idea to inspect your socks
regularly for weak areas – particularly
around the heel, toes and under the ball of
the foot. If you can catch holes before they
are proper holes you can repair the area with
duplicate stitch.
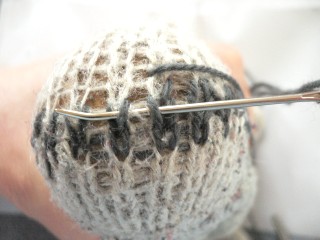
If you use same yarn that you knit with, this
will be a nearly invisible mend…
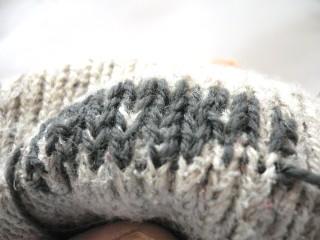
If you do get holes in your socks (or on the
elbows of your sweaters, or the fingers of
your gloves), you can fill the hole with darning.
Darning is a technique of sewing running stitches
across the hole, then weaving the yarn across
in the opposite direction.
Here are some tools you might find helpful:
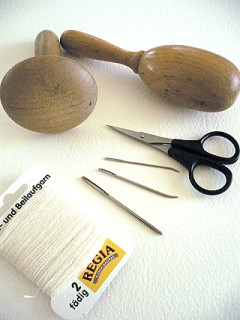
From top left: darning mushroom, darning egg,
sharp embroidery scissors,
tapestry needles
and darning thread.
Darning mushrooms or
eggs are used to support the area where you’re
repairing a hole and make it easier to sew.
I found these darning mushrooms and eggs
at an antique fair, but they’re readily
available – just search Google for “darning
mushroom”. And if you don’t have
one, you can substitute a plastic Easter
egg or an incandescent light bulb. The yarn
you choose to darn with can be the same yarn
you used to knit the sock – but if
it wore through once already, it’s
likely to do so again. Darning yarn comes
in a wide variety of colors to match your
sock yarn, but contains that magical nylon
that gives strength. It is, however, quite
thin, so you may have to use it doubled.
First insert your darning mushroom into the
sock, right under the hole.
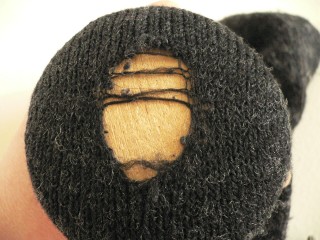
Thread your mending yarn onto a tapestry needle
and – working several rows into the “healthy” area
of the sock on all sides of the hole, begin
sewing a running stitch across the hole. (I’m
using a contrasting color yarn here so that
you can clearly see the process.)
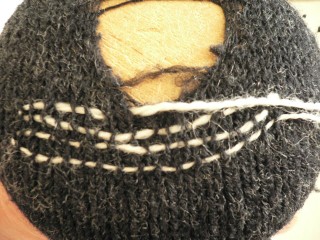
Continue until the entire hole is covered
with parallel threads.

Then turn the darning tool 90 degrees and
weave the mending yarn under and over the parallel
threads, back and forth until the entire hole
is covered. Be sure to keep working several
rows past the hole on all sides in order for
the darning to have a solid anchor.
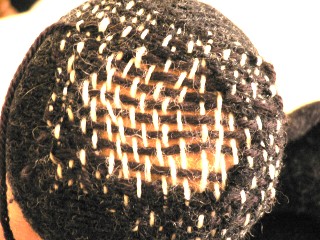
(Again I’m working with yet another
yarn to show the process.)
Since the white mending thread was thinner
than the working yarn, I’ve turned the
darning mushroom 90 degrees again and worked
yet another pass in the darker yarn.
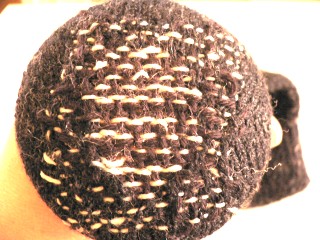
And the hole disappeared! (Try to imagine
this without the white yarn showing through.
Fortunately for my socks, but unfortunately
for this issue, I didn’t have a whole
bunch of holes to work with… and cutting
holes in my socks is a bit further than I was
willing to go.)
Maintaining and repairing your hand-knits
is a labor of love, but so is knitting. I think
of mending as yet another effort to be mindful
about taking care of things in a world where
so many things are disposable.
References:
|

