
|
|
|||

|
|
|
|
There comes a time in every designer's lifetime when they want to create their own lace. Whether it's a result of not being able to find the perfect lace repeat in a stitch dictionary or the desire to create something completely unique, you’ll need a way to express these ideas and put them into a useable form. When
the urge to create
your own motif occurs,
you can create a design
by sticking to a few
simple guidelines. Throughout
the process, you’ll test your ideas by swatching in
the yarn using the same
needles as your final
product, making sure
to block each swatch
the same way the final
product is to be blocked.
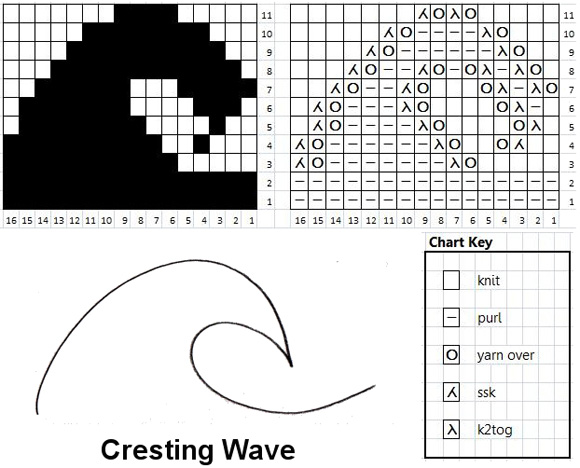 Figure
1 -- Top Left: Cresting
Wave Drawing | Top
Right: Cresting Wave Chart based
on drawing. The simple motif is created by using combinations of decrease stitches and yarn overs. To keep things simple and balanced, make sure that a decrease is always paired with an increase so the total number of stitches in each row won't change. Next, transfer your sketch into a graph. Copy the drawing (Fig 1, top left) using the sketch as a rough guideline. The inside darkened boxes remain the same, but the outer edges turn into yarn over/decrease pairs of k2tog for a right-leaning line and ssk for a left-leaning line (Fig 1, top right). The first example has a sequence of actions (yarn overs and decreases) in every row as opposed to many examples where action happens every other row. Two historical examples of knitting that require the action in every row can be found in Shetland Knitted Lace Shawls, where there is no stockinette or garter row between pattern rows, and traditional Fair Isle whose peeries require constant color changes with no plain rows in between. If you wanted to incorporate the original chart motif in Figure 1 in a style similar to knitted lace or Fair Isle colorwork, what is seen in Chart 1 would be satisfactory without any changes. For our purposes we need paired increase and decrease rows that alternate with plain knitting -- also known as Lace Knitting -- requiring that the action happen every other row. To make the graph work for our purpose, a rest row of purls is inserted between the working rows as seen in the Chart in Figure 2 below. The addition of purl rows on the wrong side of the work will make the motif taller by separating the working rows, and the design elements will become easier to distinguish in the finished knitted piece. 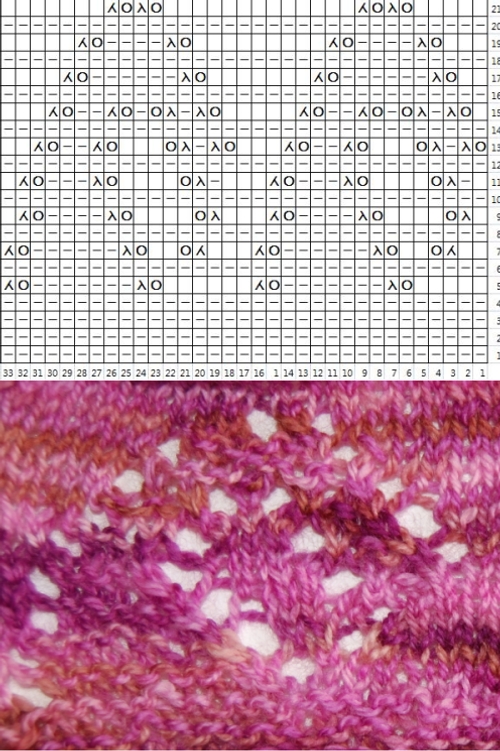 Figure
2 -- Top: Chart
identical to Figure 1,
with the addition of
plain purl rows every
other row. Bottom: Swatch.
Note that features are
too close together making
the cresting wave motif
hard to see.
What can be done to fix the motif? Make adjustments to the Figure 2 Chart to make it look more like the sketch. In this case, the bottom of the wave gets wider and the crest of the wave is moved up and toward the center as seen in the Figure 3 Swatch. Let us take a moment after editing and swatching to ask “does this motif in Figure 3 look like my sketch?” If not, we’ll repeat the editing process until satisfied with the finished product. 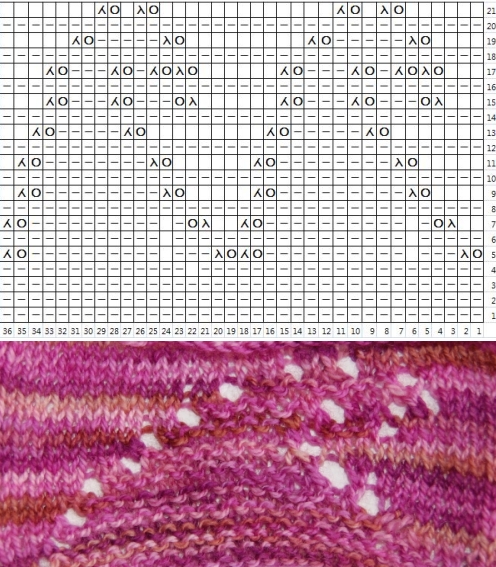
Figure
3 -- Top: Chart
edited to balance out the length and the
width of the motif so that it looks more
like the initial sketch. Bottom: Swatch  Figure
4 -- Finalized Chart and swatch.
Taken individually, the lace motif design steps are simple, but be prepared to edit yourself several times until you get satisfactory results. The journey to creating your own lace motifs may take longer than anticipated, but is a rewarding journey that will teach you many things about yourself and your design work. Look for inspiration in everyday silhouettes, photography, and nature. Keep a design notebook handy to jot down your ideas as they come. Test your ideas regularly and be fearless. But most important of all, enjoy the creative process and the feeling of accomplishment you'll get from designing something completely new! |
|
| ABOUT THE AUTHOR | |
 Find her here. |
|
| Text & images © 2008 Michelle Miller. Contact Michelle |